The Fresh Loaf

A Community of Amateur Bakers and Artisan Bread Enthusiasts.

Another Girl's blog

Another Girl's picture
Another Girl

I’ve been ordering berries from Barton Springs Mill for several years and have enjoyed every single product I’ve ordered from them. The flavor profiles they provide have been pretty accurate from my perspective, which is very helpful. Some nine or ten months ago, their Quanah wheat caught my eye. It is described as a hard red winter wheat and its flavor profile – buttery, creamy, malty – is right up my alley. A bag was duly ordered and, regrettably, it has been in storage ever since, waiting for me to bake my way through all the berries ahead of it in queue. Now that I've used it a few times, I thought I'd share my impressions. For reference, I followed the basic formula and process detailed in my Easy Peasy Pan Bread post, using a mix of 2/3 Quanah and 1/3 AP (KAF).

The spoiler is that we really, really like this wheat for sandwich breads. BSM reports the protein content for the berries at 11.5%, but the flour at 9.5%. Not sure why that is, maybe just a typo, but in my experience thus far, it makes a soft, slack dough hinting that 9.5% might be correct. After some time and a fold or two, it developed some extensibility, but elasticity required some more folds. It ended up being a nice dough. The first time I used this flour, the hydration was probably in the 90% range but that seemed to be too much so it was dialed back to 85% for the next bake. That worked fine. The rise is good, very acceptable. The bread is lighter in color than some other red wheats and the flavor is outstanding. It is mild tasting with no bitterness, but it is not bland by any stretch. To the contrary, it has a nice richness. I don’t think any sweeteners would be required with this flour, even at 100%. I baked it to about 205℉ and it keeps for about a week. I've ordered a few more bags because we like it so much.

I don’t usually leaven high percentage WW with sourdough because we don’t care for the flavor; however, I am curious how the mild flavor of Quanah will partner with my mild new(ish) low hydration white starter, so that bake will be next.

Another Girl's picture
Another Girl

After seeing some nice bakes based on the Pain de Campagne in Martin Philip's post, Don't be a bread hostage at the KAF website, I decided to give it a try. It seems in keeping with my recent effort to simplify my baking. Besides, after all the more neutral pan breads I've been making lately, I was in the mood for a sourdough. 

I followed the instructions on the KAF site for the bread as originally made by Martin's friend Maura, scaling it down to make one 750g loaf. The flour mix was 80% Ceresota AP, 10% KAF whole wheat, and 10% Arrowhead Mills whole spelt. The starter was last refreshed on Monday. My doughs always seem to get sluggish when the outdoor temperature drops, proofer or no, and I wasn't sure it would double in the proscribed 12-hours. In the end, everything happened just as the writeup at KAF said it would. The dough was mixed yesterday morning at 9:30, shaped last night at 9:00, and baked today at 9:00 a.m. It looks good and has a nice sourdough fragrance and flavor and, like others who've tried the bread, I'll be making it again.

Another Girl's picture
Another Girl

I haven’t posted in a while because I haven’t been baking anything new or different. My goals have been more inward-looking: trying to be more creative and to bake by feel a little more, which is definitely outside my comfort zone. Usually the only time I get creative is when I goof something up and have to adjust on the fly. More recently, I’ve embarked on a more practically-oriented side project to devise an easy pan bread that still boasts some flavor complexity. I don’t care for the taste or smell of commercial yeast and my husband feels the same way about sourdough so, naturally, I decided to use both. I have to proceed cautiously with the sourdough because if my husband detects any sour notes, it will turn him off the bread forever. I’m totally winging it on this pan bread so that it will dovetail with my “bake-by-feel” exercises. 

I started with a sourdough bread formula that had a yeast kicker, so my initial efforts were, for all intents and purposes, sourdough breads. After greatly reducing the sourdough component and only slightly increasing the IDY, I was in the ballpark. After some further refinements, I can now mix a fairly effortless dough in the evening, refrigerate it overnight, and bake it up fresh in the morning. I can mix it by hand or mechanically. I’ve been tweaking as I go, and Friday night’s version was the best one so far. It doesn’t taste yeasty or sour, it showed a strong rise and had a moist, open crumb.

FORMULA

AP flour 350g (Ceresota, aka Hecker’s) – 70%

Fresh ground Turkey Red - 75g (milled on the coarser side, about 10 clicks off the finest setting in my Komo) – 15%

Whole Spelt - 75g (Arrowhead Mills) – 15%

Water (body temp) - 400g – 80%

Salt - 10g – 2%

Starter - Let’s call it 3 healthy tablespoonsful. I have not yet bothered to weigh it, only to count the spoonsful. It's a 100% hydration whole rye starter, 5 days since its last refresh. I didn’t stir it down before spooning it out, but it was cold and deflated, so fairly heavy. (I can't really calculate a baker's percentage for this because I didn't weigh it, so just consider this over and above the other ingredients) 

IDY - 2.5g  – 0.5%

MIXING & FERMENTATION

  • 30-minute autolyse
  • I pressed each spoonful of starter thin between wet hands and laid them next to each other on top of the autolysed dough with the salt and yeast sprinkled between the layers. The layering is akin to Reinhard’s epoxy method, but I then folded it up and pincered it à la Forkish for the final mix. 
  • Two or three folds depending how it feels. This time I did two. They were regular stretch & folds because the container had high sides, but no reason why coil folds wouldn't work in a shallower dish. I have also mixed versions of this in the Ankarsrum, so I think any mixing method you prefer would work.
  • Bulked on the counter (71°F) till increased in volume about 75% or a little more, about 2 hours
  • Loosely shaped, panned (greased), covered with a shower cap, and tucked it into the fridge (37°F) for the night. 
  • In the morning, about 7 hours later, it had clearly risen but still had a ways to go, so I left it for another 2½ or 3 hours. It was well-risen at that point, but I was expecting it to have risen more. Nevertheless, I could see some of the bubbles were getting large, so I preheated the oven (about 15 minutes, another thing to love about pan breads) and baked. 

BAKE

40 minutes at 420°F, I de-panned the bread and placed it on the oven rack for 10 minutes to brown the sides. Internal temp after 50 minutes was 210°F. 

I was happy to see that it had good oven spring but chagrined to find a blowout on one side. Upon slicing it, I thought the fermentation looked right, so I now believe it was probably not a blow-out but a misaligned seam. It was a wet, gassy dough shaped for a nine inch pan. I handle it with wet hands so it’s entirely possible the slippery devil rolled over on its way into the pan.

At this point, I’m pretty happy with the bread but wonder whether the starter is making any contribution at all. I suspect not, simply because it doesn't have enough time to do anything. I was hoping the starter would improve the rise and/or improve the flavor... without actually tasting like sourdough. Hmm, putting it like that, the whole notion seems questionable. I’ll press ahead with some test bakes anyway in case they turn out to be instructive, but in the end, I wouldn't be surprised if the starter just goes away.

_____________________________________________________________________________________________________________

UPDATE 12/15/2022: After doing some test bakes, I can say that while I didn't notice much difference in the flavor with or without the starter, my better half did. He does not care for sourdough, but whenever I made this bread without it, he commented that it didn't taste as good. So it would seem that at least for some people, the starter DOES improve the flavor without tasting like sourdough. Go figure!


Another Girl's picture
Another Girl

This is Benny's 100% WW Sourdough Hokkaido Milk Bread. (The link points to his 2.0 version and I'm not positive whether I made that one or another variant.) Anyway, I attempted this bread back in January but got no rise to speak of, undoubtedly because I did not a thing to prepare my rye sour for a sweet levain and enriched dough. I baked it anyway and while it rose a couple inches in the oven, it barely filled half the pan. Still, the flavor and texture were good enough to convince me that this bread deserved my best effort, so I choose to make a new osmotolerant starter from scratch. Any time I’ve tried to convert my rye starter to anything else, it proved stubbornly resistant to change. For this new sweet stiff starter, I followed the recipe in Vanessa Kimball’s Sweet Sourdough and it was ready for baking a week or so later. Unfortunately, I got sidetracked by other projects and didn’t soon have a chance to return to this bread. I’ve been faithfully maintaining the sweet stiff starter with this bread in mind. Finally, Monday was the day. 

The starter was mixed with 100% whole grain, home ground Red Fife. The flour used in the levain and final dough was KAF 100% Organic Whole Wheat. I opted for commercial flour because my current inventory of of red wheat berries is from a new supplier and I’m unfamiliar with its performance. So, having failed miserably at this bread the first time out, I hoped for a modicum of success this time and so went with a flour unlikely to pack any surprises. There were a couple minor changes to the ingredients, which were these: I used 7g salt instead of 6g because I thought my taste buds would prefer it. Also, 20g honey was replaced by 1 Tbsp (I didn’t bother weighing it) brown sugar, again due to flavor preference. Finally, I accidentally omitted the diastatic malt powder. Oops. Maybe if the little beasties had their snack, they’d have risen a little higher for me.

The levain peaked at about 150% in 12½ hours of rise time. I tend to mix my levains late at night because I’m worried they’ll overferment while I’m asleep. With the weather warming here, I was planning for more activity than I’ve been used to over the winter. It’s a strategy that usually pays off, but recently I’ve been making breads such as this one with extended proof times. As I'm learning, late starts can backfire on you with long-proofing doughs and this was one of those times.

The mix went as expected and the bulk lasted 3.5 hours with no discernible increase in volume. For shaping, the dough was very soft and it stuck in spots to the rolling pin, so the pin was lightly floured as needed. The dough was then rolled into scrolls and the pan filled with the scrolls facing alternating directions and not touching the sidewalls of the buttered 9" x 4” USA pullman pan. The pan was covered with a shower cap and placed back in the proofer at 82°F. It was then 6 p.m. My family doesn’t like sourness in high percentage WW bread, so the dough would not be retarded. I was resigned to staying up no matter how long it took.

How long it took turned out to be only 5 hours – which I was thrilled about, because I had been bracing myself for 6-8 hours. It was gently brushed with egg wash and placed into a preheated 350°F oven just after 11 p.m. The bread was baked for 50 minutes at 350°F and then removed from the pan to bake for another 10 minutes at 325°F. This bread didn’t achieve the towering heights we’ve seen in Benny’s loaves but it is tall enough, very pretty, and wonderfully fragrant. A touch of sourness lingers in the finish. It's mild and acidic in a fruity way, not unpleasant, but not my family's preference. Next time, I will probably spike the dough with some IDY to minimize the fermentation time and, hopefully, the remaining touch of acidity. I would also opt for a better tasting home ground wheat. All in all, a lovely, fragrant bread with good body and a perfectly soft texture.

This is a wonderful formula, Benny, sure to be a family favorite. I recall that you spent a long time working on this formula. Thank you for developing and sharing it.


Another Girl's picture
Another Girl

BACKGROUND

My husband is not a fan of sourdough, although everyone else in my family loves the stuff. He won’t eat any bread if he detects the merest hint of sourdough flavor. When I happened upon Swiss Farmhouse Bread in Jeffrey Hamelman’s Bread, which in Mr Hamelman’s words is characterized by “a complete absence of acidity,” I was curious. The bread was leavened by water in which yeasty raisins had been soaking and that was my entree into the world of yeast water. Working with YW made me wonder if it could be used in conventional sourdough breads and what its effects might be. Wouldn’t it be nice if a flavor profile emerged that could be a favorite (if not the favorite) of all the people I bake for? Hey, a girl can dream, can’t she?

YW is interesting to me as a potential means to that end, but two things about it concern me: 

1) The Swiss Farmhouse crumb was a little bland without the flavor enhancement provided by fruit and nuts. I’m searching for something other than the familiar sourdough flavor profiles, but I would still like a flavorful bread. 

2) I’ve found the rise times of YW to be wildly unpredictable, which makes me hesitant to use it except when I happen to have a few days when nothing else is planned. Once my YW matures and I get in the habit of keeping YW levains under refrigeration for later use, I hope this will change. 

It seemed reasonable to start this project with my basic SD bake, Vermont Sourdough (also a Hamelman formula). After again checking with the YW gurus here on TFL, it was pretty clear that every baker has their own way of incorporating YW into conventional SD loaves and that pretty much any of them could be expected to work. 

PROCESS 

Yeast Water

The first order of business was to give the YW some TLC. It was removed from the refrigerator the day before the bake and the liquid poured off into a clean jar. I was careful to pour off as little of the bottom sludge as possible, which I understood might contain a fair percentage of dead yeasts that could add glutathione to the dough, an eventuality I wished to avoid. There seems to be some anecdotal evidence contradicting that outcome, but I didn’t see any point in taking the risk, so I declared the new jar a Sludge-Free Zone. Diced organic apple was added to the jar and the pH was measured. It tested at 3.73 despite the fact that it had been holding steady at 3.43 – 3.46 for its first three weeks of life. The jump to 3.73 seemed like a large-ish decrease in acidity that I was unable to account for. As long as the pH was below 4.0, I believed it was safe to use, but it seemed to be headed in the wrong direction, so I dropped in the teeny-tiniest pinch of Ascorbic acid (probably about a tenth or two of a gram) and left those little yeasties alone to do their overnight thing. Since the YW was increasingly sluggish the last couple bakes, I hoped these measures would yield a yeastier, more active YW.

Preferments

Based on input from several TFL members and my own wish to use the same amount of prefermented flour called for in the original formula, I decided to make two half-size levains, the first half a standard SD and the second half made from YW. The SD levain for this bread is a liquid levain of 120% hydration. My preference was not to change the hydration, but I remembered reading an assertion that YW levains are better on the stiff side, so at the last second I decided to make the YW levain at 70% hydration to match the final dough. The final dough water was adjusted to accommodate this change. For the record, bottled mineral water was used in the final dough. I usually use filtered tap water.

I decided to build both levains just before bedtime and hope that the SD levain didn't mature first. Fortunately they seemed to track reasonably well and both levains were ready for use around the same time. The SD had receded only very slightly from its peak when it was mixed into the dough. 

Final Dough

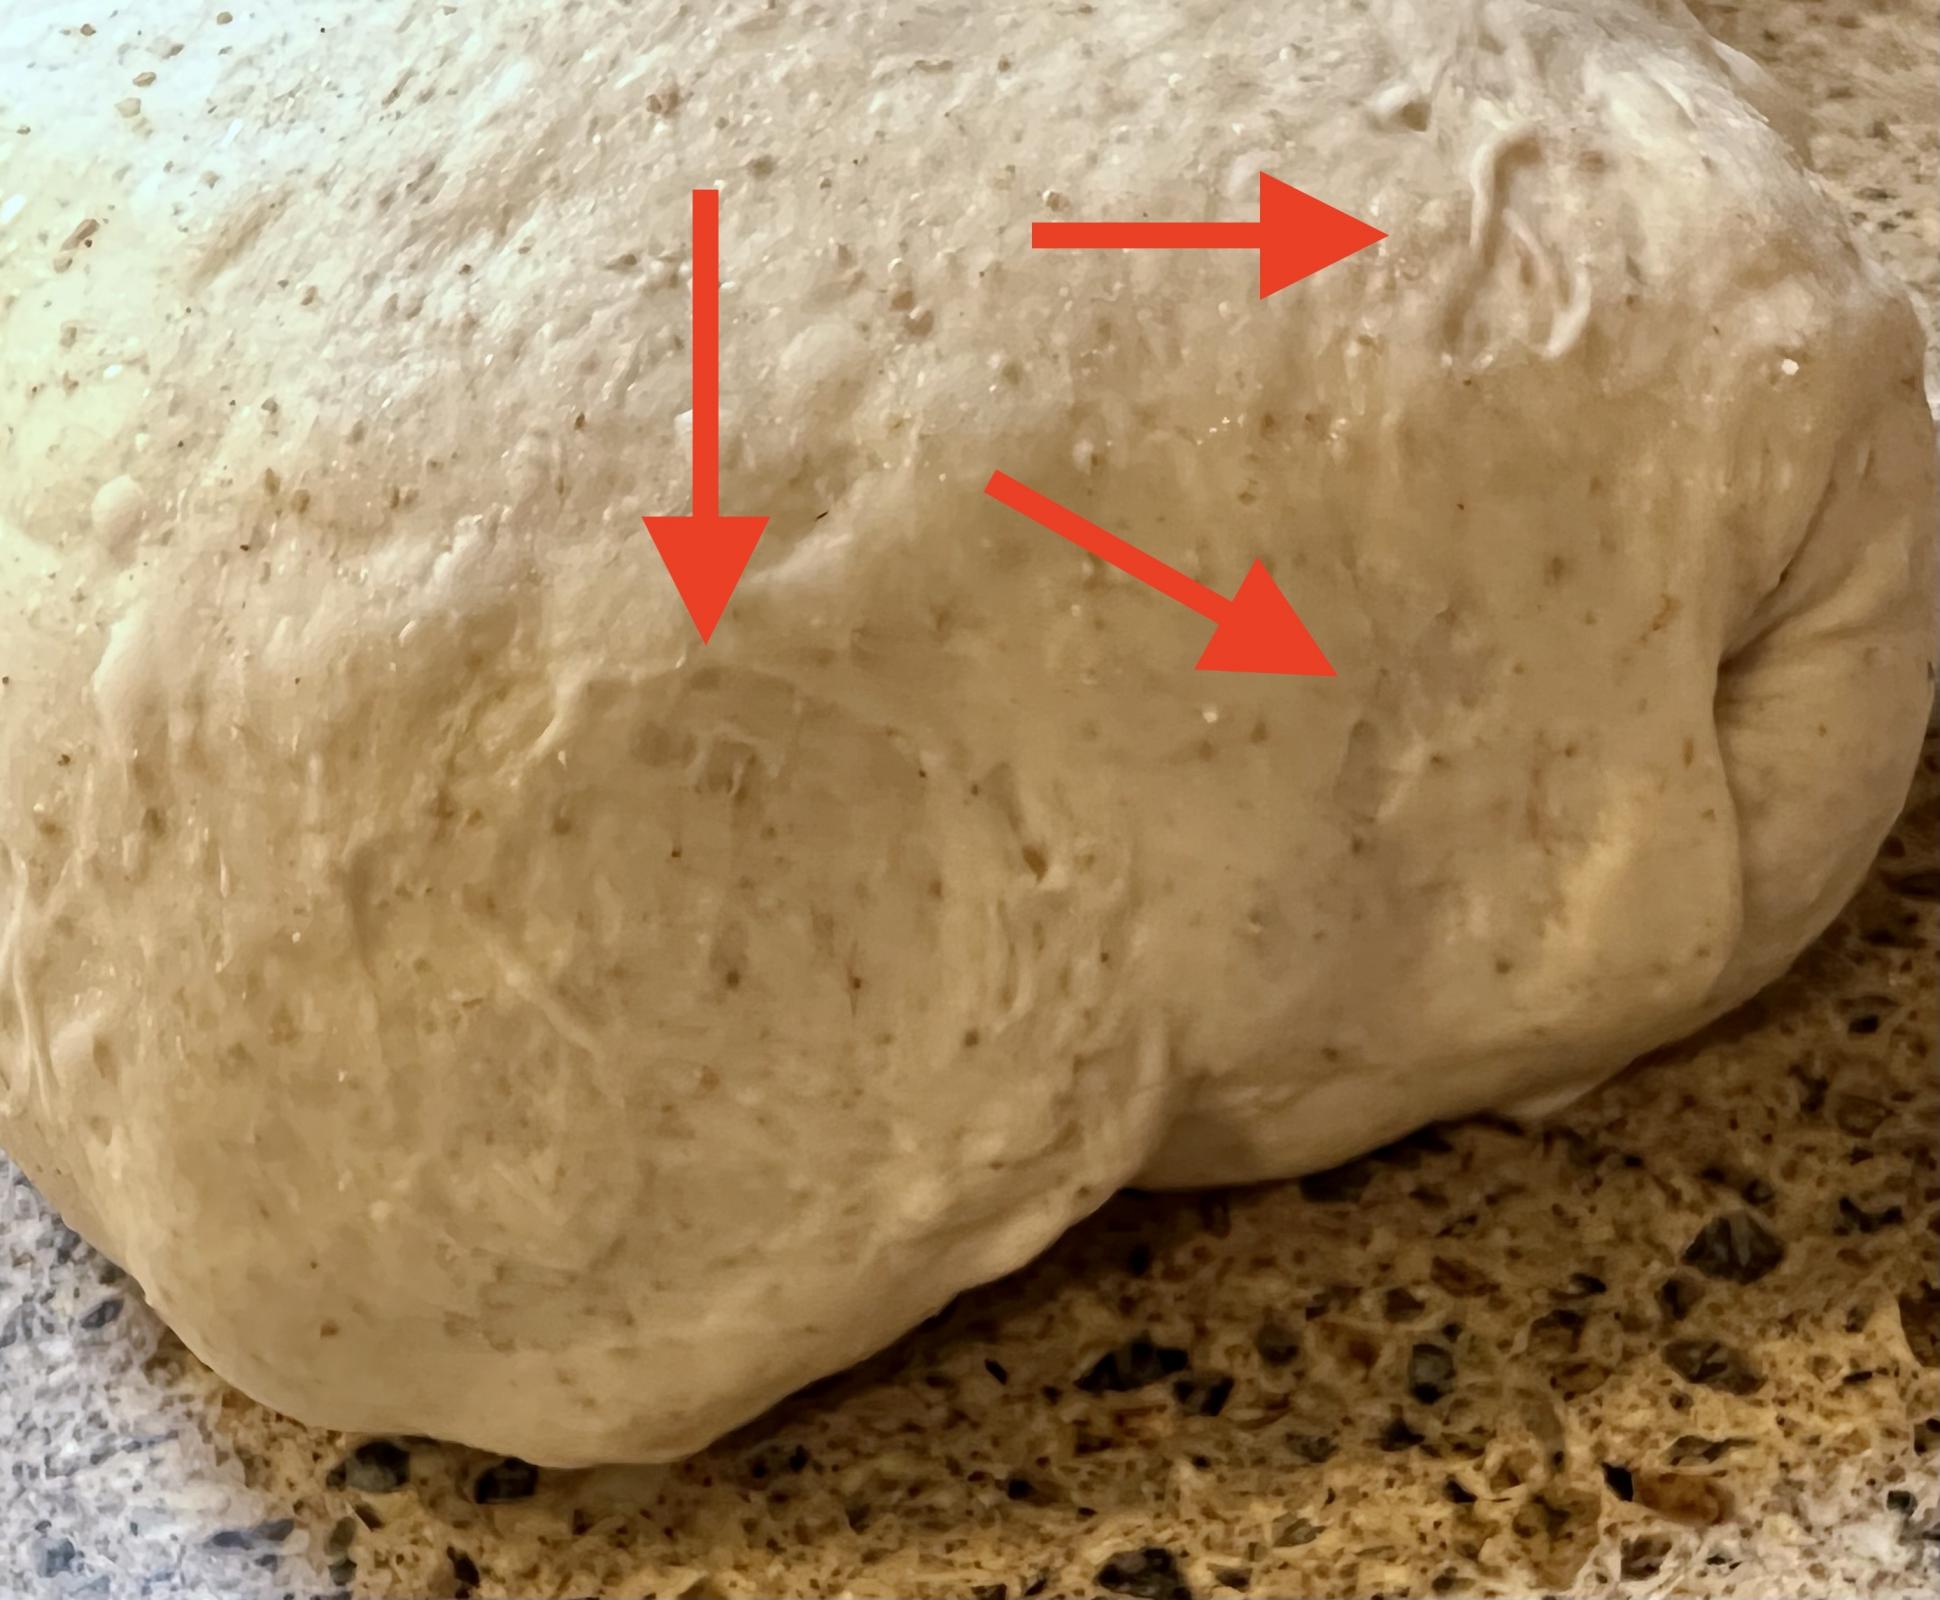
The autolyse was mixed in my Ankarsrum on the lowest speed because I intended to do the final mix that way, so why not. The Ank is very gentle on low settings. The dough was still surprisingly ragged 30 minutes into the autolyse, but had improved by the 45 minute mark. It had an unusual feel to it, but I proceeded with the mix and that’s when things got really weird. I’m hard-pressed to describe the dough’s texture. It felt soft but… I don’t know… dry? tight? Those aren’t the right descriptors, but they’re the best ones I can come up with. I added 10-15g water in small increments in the hope of improving the texture. The additional water helped the dough feel somewhat better, but it did not feel like the gluten was developing well at all. The surface of the dough was beginning to appear pock-marked and after 7 minutes of mixing about 3/4 of the way up the Ankarsrum dial (the sixth “box”), the surface of the dough started pulling and breaking. I have not encountered this before and wondered if it might be the affect of glutathione. I have no familiarity with it and don’t know.  

The Jiffy Pop Moment

Instinctively, I pulled the dough from the mixer bowl. It was quite sticky but not unmanageable with wet hands. I folded the dough but that just made it tear. I don’t know why I thought to try French folds when regular folds didn’t work, but for some reason they did seem to have a positive effect – until they didn't. Just when I was about to stop, the top surface of the dough split open like Jiffy Pop revealing layers of folded dough inside. I wish I’d thought to photograph it but in the moment my only thoughts were geared toward salvaging the dough if possible. I quickly folded the hole closed and did another FF. It seemed alright, so I did another and then another until the dough was largely smoothed out. Not wanting to bring on the Jiffy Pop Effect again, I stopped the moment most of dough’s surface looked smooth. I’d guesstimate there were about 40 or 50 FFs in total. 


Mostly smooth, but there are still pock marks along the edges. I do wish I had photographed the dough at its worst, but honestly, there was work to be done.

At the end of the mix, the dough temp was 76.3°F so at least that was on target, even if nothing else was.

Bulk Fermentation

The dough was slightly risen after 90 minutes. It was more extensible after resting but still prone to tearing so there was no stretching, only folding. Pock marks like the ones in the photos above were apparent where the dough folded. Afterwards, the dough continued to rise but felt dense and heavy. Even when it had doubled in volume, it looked and felt leaden. I don’t typically let my doughs double during bulk and, under the circumstances, I was afraid of degradation so I shaped the loaves. Maybe I should have done so sooner. Too many mixed signals to be sure of anything. 

Shape & Bake

After a preshape and 15 minute bench rest, the dough was molded more so than folded into shape to avoid tearing. The final proof progressed quickly and looked sufficiently risen after about 60 minutes. On feeling the dough, it still lacked that certain lightness that tells you it’s ready, so I let it go another 20 minutes until one of the loaves felt acceptably aerated. I was still concerned about gluten degradation, so that loaf was sprayed with water and, since it seemed sturdy despite its propensity for pulling and tearing, I scored it but only very shallowly. It stood up well to the slash. The dough was loaded into the preheated Fourneau Grande and the hatch closed. Silent prayers were said.

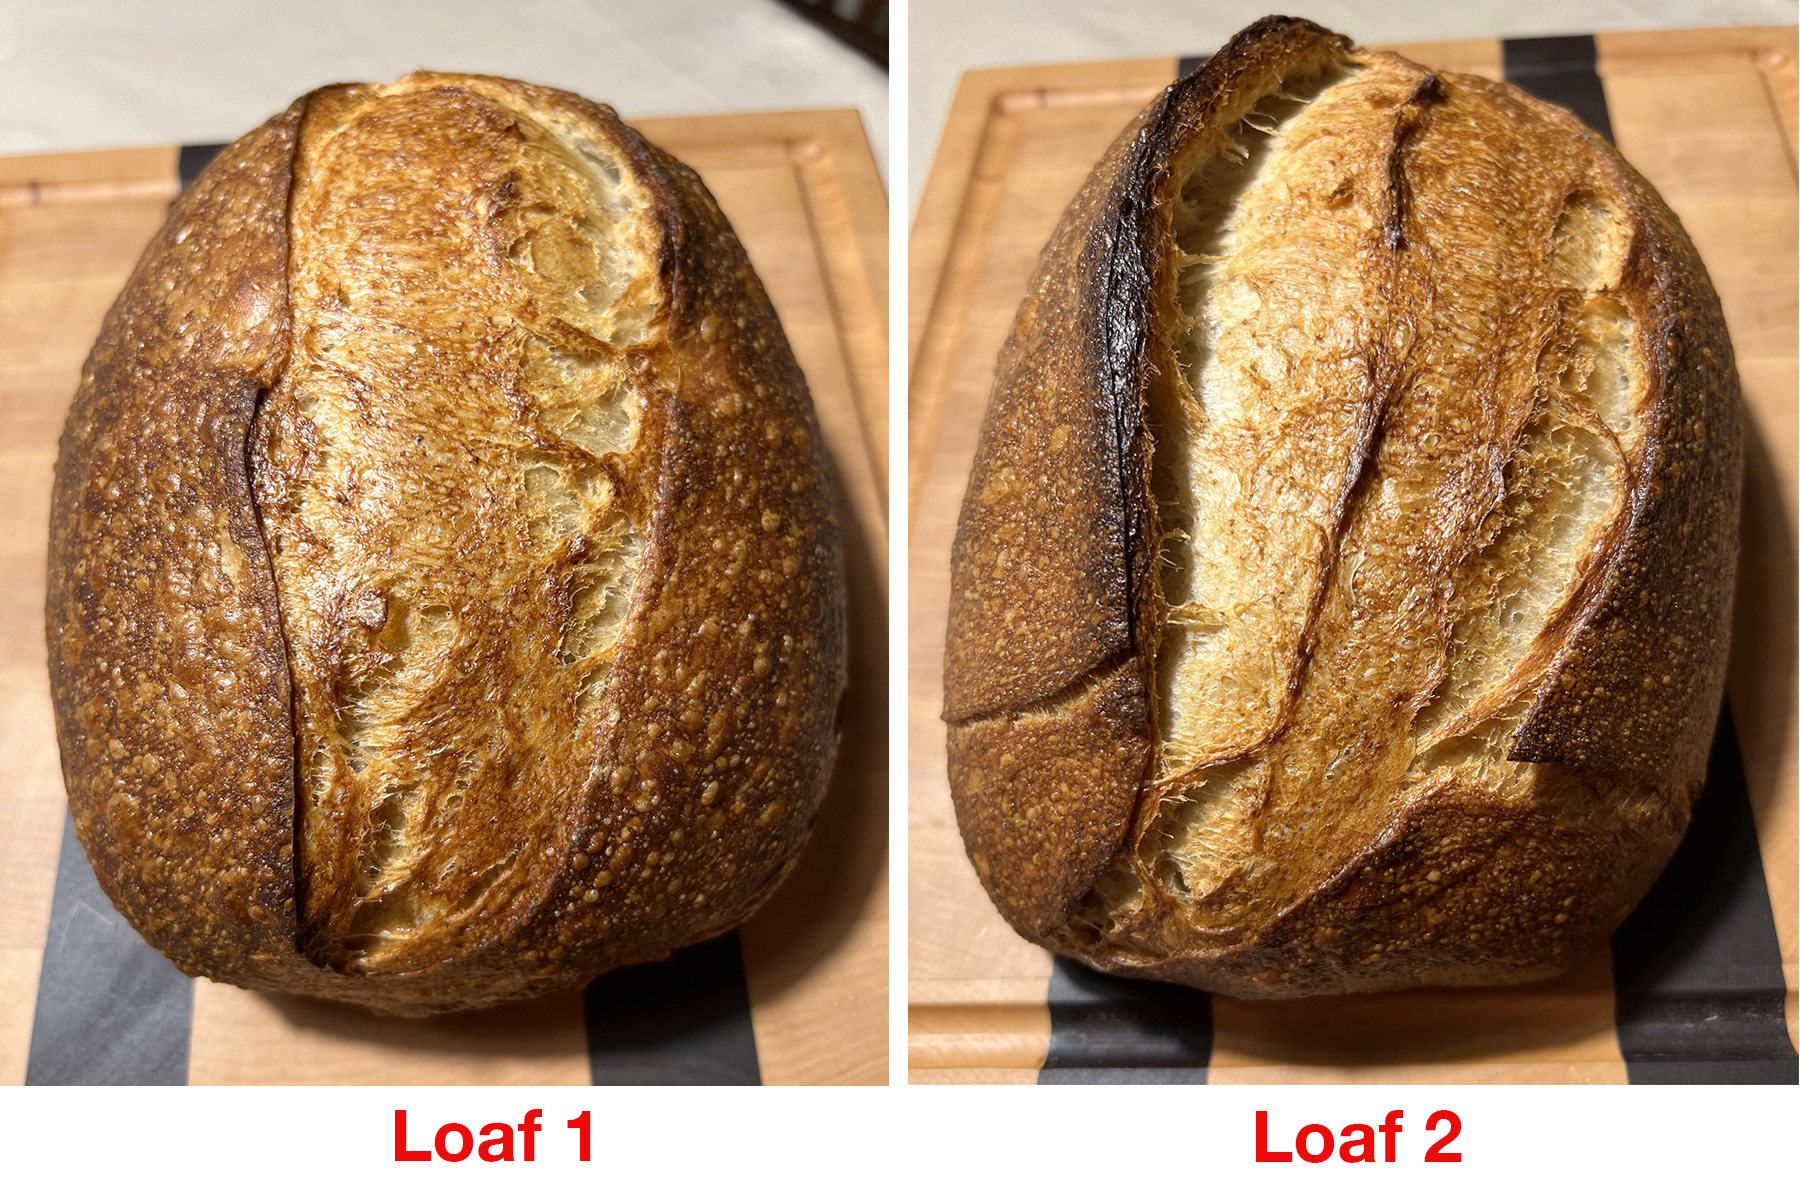
When Loaf #1 emerged from the oven, it exhibited great oven spring and a nice blistered crust. There was no ear; the dough filled in the bloom area and leveled out. I thought this was most likely due to the shallow scoring, so I focused on making a deeper cut into the second loaf. Unfortunately, I didn’t angle the blade very much. Who in that situation can resist the urge to commit the cardinal sin of re-scoring even though you know its impossible to hit the exact same spot? Not me. The result is the second loaf has a somewhat better ear and bloom but bears the scars of botched surgery.  

Grand Opening

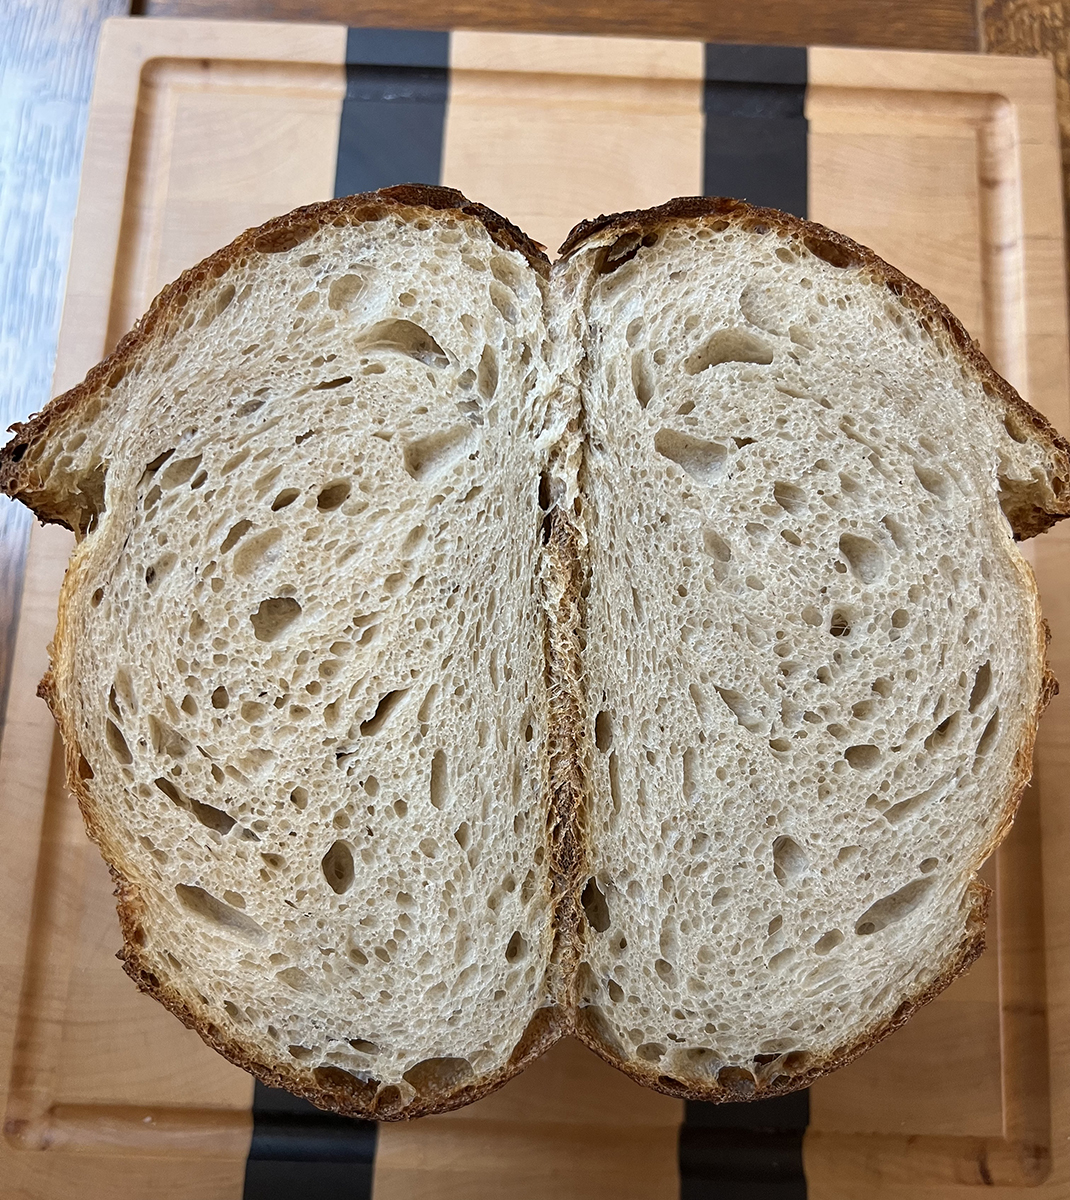
I'm going to bury the lede here and begin by saying the flavor was good, and the best part was that my husband enjoyed it. That was a win right there. Unfortunately, the crumb was a different story. Despite the good oven spring, the loaf was verrry heavy  – not unexpected given the dough quality. You know that old trick question about which weighs more, a ton a feathers or a ton of bricks? The correct answer is a pound of this bread.

The bread looks better in the photos below than it turned out to be in real life. At the same, it wasn’t terrible. Given the bizarre dough quality, I was not expecting an edible bread. And, truthfully, the eating quality is not great… but it’s not bad either and makes, like many substandard loaves, decent toast. 
ANALYSIS – NO ANSWERS, ONLY QUESTIONS

So what happened with this dough? I assume the fault was floating in my jar of YW, so I made a fresh batch inoculated by a spoonful drawn from the old jar. This is the first time in the 4 weeks since it was first made that the water was completely changed. I feared doing so might dilute the yeast population in a young culture, but in light of the poor dough development, it seemed the prudent thing to do. The new YW spent the night in the proofer at the low setting of 75°F (the overnight temp inside the box was probably closer to 70°F). Once it looks active and the pH dips below 4.0, it will be refrigerated and given a few more days to develop.

Meanwhile, another YW levain (second build) rests in the refrigerator. I mixed extra to have on hand for SD-YW Test Bake #2, but now I think I will toss it and make a new levain when the new YW is ready. 

TO BE CONTINUED

Another Girl's picture
Another Girl

My husband isn’t a big sourdough fan, so I will occasionally fiddle around with ways to minimize the acidity in our bread. Recently, I was thumbing through the second edition of Hamelman's Bread and was intrigued by his introduction to the formula for Swiss Farm Bread, in which he notes a lack of acidity. I decided to give it a try. 

The bread is started with yeast produced from a raisin soak, which was to be a new experience for me. When I ran into trouble, I consulted TFL and found a community bake dedicated to this very bread. Without going into the details all over again (my experience making YW is posted in the Swiss Farm Bread Yeast Water CB), suffice it to say that with a little help from the TFL brain trust, I was eventually successful in starting a yeast water made with apples. By that time, unfortunately, my schedule would not permit a bake for at least a week and I did not want to wait that long. I had Tuesday mostly free, but my free time would be punctuated by interruptions. And with two levain builds, the first of which could reportedly run long, I knew Tuesday probably didn’t have enough hours to give this bread its due. Still, if the dough progressed roughly according to the timelines outlined in the book, I thought I might be able to make it kinda, sorta work. And besides all that, I had an itch to make this bread and was determined to scratch it.

As it played out, the dough did not conform to the time estimates in the book, but that is probably because my day didn’t work out as planned. I ended up stopping Build 2 a little short (it tripled in volume, but I didn’t feel it had peaked), but due to a schedule change, I felt compelled to hope 200% growth would be sufficient. It wasn’t, and the bulk progressed very slowly. I ended up calling the bulk after 5 hours when the dough had risen maybe 30% percent and still looked and felt rather dense. Then I had to leave the house for a few hours, so I refrigerated the shaped loaf. When I returned, there was some slight drying around the edges so I dabbed a bit of water on the dry spots to remoisten them. This of course caused the dough to stick like glue when I tried to turn it out of the banneton. (I know, I know…) 

So. Not exactly a text book bake, but I pretty much always screw up something. And I knew this one wouldn’t be textbook before I even started. But I satisfied my urge to try a yeast water bread and now have some idea of what to expect when I can bake this interesting bread with time on my side. I have a not perfect but certainly enjoyable bread to show for my efforts. And next time, I'll know to add the fruit.

Another Girl's picture
Another Girl

This is my first blog entry but not my first post. I thought it might be worthwhile to post my experience with the new Anova Precision Oven, which has been promoted, in part, as a steam oven suitable for bread baking. My review is pretty mixed, but after a dozen or more failed bakes, I’ve finally begun to see good results.

For those who aren’t familiar with it, the Anova Precision Oven is a combi (steam and convection) oven. It’s said to retain temp to within 0.5°F for sous vide-like cooking. The oven has many capabilities and, in my experience, some flaws, but I’ll limit my review to bread baking because A) this is bread bakers forum; and B) that’s about the only thing I’ve used it for. 

When I first got the oven, I thought I could follow the baking instructions from a recipe in much the same way I would bake a loaf in my old GE gas oven, except that I’d use a setting to steam the oven instead of pouring boiling water on old towels and lava rocks. Turns out that was a gross over-simplification and unless you’ve used a combi oven before, you might find the learning curve pretty steep. At least, I have.

BAKING

I’ve had a hard time getting bread right in this oven. I prefer darker crusts, but when baked in this oven, the crusts set and darken very fast – well before the interior of the loaves have time to fully bake. At this point, about 15 loaves have been baked in my Precision Oven, nearly all of them with dark exteriors and interiors that range from gummy to doughy. Anova’s Customer Service seems unable to provide meaningful guidance on how to *properly* bake bread in their oven. The app has few bread recipes and I’ve been unable to find any solid direction on how to migrate standard baking instructions to the steam oven. I’ve referred to a number of online resources (Anova Cusine app, some Facebook pages, and even a subreddit for combi oven users that seems to have a lot of Precision Oven users on it), but there’s no authoritative place to get meaningful guidance. I’ve found the app to be disorganized and not particularly helpful. Baking decent bread in the oven has, unfortunately, involved a lot of hit and miss experimentation.

The oven has some “limitations” that, in my impression, might contribute to less than ideal bread baking conditions:

  • The convection fans in the Anova oven are variable only under certain configurations; unfortunately they are not configurations you’d normally use for baking bread. If the rear heating element (recommended for bread baking) or steam (the whole reason for using the oven) is in use, the fan is locked on high 
  • The oven cavity is small, so the baking bread is mere inches away from the fan blowing intensely hot air onto it at full speed (it’s a countertop oven, so…)
  • Water/Steam conducts heat faster than air, so I would imagine that using the highest steam setting (100%, which is what the recipes on their app seem to recommend) intensifies the heat and accelerates the browning. (Most if not all of the recipes I’ve found on the app recommend 100% steam.) 
  • Using the bottom heating element in place of the rear element is a non-starter because the heat maxes out at 356°F
  • I have wondered if the water inside the loaf can’t evaporate quickly enough in the steam-saturated air to keep up with the fast-cooking crust

I could be entirely wrong about the effect of these items, but they do limit the baker’s control. Reducing the fan speed and switching to the bottom heat element were among the things I intuitively wanted to try in order to “fix” the overbrowning/underbaking problem, but they ended up not being viable solutions. That said, I have no scientific training and these are just my impressions. Hopefully those of you with more experience can correct me if I’m wrong. 

After reaching out to Anova Customer Service and waiting days for a reply, I was advised to reduce the oven temp (no direction as to how much) and tent the loaf if it appeared to be browning too fast. I already thought of tenting, but their marketing material promises “no hack”  bread baking and, frankly, fiddling with foil in the small, hot, and steamy oven cavity does not appeal to me. They also referred me to a Facebook page where some bakers were posting results with their own time and temperature combinations. Ultimately, it was the fb page and advice from everyday users like me that got my bakes in the ballpark. Based on other user experiences, I now reduce temperatures more than I’d have thought necessary (425°F) and dial the steam down to 70% – 75%. In this scenario, I turn the steam off after the crust sets and starts browning, but don’t vent it for another 5 minutes or so after that. Then I continue baking at the same temp without steam until done. This results in a dark brown crust and a tender, moist, but not under-baked, crumb. If you’re a person who prefers a lighter crust, you might have to resort to tenting. Over the next week, I’ll do more experiments with different hydrations and dough sizes (up to now I’ve been limiting my bakes to 700g). 

PROOFING

I’ve also tried using the oven for proofing dough and maintaining starter. I did this only to see how it would go because the oven seems like overkill for this purpose, especially considering that I already have a Brod & Taylor proofing box. The oven is supposed to maintain temp within 0.5°F in sous vide mode and I found that the oven actually fluctuates between 5°F – 10°F above the set point. There are reports online from users who say the oven doesn’t maintain temp at the low end of the sous vide range, and this sounds like an example of that. It seems to perform better at higher temps. I reached out to Anova customer service on Feb 11 to see if they could help me understand that, but I have not yet heard back. However, when I used the probe thermometer to sous vide some steaks, they came out really good, better in my opinion than steaks I’ve cooked sous vide using a water bath circulator. 

I’d be most interested in comparing notes from any other users out there. 

Two weeks ago, I thought I would return the oven for sure, but now I’m leaning toward keeping it. If I didn’t already own one, I would probably hold out for a while though. Anova does seem to be making adjustments based on user feedback, so I would expect subsequent iterations of the oven to be better. And now that I’m getting used to it, I’m finding there is a lot to like about the oven. I just wish Anova had dedicated at least a little bit of energy to supporting the consumer market that may not be familiar with the more practical aspects of using it. 

As an aside, I’ve had some issues with the physical oven: the water tank bowed and Anova put me on a waiting list for a replacement. Also, the pan buckled at high heat and they promised to send a replacement for that, too.

Subscribe to RSS - Another Girl's blog