The Fresh Loaf

A Community of Amateur Bakers and Artisan Bread Enthusiasts.

Benito's blog

Benito's picture
Benito

Building on my successful 50% WW SD Challah I baked last week I decided to bake a 100% WW version. I think based on the appearance that I was patient enough with the final proof and didn’t under ferment it this time. I didn’t want to take a chance with weak gluten so I did add VWG to this one since there is no strong flour. I wanted to ensure that the shape of the each strand held its own and I think they did.

Procedures

  1. The night before baking, build the levain and ferment it at 76-78°F for 8-12 hours.
  2. In the morning, in a large bowl or the bowl of a stand mixer, add the starter then mix in the 4 eggs, salt and honey and mix until completely combined.
  3. Mix in all the flour until it forms a shaggy mass.
  4. Knead the dough on the bench or in a stand mixer until it is smooth and there is moderate gluten development. Add the water via bassinage the water to achieve the desired consistency. The dough should be quite firm. Gradually add the oil, the dough may break down, wait until it comes back together and before you add more. Mix until gluten is well developed.
  5. Transfer the dough to a lightly oiled bowl and cover it tightly. Ferment for about 2-2.5 hours. At 82°F it rose 20-25%
  6. To make one loaf, divide the dough into two equal portions, and divide each portion into the number of pieces needed for the type of braiding you plan to do, so divide each by 3 to make 1 six strand braided loaf.
  7. Form each piece into a ball and allow them to rest, covered, for 10-20 minutes to relax the gluten.
  8. Form each piece into a strand about 14” long. (I like Glezer’s technique for this. On an un-floured board, flatten each piece with the palm of your hand. Using a rolling pin, roll out each piece to about ¼ inch thickness. Then roll up each piece into a tight tube. Using the palms of your hands, lengthen each piece by rolling each tube back and forth on the bench with light pressure. Start with your hands together in the middle of the tube and, as you roll it, move your hands gradually outward. Taper the ends of the tube by rotating your wrists slightly so that the thumb side of your hand is slightly elevated, as you near the ends of the tube.). You can consider rolling each rope of dough in two different types of seeds at this point for a decorative effect, or only a few of the strands.
  9. Braid the loaves. Braiding somewhat loosely, not too tight.
  10. Place loaf on parchment paper on a sheet pan. Brush with egg wash. Cover well with plastic wrap (brush with oil so it doesn’t stick to the dough) or place the pans in a food grade plastic bag, and proof at room temperature until the loaves have tripled in volume. About 4-6 hours.
  11. If it’s almost tripled and when poked the dough only springs back a little, preheat the oven to 180°C/350°F. Gauge the dough again. Stick a finger lightly in the dough. If it makes an indentation that doesn’t spring back, the dough is ready to be baked. If not, wait a bit more.
  12. Pre-heat the oven to 350ºF with the rack in the upper third of the oven about 30 mins before final proof is complete.
  13. Brush each loaf with an egg lightly beaten with a pinch of salt.
  14. Optionally, sprinkle the loaves with sesame seeds and/or poppy seeds.
  15. Bake until done – 30-40 minutes rotating half way. If baking as one large loaf may take a bit longer, bake until sounds hollow or reaches 190ºF in the middle.
  16. Cool completely before slicing.

To see the index of all my bakes click here.

Benito's picture
Benito

I still have some Lap Cheong (Chinese sausage) left over from my Lap Cheong filled buns so wanted to use some up. I’ve been wondering what to top a focaccia with to go along with the lap cheong when I saw a post by King Arthur of a Taiwanese Focaccia, so I borrowed some of their ideas and added a couple of slight changes of my own. For one I had a bit of semola rimacinata left that I wanted to use up so all the flour in this focaccia is that finely ground semolina. One negative to this flour is that it is challenging to get a really open crumb, but that’s alright it doesn’t really bother me. So in addition to the lap cheong, I added toasted sesame seed oil, black and white sesame seeds, scallions, corn, kewpie mayo and cilantro.

The levain was made the night before and the dough was developed using the stand mixer adding the oil last. Bulk fermentation went for about 6 hours and then the dough had a cold retard until the following day.

The cold dough was then transferred to a 9” cake pan that was well oiled with olive oil. The dough was easily stretched out to fill the pan. The dough was left to double in size. About 30 mins prior to doubling in size the oven was pre-heated at 450°F.

The dough was docked using very wet fingers. Toasted sesame seed oil was drizzled on the dough. The following were placed on the dough, sliced pre-cooked lap cheong, corn, scallions, black and white sesame seeds and then kewpie mayo.

The focaccia was baked for 30 mins. The focaccia was removed from the pan and then a bit more kewpie mayo was drizzled on and cilantro was added.


My index of bakes
Benito's picture
Benito

Despite the fact that growing up challah was my favourite bread, since I’ve been baking bread for the past three years I’ve only made challah once. My first challah was Maggie Glezer’s sourdough challah which I blogged about last year. I made some changes to her recipe in order to add some whole grain. I also love an eggy challah so also increased the egg. I reduced both the water and the oil to compensate for the contribution of both by the additional egg. This is what I came up with for my test bake.

The dough was stickier than I would have liked so shaping was more challenging than I wanted. I would omit the holdback water the next time I bake this.
Procedures


  1. The night before baking, mix the starter and ferment it at 76-78°F for 8-12 hours.
  2. In the morning, in a large bowl or the bowl of a stand mixer, add the starter then water, then mix in the 4 eggs, salt and honey and mix until completely combined.
  3. Mix in all the flour until it forms a shaggy mass.
  4. Knead the dough on the bench or in a stand mixer until it is smooth and there is moderate gluten development. (Bassinage the hold back water to achieve the desired consistency) The dough should be quite firm. Gradually add the oil, the dough may break down, wait until it comes back together and before you add more. Mix until gluten is well developed.
  5. Transfer the dough to a lightly oiled bowl and cover it tightly. Ferment for about 2 hours. It may not rise much.  At 82°F it rose 20-25% in 2 hours.
  6. To make one loaf, divide the dough into two equal portions, and divide each portion into the number of pieces needed for the type of braiding you plan to do, so divide each by 3 to make 1 six strand braided loaf.
  7. Form each piece into a ball and allow them to rest, covered, for 10-20 minutes to relax the gluten.
  8. Form each piece into a strand about 14” long. (I like Glezer’s technique for this. On an un-floured board, flatten each piece with the palm of your hand. Using a rolling pin, roll out each piece to about ¼ inch thickness. Then roll up each piece into a tight tube. Using the palms of your hands, lengthen each piece by rolling each tube back and forth on the bench with light pressure. Start with your hands together in the middle of the tube and, as you roll it, move your hands gradually outward. Taper the ends of the tube by rotating your wrists slightly so that the thumb side of your hand is slightly elevated, as you near the ends of the tube.). You can consider rolling each rope of dough in two different types of seeds at this point for a decorative effect, or only a few of the strands.
  9. Braid the loaves. Braiding somewhat loosely, not too tight.
  10. Place loaf on parchment paper on a sheet pan (I used a quarter-sheet pan for each loaf.) Cover well with plastic wrap or place the pans in a food grade plastic bag, and proof at room temperature until the loaves have tripled in volume. About 4-6 hours.
  11. If it’s almost tripled and when poked the dough only springs back a little, preheat the oven to 180°C/350°F. Gauge the dough again. Stick a finger lightly in the dough. If it makes an indentation that doesn’t spring back, the dough is ready to be baked. If not, wait a bit more.
  12. Pre-heat the oven to 350ºF with the rack in the upper third of the oven about 30 mins before final proof is complete.
  13. Brush each loaf with an egg lightly beaten with a pinch of salt.
  14. Optionally, sprinkle the loaves with sesame seeds and/or poppy seeds.
  15. Bake until done – 25-40 minutes rotating half way. If baking as one large loaf may take a bit longer, bake until sounds hollow or reaches 190ºF in the middle.
  16. Cool completely before slicing.

Benito's picture
Benito

The first time I baked brioche I did a test bake baking them as buns.  For today’s bake I decided that I’d plait my brioche dough and bake it in a pullman pan for fun.  I reduced the butter because I ended up not having enough for 50% so decided to go ahead and make adjustments and make it at 25% butter, poor man’s brioche LOL.

Levain

Mix the levain ingredients in a jar or pyrex container with space for at least 300% growth. 

Press down with your knuckles to create a uniform surface and to push out air.

At a temperature of 78ºF, it typically takes up to 10-12 hours for this sweet stiff levain to be at peak.


Dough

In the bowl of a stand mixer, add the milk, eggs, salt, sugar and levain.  Mix and then break up the levain into smaller pieces.  Next add the flours.  Mix on low speed until there is no dry flour remaining.  Once incorporated increase the speed gradually to medium.  Mix at medium until the gluten is moderately developed.  With the mixer running add the room temperature butter one pat at a time until it is fully incorporated, waiting until each pat is well incorporated before adding the next.  Continue to mix until you can  pull a good windowpane, not quite as good as a white flour because the bran will interrupt the windowpane somewhat.


Shape the dough into a tight ball, cover in the bowl and ferment for 3-4 hours at 82ºF.  There should be some rise visible at this stage.

You can next place the dough into the fridge to chill the dough for about 1.5 hours, this makes rolling the dough easier, remember if you do so the final proof will take longer.  Alternatively, you can do a cold retard in the fridge overnight.


Prepare your pans by greasing them with butter or line with parchment paper.
Scrape the dough out onto a clean counter top. Lightly flour the bench. Transfer the dough onto the bench and divide it into four. Shape each into a roll, allow to rest 5 mins.  Next like a baguette, shape each roll into a long log with tapered ends.  Next do a 4 strand plait.  Tuck the ends underneath and transfer into the prepared pan.


Cover and let proof for 6-8 hours, longer time if you chilled your dough for shaping. I proof until the top of the dough comes to within 1 cm of the top edge of the pan.


Preheat the oven to 350F and brush the dough with the egg-milk wash (1 egg with 1 tsp of milk and pinch of salt).  Just prior to baking brush with the egg-milk wash again.


Bake the loaves for 35-40 minutes or until the internal temperature is at least 190ºF, rotating as needed to get even browning. Shield your loaf if it gets brown early in the baking process. After 35-40 mins remove the bread from the pan and bake a further 10 mins by placing the loaf directly in the oven on the rack with the oven turned down to 325ºF. You can brush the top of the loaf with butter if you wish at this point while the bread is still hot to keep the top crust soft.

My index of bakes.


Benito's picture
Benito

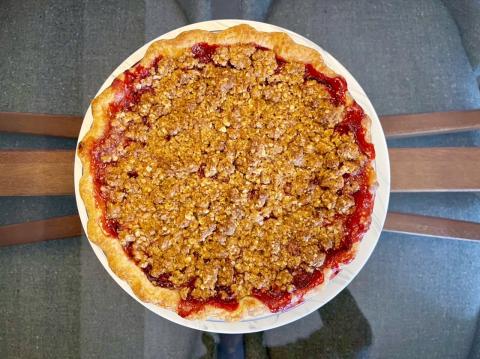
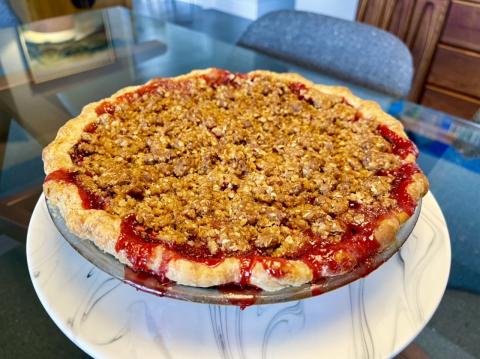
I realized that I hadn’t baked a crumble topped pie in at least 3 years so I decided it was time to do a crumble pie again.  I’m using Kenji Lopez-Alt’s pastry recipe again because it is now my go to recipe.  It is a reliable way of baking a buttery yet tender pie crust every time.  Rather than cutting in butter, you make a  butter flour paste with ⅔ of the flour.  This essentially coats ⅔ of the flour with butter.  So later when water is added that flour encapsulated in butter cannot form gluten and guarantees a tender buttery crust.  I’ve posted the recipe in an earlier post so if you’re interested have a look.

Brown Sugar Crumb

MAKES ABOUT 2 CUPS; ENOUGH TO TOP 1 (9-inch / 23-cm) PIE OR 12 (2-inch / 8-cm) MINI PIES

½ cup / 40 g rolled oats

½ cup / 62 g all-purpose flour

½ cup / 96 g packed light brown sugar

½ teaspoon ground cinnamon

¼ teaspoon fine salt

6 tablespoons / 85 g unsalted butter, melted and cooled

Put the oats in the bowl of a food processor and pulse the machine to grind the oats to the texture of coarse cornmeal. Add the flour, sugar, cinnamon, and salt and pulse the machine 5 times to combine.

Transfer the mixture to a medium bowl. Add the melted butter and blend with a fork or your fingers until the butter is incorporated and the mixture gathers into small clumps. Transfer the bowl to the refrigerator and chill the crumb for 5 to 10 minutes before topping a pie.


2 pounds / 906 g strawberries, hulled and quartered

2 teaspoons freshly squeezed lemon juice

¼ teaspoon freshly grated orange zest

½ teaspoon vanilla extract

¾ cup / 144 g granulated sugar

¼ cup / 48 g finely ground instant tapioca (see page 45)

2 tablespoons cornstarch


Follow the instructions on pages 20–23 to roll, pan, and flute the dough. Transfer the pan to the refrigerator to chill the crust while you make the crumb and filling.

Prepare the crumb as directed on page 81. Set the bowl in the refrigerator and chill the crumb while you make the filling.

Preheat the oven to 375°F (190°C). Line a rimmed baking sheet with parchment paper.

In a large bowl, toss the strawberries with the lemon juice, orange zest, and vanilla extract. Toss to combine.

Whisk the sugar, ground tapioca, and cornstarch together in a small bowl. Sprinkle the sugar mixture over the strawberries and toss to combine. The mixture may seem dry at first; let it sit 5 to 10 minutes, and the lemon and sugar will draw the juices out of the fruit. Then give the mixture another good tossing to thoroughly moisten all of the sugar and tapioca granules.

Retrieve the prepared crust and crumb from the refrigerator and set the pan on the parchment-lined baking sheet. Pour the filling into the pie shell. Top the pie with the crumb, spreading in an even layer and covering all of the fruit.

Transfer the baking sheet to the oven and bake 25 minutes, then reduce the oven temperature to 350°F (175°C) and bake 25 to 30 minutes more, or until the juices bubble up through the crumb. Tent the top with foil if the crumb or crust starts to over-brown.

Transfer the baking sheet to a wire rack and let the pie cool and set, uncovered, at room temperature, overnight (or up to 3 days) before slicing and serving with buttermilk ice cream.

My Index of Bakes

Benito's picture
Benito

My original plan was to test bake a bread raised by sakadane, however, that didn’t get bubbly enough to raise anything.  So plan B was baked instead.  I have a small amount of einkorn that I haven’t touched recently and thought that it would be perfect to use as a tangzhong.  It has poor gluten so gelatinizing it in a tangzhong is a perfect way to add it to a bread.  I also enjoyed a test bake of buttermilk bread that I did recently so decided on a buttermilk bread.


Instructions

Levain

Mix the levain ingredients in a jar or pyrex container with space for at least 300% growth. 

Press down with your knuckles to create a uniform surface and to push out air.

At a temperature of 78ºF, it typically takes up to 10-12 hours for this sweet stiff levain to be at peak.

Tangzhong 

Put about 1” of water in a sauce pan set on medium high heat. In the bowl of the stand mixer stir the buttermilk and flour until blended. Then place the bowl on the sauce pan to cook the tangzhong (Bain Marie) for several minutes until well thickened, stirring regularly with a spoon or heat-resistant spatula. Theoretically it should reach 65ºC (149ºF) but I don’t find I need to measure the temperature as the tangzhong gelatinizes at this temperature.  Let cool in the bowl and then refrigerate until the next morning.


Dough

In the bowl of a stand mixer, add the milk, egg, tangzhong, salt, sugar and levain.  Mix and then break up the levain into smaller pieces.  Next add the flour and vital wheat gluten.  Mix on low speed until there is no dry flour remaining.  Once incorporated increase the speed gradually to medium.  Mix at medium until the gluten is moderately developed.  With the mixer running add the room temperature butter one pat at a time until it is fully incorporated, waiting until each pat is well incorporated before adding the next.  Continue to mix until you can  pull a good windowpane, not quite as good as a white flour because the bran will interrupt the windowpane somewhat.


Shape the dough into a tight ball, cover in the bowl and ferment for 3-4 hours at 82ºF.  There should be some rise visible at this stage.

You can next place the dough into the fridge to chill the dough for about 1.5 hours, this makes rolling the dough easier, remember if you do so the final proof will take longer.  Alternatively, you can do a cold retard in the fridge overnight.


Prepare your pans by greasing them or line with parchment paper.
Scrape the dough out onto a clean counter top. Lightly flour the bench. Transfer the dough onto the bench and divide it into four. I like to weigh them to have equal sized lobes. Shape each tightly into a boule, allow to rest 5 mins. Using a rolling pin roll each ball out and then letterfold. Turn 90* and using a rolling pin roll each out to at least 8”. Letterfold again from the sides so you have a long narrow dough. Then using a rolling pin, roll flatter but keeping the dough relatively narrow.  The reason to so this extra letterfold is that the shorter fatter rolls when placed in the pan will not touch the sides of the pan.  This allows the swirled ends to rise during final proof.  Next roll each into a tight roll with some tension. Arrange the rolls of dough inside your lined pan alternating the direction of the swirls. This should allow a greater rise during proof and in the oven.


Cover and let proof for 6-8 hours, longer time if you chilled your dough for shaping. I proof until the top of the dough comes to within 1 cm of the top edge of the pan.


Preheat the oven to 350F and brush the dough with the egg-milk wash (1 egg with 1 tsp of milk and pinch of salt).  Just prior to baking brush with the egg-milk wash again.


Bake the loaves for 50 minutes or until the internal temperature is at least 190ºF, rotating as needed to get even browning. Shield your loaf if it gets brown early in the baking process. After 50 mins remove the bread from the pan and bake a further 10 mins by placing the loaf directly in the oven on the rack with the oven turned down to 325ºF. You can brush the top of the loaf with butter if you wish at this point while the bread is still hot to keep the top crust soft.


My index of bakes.
Benito's picture
Benito

So with the success of my first vinegar a rose wine vinegar I decided I’d try making a fruit vinegar.  Raspberries were on sale recently and raspberry vinaigrettes are delicious so that made my decision easy.  Because I recently refreshed my 1.5 year old grape yeast water I decided I’d speed the first fermentation up by inoculating the raspberries with some about 2 tbsp of the grape yeast water.  So into a jar went the two containers of raspberries.  In a ratio of 500 g of fruit to 66 g of sugar, added sugar and enough water to cover the fruit.  You want to use a jar that will allow the fruit to rise quite a bit as they ferment.  I didn’t do this and lost a fair amount of the raspberry water initially until I transferred half of the raspberries and water into a new jar.

Within a day or two you will have vigorous fermentation of the sugars into ethanol by the wild yeast.

Next, swirl this daily until the fruit is no longer floating and bubbling, this indicates that the first fermentation is complete.  Another indication that this first stage is complete is that the water is clear.  Apparently for apple vinegar the water will never be clear so you cannot use that indicator as a sign of the completion of this stage.

The fruit solids are strained out and now the jar of raspberry wine is left to spontaneously start the second fermentation of ethanol to acetic acid.  This is an aerobic fermentation so you must allow the water to be exposed to air for this to occur.  I covered the jar with gauze kept in place by a rubber band.  The Acetobacter needed to ferment is naturally in the fruit so it is already there in the raspberry wine so this should start on its own.  If I had enough vinegar mother I could speed this up by placing the mother into this jar, however, I don’t have a mature vinegar mother yet so I’ll have to wait and see if this second fermentation will start on its own.

The pH today is 3.5 and the target is 2.8.

My index of bakes

Benito's picture
Benito

I’ve had orange poppyseed in the back of my mind for quite some time and finally got around to trying it in this 100% whole stoneground spelt sourdough bread.

Whole stoneground spelt 453 g sifted yielding
47 g of bran scalded with 94 g of boiling water and left overnight in the fridge.
VWG 23.55 g
Water 341 g water and 15 g for bassinage
Salt 10.47 g
50 g of poppyseeds
Zest of 1 small-med orange

Overnight levain
16 g starter + 16 g brown sugar + 25 g water + 47 g whole spelt

In the morning breakdown the levain in the water. Add salt and dissolve. Add all the sifted spelt and VWG and mix until there is no dry flour. Rest for 10-15 mins. Do French Folds until good gluten development. Add bassinage water and incorporate. Add poppyseeds and orange zest. Stretch and fold until well incorporated. Do a bench letterfold and place dough in a bowl in the proofing box at 82°F.

Do coil folds every 30 mins stopping when the dough is strong and doesn’t really spread. Four coil folds were done. Allow to rest until 40% growth.
Shape and place in a banneton and allow to rise to 60% growth.

Preheat the oven to 500°F and place the dough in the freezer to firm it up for scoring. Place cast iron skillet in the oven. 30 mins later fill a metal loaf pan with a towel with boiling water and place in the oven to pre steam the oven.

When the oven reached 500°F flip the dough onto a sheet of parchment paper. Brush off rice flour and score. Brush water onto the dough. Transfer the dough to the peel and load into the oven onto the baking steel. Drop the temperature to 450°F and pour 1 cup of boiling water into the cast iron skillet. Bake with steam for 25 mins. After 25 mins vent the oven removing the pan and the skillet. Drop the temperature to 420°F and baking for 20-25 mins turning as needed.

image image


image


image


image


imageIndex of my bakes 
Benito's picture
Benito

When I went to the local sake distillery to get more Koji rice for my various fermentation projects using aspergillus oryzae I noticed that they also sold sake kasu. For those unfamiliar sake kasu are the lees remaining after sake production. The Japanese do not like to waste useable food products so sake kasu can be used to make many things. In fact, I used the sake kasu in this test bake to see if I could use it to build a levain to bake a loaf of bread. I think I had some success with this. I will need to adjust the recipe but to give you an idea of what I did I’ll share the outline.

Using sake kasu:water:bread flour in a 1:1:1 ratio I created a first build levain, Unfortunately I did not have a small jar and didn’t think to use a small water glass to ferment this in. As a result I couldn’t tell if it grew, even after 24 hours at 82°F. Despite the apparent lack of growth I went on and make a second build of a levain using all the first build at a 1:2:2 ratio. Surprisingly after 8 hour it almost quadrupled.

Using an all bread flour SD Hokkaido milk bread as the general guide I made a tangzhong using buttermilk. After this cooled I mixed all the levain with all the tangzhong, more buttermilk, salt and sugar. I then added the bread flour and used the stand mixer to develop the dough moderately. I then added the butter in small pats until fully incorporated and with great gluten development. The dough was left to ferment at 82°F for hour hours. At that point in time there was barely 10% rise. I had expected it to ferment more quickly but I supposed the enrichments slowed it down. Into the fridge it went for the night.

In the morning I removed the dough from the fridge and allowed it to ferment at 82°F until it reached 20% rise at which point in time it was pre shaped, shaped and then placed in a buttered cube pan. Again it was allowed to ferment until it reached less than 1 cm of the top of the pan this was a 120% rise overall. It was given an egg milk wash and baked.

My index of bakes.

Benito's picture
Benito

In my earlier blog post I described how I made my first ever amazake from scratch.  It is delicious, rich and sweet despite there being no added sugar.  Today I am doing a test bake of an Amazake Sourdough Vegan Hokkaido Milk Bread.  The amazake was used to make the tangzhong.  Because it is so sweet I didn’t add any sugar to the dough as I usually would.  I’m hoping that I have enough dough to fill the 10x10x10cm pullman pan I have and that it’ll bake up into a nice cube.

Instructions

Levain

Mix the levain ingredients in a jar or pyrex container with space for at least 300% growth. 

Press down with your knuckles or silicone spatula to create a uniform surface and to push out air.

At a temperature of 78ºF, it typically takes up to 10-12 hours for this sweet stiff levain to be at peak.  For my starter I typically see 3-3.5 times increase in size at peak.  The levain will smell sweet with only a mild tang.

Tangzhong 

Put about 1” of water in a sauce pan set on medium high heat. In the bowl of the stand mixer stir the amazake and flour until blended. Then place the bowl on the sauce pan to cook the tangzhong (Bain Marie) for several minutes until well thickened, stirring regularly with a spoon or heat-resistant spatula. Theoretically it should reach 65ºC (149ºF) but I don’t find I need to measure the temperature as the tangzhong gelatinizes at this temperature.  Let cool in the bowl and then refrigerate until the next morning.


Flax seed gel

Grind 1 tbsp of flax seeds and combine with 2-3 tbsp of water and stir to form a thick gel.


Dough

Into the bowl of a stand mixer with the tangzhong, add the soy milk (consider holding back 10 g of soy milk and adding later if this is the first time you’re making this), ground flax seed gel, salt, and levain.  Mix and then break up the levain into many smaller pieces.  Next add the flour.  I like to use my spatula to mix until there aren’t many dry areas.  Allow the flour to hydrate (fermentolyse) for 20-30 minutes.  Mix on low speed and then medium speed until moderate gluten development this may take 5-10 mins.  You may want to scrape the sides of the bowl during the first 5 minutes of mixing.  Next drizzle in the toasted walnut oil a little at a time.  Slow the mixer down to avoid splashing the oil at you. The dough may come apart, be patient, continue to mix until it comes together before drizzling in more oil.  Once all the oil has been added and incorporated increase the speed gradually to medium.  Mix at medium speed until the gluten is well developed, approximately 10 mins.  You will want to check gluten development by windowpane during this time and stop mixing when you get a good windowpane.  You should be able to pull a good windowpane, not quite as good as a white flour because the bran will interrupt the windowpane somewhat. 


On the counter, shape the dough into a tight ball, cover in the bowl and ferment for 4-4.5 hours at 82ºF.  There should be some rise visible at this stage.


You can next place the dough into the fridge to chill the dough for about 1.5 hours, this makes rolling the dough easier to shape.  Remember, if you do so the final proof will take longer.  Alternatively, you can do a cold retard in the fridge overnight, however, you may find that this increases the tang in your bread.


Prepare your pans by greasing them or line with parchment paper.  I used a muffin pan oiled with walnut oil.


Lightly flour the top of the dough. Scrape the dough out onto a clean counter top and divide it into six. I like to weigh them to have equal sized bun. Shape each tightly into a boule, allow to rest 5 mins. Flatten each boule, divide it into three pieces shaping each into a small boule.  Place each set of three small boules into the muffin tin to bake into a three lobed bun.


Cover and let proof for 3-5 hours at a warm temperature.  I proof at 82°F.  You will need longer than 3-5 hours if you chilled your dough for shaping. I proof until the top of the dough comes to within 1 cm of the top edge of the pan.


Preheat the oven to 350°F.  


Bake 20 mins lid on then remove lid and bake further 10-15 mins.


pH of the dough after mixing completed was 5.52.  

pH of the dough at the time of baking was 5.02 with a 100% rise.

I’m guessing that I’ll need to make an additional 50-75 g of dough to properly fill this pullman cube pan when baked with the lid on.  Not bad for a first time baking with the new cube pan though.  I’ll post the crumb and flavour later when the bread cools.

Pages

Subscribe to RSS - Benito's blog