The Fresh Loaf

A Community of Amateur Bakers and Artisan Bread Enthusiasts.

gavinc's blog

gavinc's picture
gavinc

Issue

My liquid white flour starter gets gradually weaker over time, although was created from rye flour. My regimen was to feed my culture a couple of times a week and refrigerate after the starter had ripened on the bench. The culture is 125% hydration and is fed with white bread flour.

The culture was initially strong with good rising power. After about three weeks it becomes weak and has a reduced ability to give a good rise and volume to the loaves. I have to occasionally freshen the starter with stone-ground rye to return its vitality and power.

The problem is that I did not notice the weakened state of my culture until I elaborated the starter to make the levain. The ensuing bake yielded a loaf with poor rise and volume.

Remedy

I stumbled across Jeffrey Hamelman’s ISO videos. In the Vermont sourdough episode, Hamelman revealed that the culture he maintains at home is a stiff rye sourdough. He gave the formula as 10-gram stiff rye sourdough, 20-gram rye flour and 17-gram water. I calculated the baker's percent to be 50% stiff rye sourdough, 100% rye flour and 85% water. He feeds it every morning and has been doing so for 40 years, without alteration.

I was immediately interested in trying out a stiff rye starter in the hope it would solve my issue.

Furthermore, in the Deli Rye Bread episode, Hamelman again used his stiff rye sourdough to make the Deli Rye Bread. He also included some liquid starter. He does not maintain two starters, only the stiff rye sourdough. When he needs a liquid white flour levain, he first converts some stiff sourdough to a liquid starter over two feeds.

I was convinced that this would provide me with a consistently lively starter that I could rely upon.

My experience

I fired up my Excel spreadsheet and made the calculation: Liquid stater to a stiff rye sourdough to match Hamelman's.

The process is in two stages:

1.       Convert the liquid starter to a stiff starter. This is only needed to be performed once. To 56 gram of my 125% hydration liquid starter, I added 68-gram of stone-ground rye flour. Cover and leave on the bench until next morning.

2.       Commence Hamelman's regimen. Mix 10-gram stiff rye culture with 17-gram water. Mix in 20-gram stone-ground rye flour.

I repeat the feeding once a day first thing every morning.

Using the stiff rye starter

Many of the sourdough formulae I bake with requires a liquid levain of 125% hydration.

Again with my spreadsheet, I calculated that I could easily create the liquid levain over two feedings. At the time of feeding the stiff starter in the morning, I use the leftover starter to make a small amount of 125% liquid starter: 37-gram stiff rye starter, 20-gram water and 9-gram bread flour. Then leave on the bench until about 5 pm that day. I then elaborate the starter to make the levain for the next day. The levain requirements for a Vermont sourdough is to pre-ferment 15% of the overall flour. Bread flour 100%, water 125% and mature liquid starter 10%. (I put the levain in a proofing box overnight at 24C). The levain is ripe when needed at 7 am the next morning.

Results

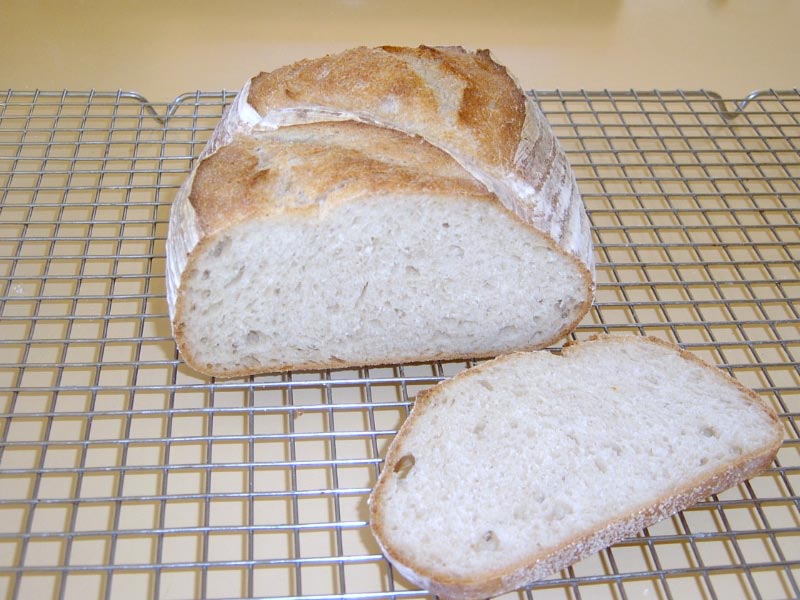
The elaborated levain was very bubbly and appeared lively, more so that I have ever seen.

Dough development

I noticed at the end of the bulk fermentation, that the dough had a nice feel of lightness, and had good structure.

It was easy to pre-shape and shape into an oblong. I placed the dough into a banneton to proof.  After 2 hours I checked the dough and determined it was ready for the oven, half an hour earlier than the usual proofing time.

The dough was easy to score after being inverted onto a wooden peel. It did not flatten out on the peel and held it's structure.
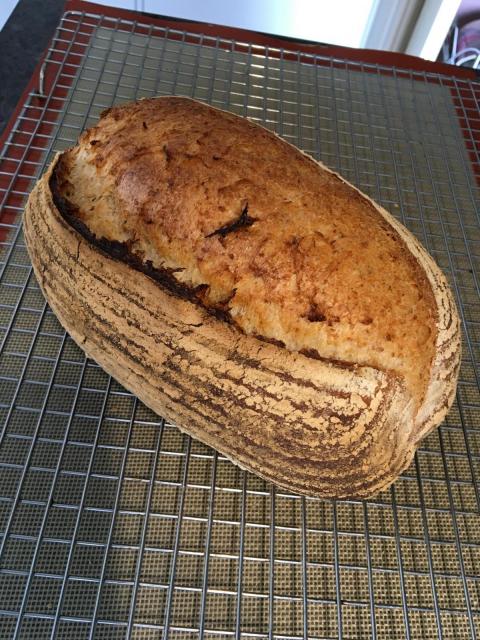
Baking

I baked the loaf on a stone in a pre-steamed oven, and steam for the first 10 minutes after loading. Finished in a drying oven.

The oven spring was much better than before. The ear and gringe opened up nicely.

This will now be my new sourdough starter regimen.


gavinc's picture
gavinc

I was inspired by alfanso making baguettes using Hamelman's Sourdough Seed Bread recipe. His results looked stunning with great crust colour and crumb. Today I made the same recipe into an oblong loaf. Reasonably happy, except I was expecting more volume and more open crumb. Still tasted great. 75% hydration, 25% seeds; sunflower, sesame and flax (linseed). Definitely will make this again, but will extend the final proof. I didn't retard the final proof but gave it 2 1/2 hours at 24C. Ideas welcome.

gavinc's picture
gavinc

I have never baked a ciabatta in all the years of baking. I wanted to take some nice bread to friends for late afternoon drinks that would pair nicely with cheese and selected wines. My usual bake for these events is baguettes with a poolish, but I wanted to try something. I went with Hamelman's ciabatta with biga which is a 73% hydration loaf.

The result was better than I was expecting, The crumb is not as open as some prefer, but I don't like the holes so large that the toppings fall through. I may experiment with upping the hydration a few points to test my nerve.

Cheers,

Gavin.

gavinc's picture
gavinc

My second bake of the Swiss Farmhouse Bread. This time I was able to source organic raisins and make the raisin yeast water successfully.  My first attempt at yeast water failed due to impurities on the raisins, so I resorted to making the yeast water using kumquats and honey.

This time I made the raisin yeast water using organic raisins and was successful. I also changed the container setup using an airlock lid and a cling film layer in contact with the water. I observed the development daily and on the sixth day, the bubbles were very active.

Setup day 1

Day 6 - ready for build 1

gavinc's picture
gavinc

Swiss Farmhouse Bread – “Bread. A baker’s book of techniques and recipes, 2nd Edition” by Jeffrey Hamelman.

My experiment into the world of yeast water bread was inspired by an organised community bake on the Fresh Loaf bread site. The members have such a wealth of experience and expertise.  When things do not go to plan, experts jump in with great advice. I learned a lot by participating and through others experience.

This bread contains walnuts and raisins and uses raisin yeast water for leavening. The first step is to make the yeast water and takes 5 to 6 days.

My proofer is set at 25°C.

Yeast Water – My first attempt with raisins failed due to non-organic raisins coated with oil. I was told that I could produce yeast water using any organic fruit.  I have a kumquat tree in our yard, so thought to experiment (it’s winter here and my options are limited). My second attempt was successful using kumquats and honey. The yeast water was ready for the first build on day five.

The first build took 8 hours to mature. I left the second build overnight for 14 hours which was slightly over; 12 hours would have been good.

I recalculated the ingredients for a 680-gram dough. After mixing, the dough felt quite wet but had reasonable development. Mixed in walnuts and raisins by hand. Desired dough temperature within range (24.5°C).

Bulk fermentation for 3 hours with a letter fold halfway.

Pre-shape, bench rest and shape. Final proof for 2 hours. I chose a boule banneton on this occasion.

I scored the boule with scissors just before loading into the oven and bake the loaf in a pre-steamed oven for 36 minutes; 232°C for first fifteen minutes then lower to 221°C to avoid excess darkening due to the raisins.

In conclusion, I am very happy with this experiment as I was able to meet all the timeframes in Hamelman’s recipe. Temperature control is important for success and schedule. I was sceptical about yeast water, but now I am convinced it has its place in my arsenal and was easier than first thought. No waste!

Taste – complete absence of sour, highlights of the walnuts and raisins blended well with the crumb. Not overly sweet.

Crumb – Not dense and enjoyable.

Flour – Unbleached bread flour 11.5% protein (90%) plus freshly milled whole-wheat (10%).

Further experimentation: change nuts and fruit, leave them out, increase whole wheat.

gavinc's picture
gavinc

This Rustic loaf is my regular weekly loaf and never misses if I am true to the process. I use instant yeast to make only one loaf at a time. That's what I like about Hamelman's book; you get the bakers per cent and I can rescale one 750 g loaf to suit my banneton. 

gavinc's picture
gavinc

I now get week by week repeated success with Hamelman's Vermont Sourdough which is our regular bread I bake each weekend.  My take-home message to all sourdough newbies is to persist and pay attention to detail.  It's tempting to skip and make do with estimates and a "she'll be right" attitude, but if I want consisency week after week with sourdough, I have to do all the below:

  • Always have a fully active starter to build a fully active levain.
  • Use baker's percentage and scale all ingredients-
  • Take the time to measure the temperatures of the room, flour and levain and work out the desired water temperature so you can achieve a final dough temperature after mixing of 24 to 25C. (Believe me this doesn't take long and is not difficult).
  • Fold during bulk fermentation. (I do two at 50 minute intervals and shape after a further 50 minutes).
  • Final ferment for 2 hours; (or retard in the fridge until the next day works great for additional flavour, but not essential).
  • Bake in a hot oven 235C for 40 to 45 minutes (I find lower temperatures will not get the oven spring).  Use steam.

This never misses.

cheers,

Gavin.

gavinc's picture
gavinc

I usually only have time to make our favourite sourdough each weekend, but this weekend we have had rain and cold winds which cancelled some plans.  So I decided to make a recipe I hadn't tried before -Golden Raisin Bread - from Jeffrey Hamelman's "Bread".  This took me out of my comfort zone somewhat but I enjoyed the challenge and will try to take on a new recipe regularly.  I think I've grown in confidence thanks to this site.

I was very pleased with the result.  I experimented with the scoring pattern between the two loaves and also made them in a pan rather than free form batards.  The taste was very nice and sweeter than I expected.  The crumb is denser than my usual Vermont Sourdough, but I guess it's the type of loaf.  Couldn't wait until it was completely cool before I tucked in....

Edit - I forgot to add that this was made using my new two week old starter (Debra Wink version).

gavinc's picture
gavinc

Hi,

I wanted to share my experience of building a backyard brick oven. I researched (and talked with mates) on and off for quite a few years before getting to work on this project. There is a lot of detail on the internet and books with lots of design, construction and material options (confusing!). I finally settled on a simple design that was a mixture of ideas from various sources. Simple approach as I'm not a trades-person, so I went with a dome-shaped oven out in the open to eliminate the need of a chimney. The dome is made from red clay bricks and has an inner diameter is 1.1 meters. The oven is insulated with four layers of perlite-cement mixture and a final outer layer of builder's render. I included two K-type thermocouples during the build so I can measure the floor and dome brick temperatures.

My oven was built mostly from second-hand materials and scrap for about $500 AUD and was constructed in my spare time between Oct and Dec 2005. I use the oven for pizza days with friends, roasts and veggies on special occasions, and of course, bread baking when a few mates also prepare dough to make the firing of the oven worthwhile.

I have placed a photo set of the construction approach at:

https://www.flickr.com/photos/27771627@N07/2589138025/in/dateposted-public/

I hope this encourages other novices that may be thinking of a similar project. It wasn't as hard as I had envisaged and has given a tremendous amount of satisfaction and good times.

Edited to fix broken link to flickr.


Pages

Subscribe to RSS - gavinc's blog