The Fresh Loaf

A Community of Amateur Bakers and Artisan Bread Enthusiasts.

Recent Blog Entries

browndog's picture
browndog


(This is a continuation of a discussion started here.)

I was starting to feel guilty hijacking weaverhouse's beautiful sourdough thread, xma, so I thought we could step over here. I agree about the potential for pan size--fantes carries a couple types of $7 7x I think 9 cookie sheet, you might take a look at that. I quite like their selection and service, I use them often when I want kitcheny stuff. I've just started baking my rounds on seperate sheets, a 12" pizza pan and my 10" cast iron griddle. It's working well for just the two, and there's still enough room to pop a bowl over them if I want.

The fresh loaf is so terrific--Asian, huh? and tiny? Well, me too, 5'1" right after a good stretch. I saw a movie (all right, I admit. Shaolin Soccer, it was) where an Asian, Chinese in this case, steamed bun featured somewhat prominently in the script. The bun was a kneaded white bread sort of thing, it looked delicious, though as you say, who connects bread with Asia?

bwraith's picture
bwraith

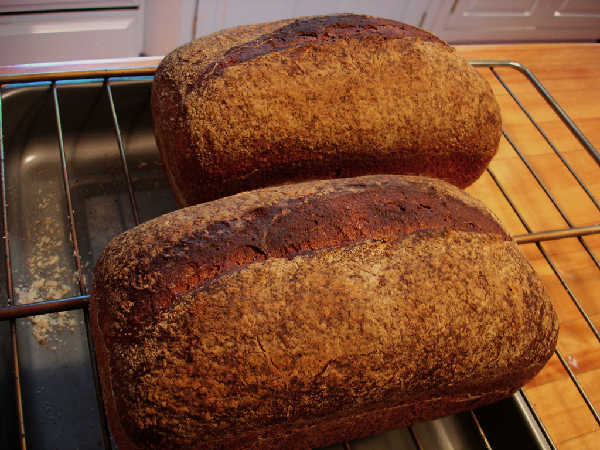
Whole Grain Sourdough Sandwich Bread Loaves

This bread is an attempt to improve on the results from a previous blog entry. This one also has a spelt levain, but it was designed to rise overnight with only a small quantity of 90% hydration white flour starter added. The levain was added to the dough when it was not very ripe, before it had peaked and dipped. The percentage of fermented flour is about 32%, but the less ripe starter results in flavor and dough handling more like what you would expect if you used a lower percentage of fermented flour. The whole spelt flour contributes a characteristic nutty, slightly sweet flavor to the bread. I was very happy with the flavor resulting from this combination of flours and plan to use it more often for this bread and for my favorite mixed grain miche recipe. The hydration is about 83%, which for a whole grain bread is not enough to make it very wet or difficult to handle. However, it is a slightly slack and sticky dough. It should spread out only a little bit after sitting on the counter, not like a very wet ciabatta dough that might spread out more quickly and more or less pour out of the bowl until it has been folded more.
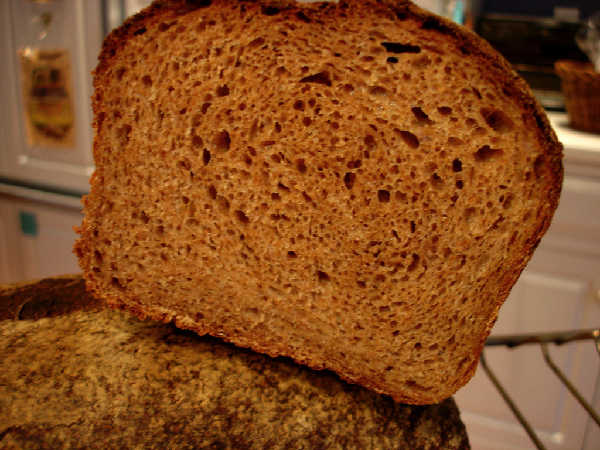
Whole Grain Sourdough Sandwich Bread Crumb

I have posted some photos, videos of my version of doing a "French Fold" and of periodic "Folding" during bulk fermentation, and also a spreadsheet with some further information such as baker's percentages, fermented flour percentages, and hydration.

Ingredients:

Firm Levain:

  • 90% hydration storage starter 11g (0.4 oz) (use any healthy active sourdough starter here, ideally contributing the same amount of fermented flour, e.g. use more like 9 grams of 60% hydration firm starter)
  • whole spelt flour 298g (10.5 oz)
  • water 184g (6.5 oz)

Overnight Soak Ingredients:

  • malt syrup 40g (1.4 oz)
  • diastatic malt powder 5g (.16 oz)
  • whole red wheat flour 397g (14 oz)
  • whole white wheat flour 170g (6 oz)
  • KA rye blend 57g (2 oz)
  • water 581g (20.5 oz)

Final Dough Ingredients:

  • overnight soak from above
  • firm levain from above
  • salt 17g (.6 oz)
  • olive oil 28g (1 oz)

Levain

Mix levain ingredients the night before you plan to bake. The levain is designed to rise by about double in 10 hours at a temperature of 75F. Adjust accordingly if you have different temperatures. It is not a problem if the levain rises by more than double or peaks and dips. However, if it is allowed to ripen too much, you may experience a sluggish rise or other symptoms similar to overproofing sourdough, since the amount of fermented flour contributed by this recipe is fairly high. I added this levain when it had a little more than doubled, but it was clearly not at its peak yet.

Overnight Soak

Mix all the flour and other dry ingredients for the overnight soak together well, so they are fully integrated and uniformly distributed. Mix the malt syrup and water so that the malt syrup is fully dissolved and well distributed in the water. Pour the water into the bowl and use a dough scraper to work around the bowl and mix the flour and water well enough to fully and uniformly hydrate the flour. This should be very easy and take only a couple of minutes of mixing. You can also use a mixer, but use very slow settings and do not overdo it. The idea is to just mix the ingredients. Cover and put in the refrigerator.

Mix Final Dough (next morning)

Chop up the levain into small pieces about the size of marshmallows. Wet your hands and rub the counter with water. Pour the dough from the overnight soak out onto the counter and spread it out like a pizza. Distribute the pieces of levain evenly across the dough. Press them in with the heel of you hand. Roll up the dough in one direction, then the other. Allow it to rest for a few minutes. Again wet your hands and the counter if it needs it. Spread out the dough again like a pizza. Evenly spread the salt and the oil over the surface of the dough and press it into the dough again with the heel of your hand. Roll up the dough in one direction, then the other. Let it rest a few minutes. Spread it out one more time like a pizza. Work across the dough pressing the heels of your hands deep into the dough to integrate any oil and salt that may not have already been well integrated into the dough. Roll up the dough in one direction, then the other.

Let rest for 15 minutes.

Do two or three "French Folds", as shown in the video. Note that this is a good technique for developing the gluten in a wet dough that may not respond well to conventional kneading. Also, note, when I say two or three, I mean literally about 10 seconds, like two repetitions of the motion, as shown in the video. That is all the "kneading" that was done to make this bread. Place the dough in a covered bucket or bowl to rise.

Bulk Fermentation and Periodic Folding

The dough should rise by double in about 4 hours at 75F, but the folding will degas the dough somewhat, so lean toward less than double, depending on how much you are degassing the dough while folding. Also, adjust accordingly if your temperature is different or your starter is faster or slower. Try not to let this dough ferment too long. The high percentage of fermented flour in the dough and the spelt flour will conspire against you if you allow the dough to rise for too long. If in doubt, stop the bulk fermentation and go on to shaping, even if the dough doesn't rise by double.

Fold the dough about three times approximately on the hour, as shown in the "Folding" video. If the dough appears to be wet enough to relax significantly before one hour, then fold sooner. If the dough appears to be fairly stiff and holding its shape or is hard to stretch when you fold it, then fold less often or fewer times.

Shaping

Create sandwich loaves using a typical batard technique or whatever method you prefer. Place loaves in typical loaf pans that are about 9 inches long by 4.5 inches wide. I sprayed the pans lightly with oil beforehand to avoid any sticking.

Final Proof

Allow loaves to rise by roughly double in about 2.5 hours at 75F. Again, adjust your proofing time as necessary for different temperatures or different starter. Once again, avoid overproofing, which is easier to do inadvertently with less tolerant spelt flour and the higher percentage of fermented flour in this recipe.

Bake

I slashed the loaves and baked them from a cold start for 1 hour and 5 minutes at 400F after proofing for 2 hours and 15 minutes. Although the dough is not as wet as some, it still should be thoroughly baked. Otherwise the crumb will be overly moist and the crust will become soggy.

Cool

When the loaves are done, remove them from the pans and allow them to cool on a rack. Do not cut into them, if you can resist, at least until they are no longer warm to the touch.

Results

I was very pleased with the flavor of this bread. The sourdough flavor from the spelt starter is delicious, there is no bitter flavor of whole wheat that I can detect, and the spelt adds a unique and mild flavor. The bread toasts very well and carries any type of topping, since the crumb is open and light but not so irregular that honey or other wet ingredients fall right through it.

JMonkey's picture
JMonkey

Even in the midst of moving, a family’s got to eat. And with the beautiful summer weather we’ve been having in New England (70 degrees F, sunny, low humidity – ah, New England, I’m gonna miss ya), I’ve been cooking an awful lot on the grill, and I finally got around to making grilled pizza. Of course, I did it with whole wheat.

I don’t have the recipe in front of me, but if there’s interest, I’ll add it in the comments sometime later. All I can say is, Peter Reinhart’s advice in American Pie is easy to follow, and makes a fantastic pie. It’s surprisingly simple to do.

To make the pie whole wheat, I simply increased the amount of water by about 2-3 Tbs per cup. I downsized the recipe to make just two pies, and smaller ones at that. A 12-15 inch pie would be too large to fit on one side of the grill, which was a necessity, since I was using the one-grill method.

The key, it seems to me, really is to rake almost all the coals to one side so that there’s a blazing hot side and relatively cool side. I shaped my pies in a rough oval, because they fit better that way, but they got deformed because, even though I slathered the back of my baking sheet with olive oil, it was still not an easy task getting the dough off the sheet and onto the grill.

I was a little too worried about burning the dough. I could have left the second pie on the grill a little bit longer and gotten a better crust. But who’s complaining? It was excellent! For cheese, I used a 50-50 mozzarella-parmesan blend, and then added dollops of goat cheese. Toppings were roasted tomatoes, roasted red bell peppers and dollops of basil pesto.


We’ll be making these again.

Friday night, I’d started refreshing Arthur, my whole wheat starter, at 1-5-5, and did so again on Saturday morning, so by Saturday night, I had about 550 grams of starter at 100%. I decided to set up three things:

  • Whole wheat sourdough hearth bread: 88% hydration with 5% of the flour pre-fermented as starter
  • Whole wheat sourdough sandwich bread: 85% hydration with 10% of the flour pre-fermented
  • Sourdough whole wheat English Muffins: I used this recipe for Sourdugh English Muffins, substituting whole wheat flour for the AP flour and adding 2 Tbs more milk. I used only 2 cups flour for the entire recipe. Good Lord these are easy!


When I woke up, I used what has come to be called “the French Fold” on both breads, and then set about making the English muffins. Did I mention that these are easy? And delicious?

Here they are set on the breakfast table:


And here’s one opened up. I was very pleased with the spongy interior!


I rolled these out a little thin, but they were still lovely. Plus I got 15 muffins, instead of just 12. Next time around, I’ll keep them thicker, though.

Here’s the whole wheat sourdough hearth bread we had for dinner. I was rushed when shaping, so I didn’t preshape and was a little rough. You can see the results in the crumb – not nearly as open as I’d like, but still good for dinner.


We had the bread with a delicious and quick-to-make asparagus-spinich pesto over whole wheat linguini and a white bean and spinach salad. (I like 101 Cookbooks a lot, and her cookbook, Super Natural Cooking, is very good, but she uses a lot of exotic, hard-to-find ingredients. For the salad dressing, I just used some lemon zest, plain olive oil and cider vinegar, and it turned out fine.)

Last, the sandwich bread. I let it ferment a bit too long, but it nevertheless turned out just fine, if a little on the sour side (which my wife says is a feature, not a bug). The blur you see is my daughter’s hand grabbing the slice mid-shot. She’s a growing girl, what can I say?

rcornwall's picture
rcornwall

Hello, my name is RYan and I am a professional chef looking to become a professional boulanger. I am looking for someone with an intimate knowledge of regional european breads. I have many excellent books, but I am looking for some info on harder to find loaves. Does anyone know any one that may be able to help. I am about ready to start making international phone calls.

THanks,

Ryan

pmccool's picture
pmccool

In spite of the crazy, rainy weather of the past week or two, farmers in Kansas and other Great Plains states are trying to get the wheat harvested whenever field conditions allow. On my way home from work this evening, I saw these guys making their way across a field:

As soon as I got home, I gathered up my camera and my 5-year old grandson and headed back to the field so that he could see what a combine looked like and what it did. And to grab these pics, too. Yes, those are office buildings in the background of the picture, above. Johnson County is home to a number of Kansas City suburbs and more farm land gets paved every year for subdivisions, shopping centers, office parks, etc. Hard to complain about it too much, since I'm part of the problem.

Here's a closer shot of the combine as it crossed our line of sight:

This last shot shows one of the two combines at work in the field stopping to unload into a waiting semi-truck trailer:

In this shot, you can see a traffic light and part of a house in the background.

My grandson was quite impressed by the big machinery, even though he didn't completely understand what was going on. I tried to explain how the kernels from the stalk of wheat that I plucked for him were the part of the wheat that was being harvested and that it would be milled into flour for breads, cookies, pies and so on. I know he understood the food end of it and he knows what flour is; I just don't think he has a concept of how something growing in a field could be turned into those things. It will come, eventually. At least he has had an introduction to one of the steps in the process.

Oh, and for the curious among you, it's winter wheat. It was planted in October or November of last year.

PMcCool

meedo's picture
meedo


Makes 16.

A traditional bread recipe in Arabic gulf area, bakes in a special tanor build in the ground.

Serve in weddings, special occasions (Eid al adha), or the religion occasions, with coffee and dates.

This recipe is so healthy and full of nutrition.

For the dough:

5 1/2 cups all purpose flour.

1 1/2 cup wheat bran.

1 tablespoon yeast.

1/2 teaspoon baking soda.

1/4 cup sugar.

1/3 cup date molasses.

A pinch of saffron socked in 2 tablespoon of rose water.

1 cup pitted dates socked in 1 cup of boiling water (let it cool before use it).

3/4 cup water.

In a small bowel mix together:

2 tablespoons boiling water.

2 teaspoons sugar.

1/2 teaspoon baking soda.

 Toasted sesame seeds.

(dates)


(date molasses )

1)To make the dough mix the entire ingredient, knead the dough for 10 minutes. Place it in a bowl, cover, let rest for 1 hour.

2)Divide dough into 16 pieces,Shape each into a smooth ball.

3)Flat each to make a flat round square, then brush each with the (sugar and baking soda mixture), make indents with fingertips.

4)sprinkle with sesame seeds, Place on baking sheet, Cover let rise 30 minutes.

5)Bake at 350 for 20 minutes.or until it golden brown.

http://arabicbites.blogspot.com/

AnnieT's picture
AnnieT

After a few disappointing efforts I have to report that yesterday the dough fairies were on duty. I really like the firm starter PR calls for, and as I dropped the pieces into my mixing bowl the flour flew! Next time I will be more careful. I mixed all together and left it alone for 45 minutes and then did a Mike Avery fold and left it again. The dough was already feeling good and I attempted a French fold which went pretty well. Not sure whether it is allowed to mix methods like that? Then I went out and planted some new perennials and watered eveything - MiniOven did tell me to do something else, and I now know that I haven't been letting things ferment long enough. After lunch I shaped the dough and used the TT rolled towel and parchment couche, and again went off and let things take care of themselves. Baked the loaves on my stone with steam and got terrific oven spring. Need to work on the scoring - I thought I had cut deep enough but didn't get any ears. Baked the loaves until good and dark and 205*, but the crust didn't stay crisp. I was so tickled I had to share all of this - the family get the glazed eye look when I rave on, so I thought the bread fanatics would understand. Thanks for listening, A

mmcadory's picture
mmcadory

Started last week trying my hand at capturing the elusive wild yeast using an approximation of the method espoused by breadtopia.com, and it worked.

  • Day 1 started with 3 Tbsp King Arthur unbleached bread flour (KAubf) and 1/4 cup pineapple juice (paj) in a tupperware container stirring until the flour was hydrated. The consistancy could best be described as"stringy" and the odor was distinctly flour and pineapple. Left on counter top with lid laying but not fastened. Ambient room temperature at 75F.
  • Day 2 remembered to stir the experiment. Pre-stir looked pretty bad. Ever seen spoiled milk seperate into curd and whey? Very similar, but the smell was still raw flour and pineapple, with a bit of a sour odor. Continued ambient temp 75F on counter w/o lid snapped.
  • Day 3 still no visible action, looking bad but smelling more like I remember my previous attempt. Added another 3 Tbsp of KAubf and 1/4 cup paj. Decided the environment might need an adjustment in pH to help any wild beasties in the neighborhood get more active, so I added 1/4 tsp of apple cider vinegar (acv).
  • Day 4 looking fizzy and clumped. Definately have some yeast action. Now I really smelled what I felt to be the "right" smell. Thin crepe like consistancy with some minimal gluten strings. Added 3 Tbsp. more flour and tried to eyeball 1/4 cup of filtered water, but got a little over zealous and probably poured more like 1/2 cup. So to readjust I added another 3 Tbsp of flour.
  • Day 5 woke early and was in the kitchen futzing around and remembered the capture experiment. Looked frothy! Disco! The starter had lost the "sour" smell from earlier and I decided to add another dose of half a cap of acv. I also felt that maybe a little honey, like 1 Tbsp, might give some results. You know give those hard working beasties a little easy food.
  • Day 5 late afternoon and boy what a difference a few hours makes. Triple in volume very frothy and looking like all the pictures on the web. Decided I had enough of a head start to begin moving the from the Starter stage to bulking up to making bread. Took 200 g of the starter and added 200 g of KAubf and 200 g purified H20.
Now awaiting the results.
mse1152's picture
mse1152

Hello,

There are a few of us living in San Diego. Susan (of upside down Pyrex bowl cloche fame) and I (of no particular fame that we can talk about here) have gotten together a couple of times. Last week, we did a field trip to a place called Lakeside Poultry that no longer sells poultry (???), but does sell restaurant supplies, including 50 pound bags of flour. Susan bought a bag of Gold Medal Harvest King, and I bought a bag of Eagle Mills organic bread flour (from ConAgra, not exactly your old time mill).

I have been using Bob's Red Mill flours for years, so I decided to do a side-by-side bakeoff, making one loaf of sourdough from Bob's (BRM) and one from the new Eagle Mills (EM) flour. BRM is organic unbleached flour with a protein percentage of 11.75. The EM flour has 11 percent. Neither is malted. I used the recipe I've posted earlier here, except I used all unbleached flour in the sponges. I started a sponge for each batch of dough with one teaspoon of my 100% hydration white starter, created from the BRM flour. Due to yet another brain lapse, I neglected to photograph the sponges. For the record, BRM looked a bit more robust, thicker, but both had very good bubble populations. Here are pics of the two doughs just after the initial mix (BRM is on the left):


I did four stretch and folds, with 45 minutes between each (and before the first one), for a total fermentation time of about four hours. Both doughs were a bit tacky, and the EM dough rose a little more throughout than the BRM. After the fourth S&F, the dough rested for about 25 minutes before shaping. The BRM dough looked and felt smoother after shaping, as seen here (BRM on the left):


The loaves rested 30 minutes after shaping, then went into the oven at 425F (convection). I poured boiling water into a cast iron pan at (well, almost) the same time. I wasn't happy with the look or feel of the BRM loaf; it didn't take the scoring well, and the knife just dragged through the dough. It was also flatter looking than the EM. But the oven spring fairies were on duty! Here's the BRM loaf:


And the EM loaf:


I haven't used that center slash before, and I think I like it better than 2 or 3 diagonal ones. Both loaves had very good oven spring and color. They had decently open crumb for a 65% hydration bread.

Here's the BRM crumb:


And the EM:


So I'm not seeing much difference so far, are you? The biggest difference is the price; I order the organic Bob's Red Mill flour online, and the shipping doubles the cost of the flour ($12.00 for 20 lb. of flour plus $14.00 shipping). The 50 pound bag of Eagle Mills cost just over $18.00. Duh...

After all this, how did they taste? Well, in a side by side tasting, the clear winner is...um, well I think I liked...er, uh, actually, they tasted very similar! And this is actually good news, because I don't have to spend so much on flour anymore.

It was a fun experiment, and I was even able to keep track of which dough blob was which throughout the whole thing.

Sue


zainaba22's picture
zainaba22

milk mixture:

1 cup milk.

1 tablespoon olive oil .

Filling:

450 g Feta Cheese .

chopped fresh mint.

1 teaspoon sumac.

1/2 teaspoon olive oil .

 *mix the Filling ingredients.

For dough :

2 1/8 cups white flour.

1 cup whole wheat flour.

1 1/4 cups warm water.

1 tablespoon dried mint.

1 teaspoon dry yeast.

1/4 teaspoon sugar.

1/2 teaspoon salt.

1/4 cup olive oil .

1)place all ingredients in the bowl of mixer ,beat 10 minutes to make a soft dough.

2)Cover and let rise for 30 minutes.

3)Divide dough into 8 pieces.

4)shape each piece into a ball.

5)Roll each piece through pasta machine set on thickest setting,fold dough in half,roll through machine,repeat rolling several times,dusting dough with extra flour when necessary.

6)Roll dough through machine ,adjusting setting so dough becomes thinner with each roll,dust with extra flour,when necessary.roll to second thinnest setting (1 mm thick),making sure dough is at least 12 cm wide.

 7)Cut into 2 pieces.

8)Brush it with milk mixture.

 9)Place 1 tablespoon of Cheese mixture,roll pastry over filling.

Video


 10)Brush the top with milk mixture.Cover and let rise for 20 minutes.

6)Bake at 400 for 20 minutes.

zainab

http://arabicbites.blogspot.com/

Pages

Subscribe to Recent Blog Entries