The Fresh Loaf

A Community of Amateur Bakers and Artisan Bread Enthusiasts.

Recent Blog Entries

tattooedtonka's picture
tattooedtonka

Well after reading some posts on here comparing different books recipes on a given bread, I gave one a test.

I have been using BBA's recipe for Poolish Ciabatta, with wonderful results in outward appearance.  The crumb was not as open as I hoped though.

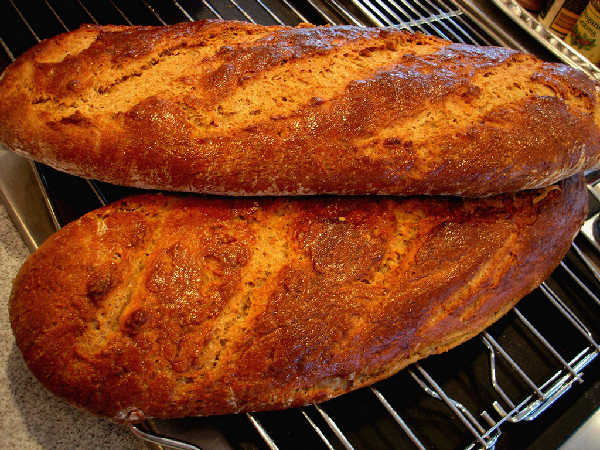
So today I made two Ciabatta w/ Olive Oil from Hamelmans "Bread" book.  The dough was much wetter than I had expected.  And all the recipes in the book print times for mixing with a stand mixer, but not if you are doing it by hand.  So I tried to make an educated guess.  The crumb is o.k. and I have much larger holes in the crumb than I did with BBA's, but I believe I underbaked a little.  I didnt use an internal temp probe to monitor temp, I thought it wouldnt be very accurate with all the large holes I knew this would make.  So I tried to go as long as I could without completely blackening the crust.  Here is what I got.

The flavor of these is much different than BBA's as well.  And I realize there would be some difference due to the Olive Oil being added, but there is a big difference to me.   It tastes good, so I wont complain to much, I just have to work on the times better in the future.

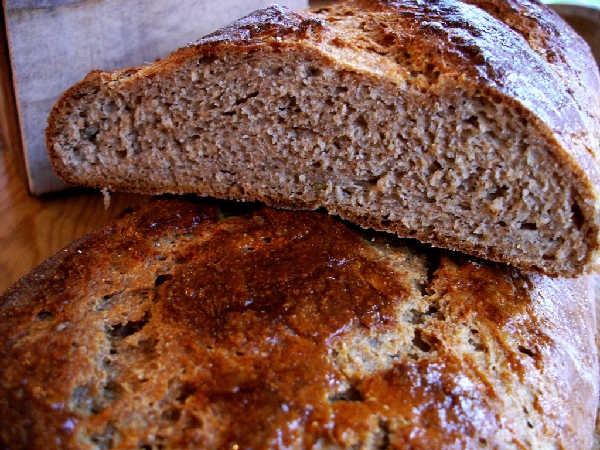
While I was at it I made two loaves of Hamelmans Pain Rustique.  These came out great.  The guesswork I did on mixing times on this worked out well.  I am very pleased with the feel of the crust, and the holes in the crumb.  Here they are.

TT

tigressbakes's picture
tigressbakes

rosemary sourdough

This is Rosemary Olive Oil Sourdough from Nancy Silverton's book. I used the starter that I have been growing since Feb - my first one (not Nancy's formula) and I have to say I am proud of this little starter! Oven spring!

I tried the La Cloche top on a preheated stone for 20 minutes. I sprayed the top of the loaf and the inside of the La Cloche top when I put it in and boy did it get crispy!


Rosemary sourdough crumb

It came out great! Moist with a nice light sourdough taste, I even think next time I would use slightly less Rosemary than the recipe called for because it is just a bit overpowering to the delicate sour taste.


Rosemary sourdough top

My slashing technique needs help!

mse1152's picture
mse1152

I've been wanting to make this recipe for a couple of weeks, and finally made time for it tonight. The recipe is at:

http://www.theartisan.net/bredfrm.htm

I can't create a link to the exact recipe, but you can click on 'Pane Ripieni' in the left column to see it. It's really versatile...you can create any filling you want. I made it with Swiss chard, garlic, and broccoli, and mozzarella here and there. I sprayed it with olive oil and sprinkled sesame seeds on, but most of them jumped off as soon as I touched a knife to the loaf. Hmmm, maybe an egg wash next time. I meant to include crumbled feta as well, but was overcome by toddler-induced brain damage, and just forgot. It's Friday, after all...

oooooohhhhhh!

oooooohhhhhh!


A Little Slice of Heaven

A Little Slice of Heaven

Give it a try. It's easy and very satisfying, especially with your favorite wine. mmmmmmmmmmm...!

Sue

Thegreenbaker's picture
Thegreenbaker

I looked here for a recipe for pumpkin bread and all I found was the chemically leavened one and a link to a yeasted recipe that my computer wouldnt open :S

Monday night for me is a seasonal feast and we are eating all the seasonal vegies like pumpkin, squash, apples and corn. Kind of odd considering that in the northern hemisphere ya'll are eating that stuff in October/november. :) but, it IS Autunm turning winter down here in the deep deep south! (Aust)

So, I searched google for a recipe and they all have sugar and spices in them. I found a few but am now getting some ideas.

I am going to try "my own" recipe possibly using spelt flour and I think a little bit of honey would be nice....... and will post the process and result (good or bad) here. :S fingeres crossed!

I've 2 days to work it out in my head........

I love cooking :D and baking :D


thegreenbaker


bwraith's picture
bwraith

Marcel's Grandmother's Potato Bread (Kartoffelbrot)
Marcel's Grandmother's Potato Bread (1)Marcel's Grandmother's Potato Bread (1)
Marcel's Grandmother's Potato Bread (2)Marcel's Grandmother's Potato Bread (2)

Marcel's Grandmother's Potato Bread (Kartoffelbrot)

We had a German exchange student stay with us for a couple of weeks recently. Marcel is about 17 years old, and we hit it off great. He shares an interest with me and my oldest son and daughter, who are about the same age as Marcel, in physics, math, computers, and music. He is one of the nicest, most polite young men I've met. One day I was making some sourdough bread in my kitchen, and I noticed Marcel paying very close attention to the process. He then mentioned that his grandmother, who lives with his family in Germany, frequently bakes breads, and he is a big fan of her breads. We quickly discovered that bread was another of our shared interests. He described going to a mill near his village and buying spelt flour and rye flour of a coarseness specified by his grandmother for her breads. What a difference from buying over the internet, as I tend to do here in NJ. So, I asked if he could recite some favorite recipes for me. He then got on the phone with his grandmother, and she emailed us two recipes, one of which is described here, and one will be described in a separate blog entry (spelt bread). We had quite a time translating German baking terminology into English for my use, including struggling with the word edelhefe and with correct translations of some or the names of spices. Also, there was some confusion over methods of handling the dough, but eventually, I felt I had enough information to try these recipes. When Marcel returned to Germany, he also forwarded to me some photos he took of his grandmother's process, although only for the spelt bread, and not for this potato bread recipe.

I have photos of my process for this bread and the spelt bread recipe. Since I did both at the same time, there is an intermingling of the two breads, but I hope it will be clear what is going on with each bread.

Marcel's Grandmother's Potato Bread (Kartoffelbrot) Recipe

Ingredients:

  • 400 grams whole spelt flour (I used Heartland Mills Spelt Flour)
  • 150 grams whole rye (I used KA Pumpernickel)
  • 300 grams water
  • 400 grams peeled, boiled, mashed potatoes
  • 12 grams salt
  • 25 grams butter
  • 1 tsp caraway seeds
  • 1/2 tsp anise seeds
  • 1/2 tsp fennel seeds
  • 3 egg yokes, stirred up
  • 1 package active dry yeast (or 1.5 tsp yeast or 30 grams fresh yeast)

Autolyse, Yeast Proof, Prepare Potatoes

Mix the flours and water aside and allow to sit for about 30 minutes (autolyse). Mix 1/4 cup flour, 1/4 cup water warm water, and yeast in a bowl and allow to sit until very frothy (yeast proofing), about 30 minutes. Peel and boil potatoes until soft, then drain and mash them up.

I actually had no potatoes in the pantry, so I used some potato flakes mixed with water to about the consistency of mashed potatoes. I realized later in the mixing stage this was probably too much water, though I suspect that potato bread like this should seem very wet, based on reading floydm's recipe.

Mix and Knead

Mix together the results from the autolyse, the yeast proofing, and the mashed potatoes along with the salt, spices, and butter. In this recipe, because I used mashed potatoes made from a box of potato flakes, the dough came out very, very wet. I was finding myself having more difficulty handling this dough than I normally have with my very wet miche doughs. So, I added some flour, trying to compensate for what was probably way too much water, and I ended up adding something like 1.5 cups more flour to the dough. Unfortunately, this means, it's tough for me to tell you what the consistency of the dough as specified in the actual recipe given to me by Marcel's grandmother really is, nor do I have pictures of it from her. Anyway, I worked the dough a little bit using a folding technique that one might use for a very wet dough. After about 3 or 4 minutes, it seemed to come together into a very supple but workable dough.

Bulk Fermentation (about 2 hours)

Place the dough in a rising bucket or covered bowl and allow to rise. I did the bulk fermentation above my coffee machine where the temperature is about 80F. It took a little longer than 1.5 hours to rise by double, as specified by Marcel's grandmother.

Kneading, Shaping, Final Proof (15 minutes), Preheat oven to 400F

Take the dough out of the container onto a bed of flour. Stretch and fold it a few times. Let it rest a few minutes. Stretch and fold again, and let it rest. I did this because Marcel's grandmother says to knead it with some flour a little bit. This was Marcel's translation. It seemed like the opportune moment to fold the dough, given that it had risen and still seemed fairly wet. The folding did help the dough to come back together, so I then formed two long batards. The recipe says "form two long breads", according to Marcel. I did this very similarly, once again, to JMonkey's video on shaping a whole wheat dough. However, I just made them a bit longer and skinnier, based on the instructions. Put them in a couche, similar to what one would do for baguettes and allow to rise for 15 minutes covered with towels.

Preheat oven to 400F while final proof continues. In my case the oven was already hot from the Dinkelbrot bake.

Marcel's grandmother says to let it rise 15 minutes under a towel. I realize this was just the right thing to do. However, being nervous this was not enough time, based on other breads I've made, I let them sit a few more minutes - maybe 25 minutes or so. This was a mistake, as they puffed up so quickly, that the skin on the surface was ripping slightly here and there. So, sticking to the instructions might have been perfect. Darn, but will do better next time.

Place Loaves on Peel

Place the loaves on a peel or upside down jelly roll pan on some parchment. The loaves were big and floppy, and I had let them go too long in final proof, so this was harder than it sounds. Paint the loaves with egg yoke. Slash the loaves.

I suspect the loaves were too wet and allowed to rise too long in final proof. The result is they were spreading out very quickly on the peel, and I took a little too long painting them and slashing them because I ran out of yoke and had a hard time moving the floppy loaves to the peel and whatnot. Again, will hope to do better with a little less water or real potatoes and less final proof next time.

Bake

Place loaves in oven preheated to 400F, and bake for about 30 minutes. Internal temperature was 210.

The loaves did spring a little, but mostly they spread. I guess the same notes as above apply - reduce the water to make a little bit stiffer dough and don't let it rise for long in final proof.

Cool

Place loaves on rack to cool completely before cutting into them.

Results

Like the Marcel's Grandmother's Spelt Bread, this bread tasted just great. The crust had a nice shine and color as a result of the egg yoke. Marcel says there is a particular look to these loaves, due to the egg yoke coating, that he says is typical of breads from his village in Germany. The spices add a nice touch to the already good flavor of the spelt and rye. I've decided German breads, at least the ones Marcel's grandmother makes, are wonderful after trying her dinkelbrot and kartoffelbrot recipes. Thanks to Marcel and his grandmother for sharing these recipes with me.

bwraith's picture
bwraith

Marcel's Grandmother's Spelt Bread (1)Marcel's Grandmother's Spelt Bread (1)

Marcel's Grandmother's Spelt Bread (2)Marcel's Grandmother's Spelt Bread (2)

Marcel's Grandmother's Spelt Bread (Dinkelbrot)

We had a German exchange student stay with us for a couple of weeks recently. Marcel is about 17 years old, and we hit it off great. He shares an interest with me and my oldest son and daughter, who are about the same age as Marcel, in physics, math, computers, and music. He is one of the nicest, most polite young men I've met. One day I was making some sourdough bread in my kitchen, and I noticed Marcel paying very close attention to the process. He then mentioned that his grandmother, who lives with his family in Germany, frequently bakes breads, and he is a big fan of her breads. We quickly discovered that bread was another of our shared interests. He described going to a mill near his village and buying spelt flour and rye flour of a coarseness specified by his grandmother for her breads. What a difference from buying over the internet, as I tend to do here in NJ. So, I asked if he could recite some favorite recipes for me. He then got on the phone with his grandmother, and she emailed us two recipes, one of which is described here, and one will be described in a separate blog entry (potato bread). We had quite a time translating German baking terminology into English for my use, including struggling with the word edelhefe and with correct translations of some or the names of spices. Also, there was some confusion over methods of handling the dough, but eventually, I felt I had enough information to try these recipes. When Marcel returned to Germany, he also forwarded to me some photos he took of his grandmother's process.

I have photos of my process for this bread and the potato bread recipe. Since I did both at the same time, there is an intermingling of the two breads, but I hope it will be clear what is going on with each bread.

Marcel's Grandmother's Spelt Bread (Dinkelbrot) Recipe

Ingredients:

  • 800 grams whole spelt flour (I used Heartland Mills Spelt Flour)
  • 500 grams warm water
  • 16 grams salt
  • 2 tsp anise seed
  • 2 tsp caraway seed
  • 1 cup nutritional yeast flakes (edelhefe in German, I used KAL brand)
  • 1 packet active dry yeast (1.5 tsp instant yeast)
  • 1 tsp honey
  • shelled, roasted, unsalted pumpkin seeds or sunflower seeds (I used pumpkin seeds)
  • butter for greasing the loaf pan

Autolyse and Yeast Proofing

Mix water and flour in bowl until flour is hydrated, and set aside for 30 minutes. Mix a small amount of flour with 1/2 cup of warm water, yeast, and the honey. Let sit for about 1/2 hour until it foams up. When I did this, the foam about doubled or tripled in volume and was very foamy.

Mix and Knead

Mix in salt, spices, nutritional yeast flakes, the contents of the cup with the yeast, flour, water, and honey and mix in mixer or by hand. I found the dough a little dry at this point, so I added just a touch of water to facilitate mixing the ingredients. The dough was fairly stiff but somewhat sticky, even after the addition of a small amount of water. I kneaded it for just a couple of minutes to fully mix all the ingredients and to bring the consistency to more like a dough. The recipe Marcel's grandmother gave me doesn't specify any kneading at all. I suspect that is correct, and that I should actually have just stopped after minimal mixing, based on a photo she sent me of what the dough looks like after mixing. Mine rose more than hers appeared to, and I think the bread may be meant to be a bit more dense than what I came up with doing what I did here.

Put Bread in Loaf Pan

I greased the sides of a 9 inch glass loaf dish with butter and sprinkled pumpkin seeds onto the butter. The seeds barely stick to the sides, but they do stay in place. I then formed a stumpy batard, which I shaped in much the same way that JMonkey did in his whole wheat bread shaping video. Again, I may have done more shaping and kneading than was intended based on the pictures, as I look at them in retrospect. Marcel's grandmother has a picture that I now see may have been more significant than I thought where she simply dumps the dough straight out of the mixer and into the loaf dish. I believe there is less kneading and mixing intended by Marcel's grandmother than I did in my version here.

Bake - No Preheat

Slash the loaf down the center, and place the dish in a cold oven and turn the temperature to 400F for 90 minutes. The bread rises nicely as the oven preheats. I forgot to slash the loaf, so I tried to do it after about 15 minutes. The crust was already forming. You can see the result from the pictures, which is not all that pretty. Sorry, it would have worked beautifully to slash before putting it in the oven, even though the oven started out cold. Oh well, I'll do better next time. The internal temperature of the loaf was about 205F after 90 minutes, and the crust was quite thick, hard, and dark.

Cool

Allow the loaf to fully cool. I dropped it out of the dish and let it cool on a rack.

Results

The crust that results is delicious. This bread tastes just great to me, and I generally have a big bias toward the flavor of sourdough breads. However, this yeast raised whole grain bread was just delicious. I realize I must be missing out on some wonderful breads in my baking life by not paying enough attention to German breads. Thank you Marcel, and Marcel's grandmother for sharing this wonderful recipe, for sending me photos, and for spending a lot of time and effort translating and explaining the ingredients and procedures that I was not familiar with.

ehanner's picture
ehanner

Yesterday morning I started a batch of my basic all white SD dough. I had meant to include some white ww and a little rye for flavor but I was having a senior moment and so today we are enjoying white sourdough. I have been experimenting with varying the amount of starter in the batch to effect the final consistency. I find that the smaller the amount of starter I use, the more slack the dough is when it's time to form. With that in mind one could simply add more flour to stiffen up the dough but in my experience the condition of the starter is not a stable value so my thought is that I should learn to adjust the amount of starter based on how healthy it is at the moment to arrive at a consistency I can work with.

Today I am using 50g of active starter to rise 1100g of AP flour (Harvest King) at 65% hydration which works out to 710g of water. This is double the amount I have been using for this bread. The usual 2% salt is 22g. I mixed all ingredients in a bowl by hand and frisaged on the counter, gathered into a ball and let it rest for an hour covered.

After the rest, the dough is smooth and elastic. I now get to enjoy the maneuver I feel is the single most helpful in the kneading step, the French Fold. In just a few moments of French folding one can transform a slack untrained mass into a well formed and tensioned dough. There used to be a video here showing this maneuver but alas I think it was taken down by the poster. Anyway the bulk ferment is planned for 12 hours in the oven with the light on.

Dividing, shaping, PAUSE 10 mins, and shape into boules for the final proof of about 1 hour. With a little creative cutting of parchment I can manage to get two boules in the oven on a cookie sheet. I boiled a cup of water and placed it in the oven alongside the dough. After an hour, I pulled the water glass, slashed and baked from cold at 425F for 30 minutes + -.

The dough spread like a turtle and I feared I would be submitting these as "out takes" but to my constant surprise the oven sprung as advertised and all is well after all.

Eric

TinGull's picture
TinGull

And got a nice bit of baking out of the way since Monday. I re-activated my starter on Sunday afternoon and started making some doughs on Monday morning. The boules I had done on Tuesday, but wanted to see for myself if a longer fermentation really did result in blistering of the loaf. So..I retarded the doughs for the olive and pepper/cheese loaves in the fridge from Monday until this morning (wednesday) and cooked em off after forming them last night. AWESOME! Totally got the blistering I love so much. Here's a little chronicle.

The starter activated

Gloppy dough before I kneaded...

After the kneading...

The top and crumb...

and the proofing and cooked loaves of the olive and pepper/cheese bread

CBudelier's picture
CBudelier

Starter A and Starter B departed this earthly plain yesterday afternoon after a brief and uneventful life.  After a short memorial, they were buried at sea.

Having wiped a tear from my eye (maybe if was just flour dust), I decided that just because these 2 starters didn't take doesnt' mean that I need to stop the experiment.  So, before the disposal had stopped running, I mixed up 2 more batches of starter.  These are being called Thing 1 and Thing 2 (I'm a Dr. Seuss fan).  They are a 30/30g mix of rye flour and water.   This time I covered both of them with a damp rag instead of cheesecloth hoping that they won't dry out.  Thing 1 resides on the refrigerator, and Thing 2 is taking shelter in a dry spot outdoors so it doesn't drown during our current rain storm.

Today is day 2, so I gave them both a quick stir and put them back in their places.   Tomorrow will be their first feeding.......we'll see what happens. 


redivyfarm's picture
redivyfarm

In spite of all the good advice, I have messed up again.  This loaf overproofed and no one suggested that I brush egg and milk on the top before baking. I thunk that up all by myself! It looks kind of nice-

Sourdough NK #3

Sourdough NK #3

Sort of like the Mexican pan dulces we ate as kids, but don't you believe it!  Each of those little chunks in the mosaic are suitable for paving the driveway. And the crumb-

Sourdough #3 crumb

Sourdough #3 crumb

Just a few little worm holes, twisting and turning like, well never mind what its like. I know I can do better. In the mean time I'm going to do some reading and get a bit of theory in my noggin instead of mucking around like, well never mind what I'm like.

Pages

Subscribe to Recent Blog Entries