The Fresh Loaf

A Community of Amateur Bakers and Artisan Bread Enthusiasts.

Recent Blog Entries

The Roadside Pie King's picture
The Roadside Pi...

My shaping could have been tighter, for a more vertical oven spring.

Many thanks to Mr Leo Maurizio at the Perfect loaf for another great formula. Formula link below.

Maurizio Traditional Sicililano sourdough semolina bread


itsbarbarino's picture
itsbarbarino

I've been a long time lurker on this forum. I started baking back in 2018, getting really into rustic/lean breads (I made the Bouabsa Baguette 3 times a week during the early COVID days), and over the last year have expanded into more adventurous flavors and pizza's. This forum is such an amazing treasure trove of experience, and you guys have taught me so much over the last 5 years, so I figured I'd share this here. 

About a month ago I decided to try my hand with sourdough. I tried to cultivate a starter in May 2020 but had some trouble (in hindsight, I think I was just impatient/unexperienced.) At the time there were issues getting flour in Atlanta, so I decided to just use yeast. My second/more recent starter attempt has had it's ups and downs, but after some patience and about a month it seems to be reliably doubling in about 3-4 hours. I had just ordered some flour from Central Milling, so I decided to give it a shot. Formula was:


Water - 67% (469g)

Salt - 3 ish% (18g)

Starter - 20% (140g)

Central Milling Organic Type 85 Malted - 100%, (700g)


67% is my sweet spot right now. I struggle with shaping and gluten development still, so I try to stick below 68% so I don't end up with flat boules (of which I've made many.) 


Starter

My starter began doubling within about 4 hours, so I decided to build a levain. That afternoon it looked really promising, bubbly and making moves. I gave the flour and water an autolyse for ab an hour, then mixed in the starter and salt. I did about 5 minutes of slap and fold/rubaud method hybrid motions- it seemed like the dough was too small to do a 2 handed S&F, but I wanted to make sure I was actually developing something (as I said, I usually find out during shaping that I didn't develop the dough enough.) I rested it 5 minutes, then repeated once more. After that I gave it stretch and folds in the bowl every 30 minutes for 2 hours, then let it rest another 3 hours in the bowl. It had grown a little and so into the fridge it went for an overnight BF. 


When I got the dough out this next morning, it looked the exact same. I was pretty frustrated- my starter seemed so active, but I guess it was no match against the fridge? I took the dough to rest in our garage, which was about 80f- 85f.

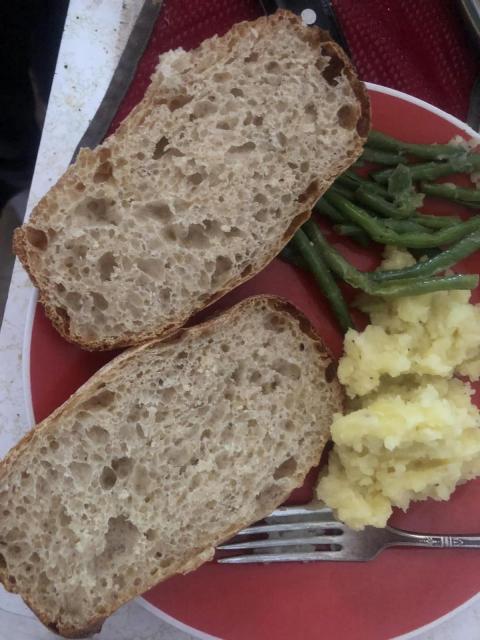
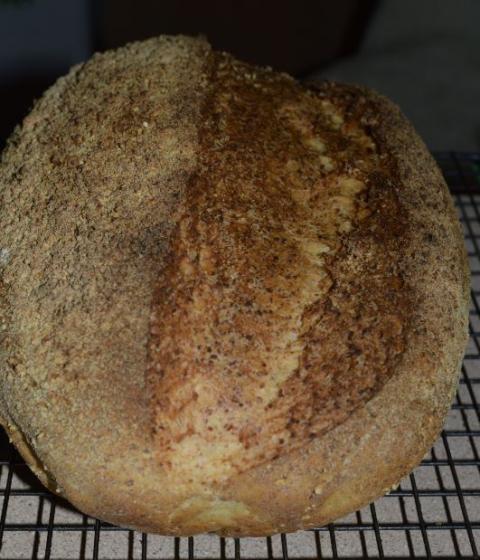
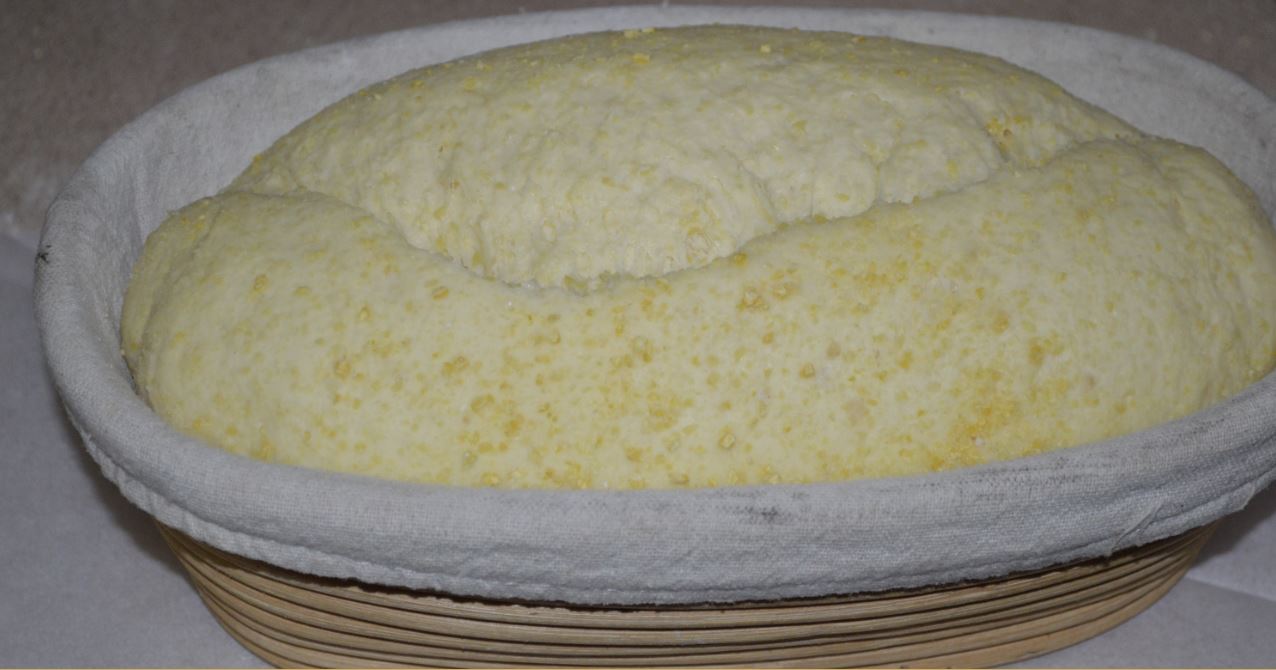
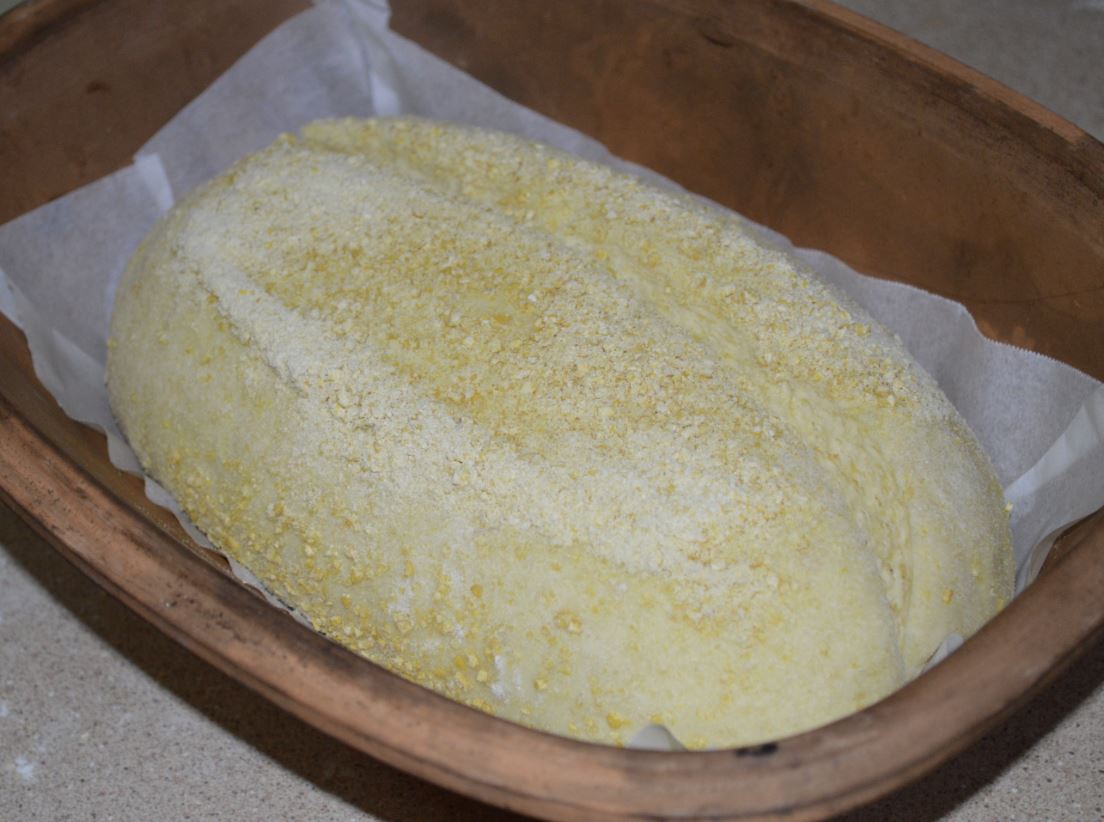
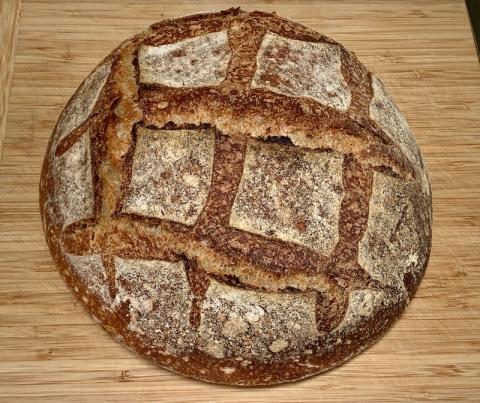
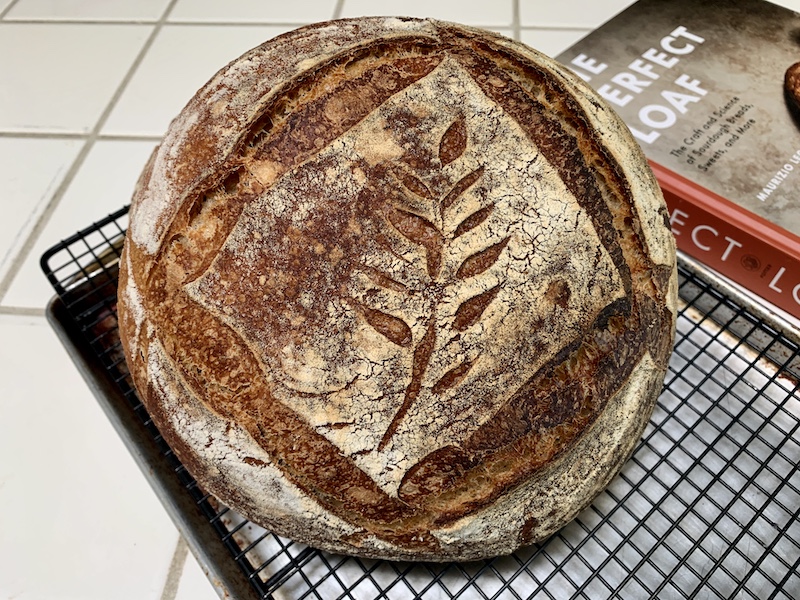
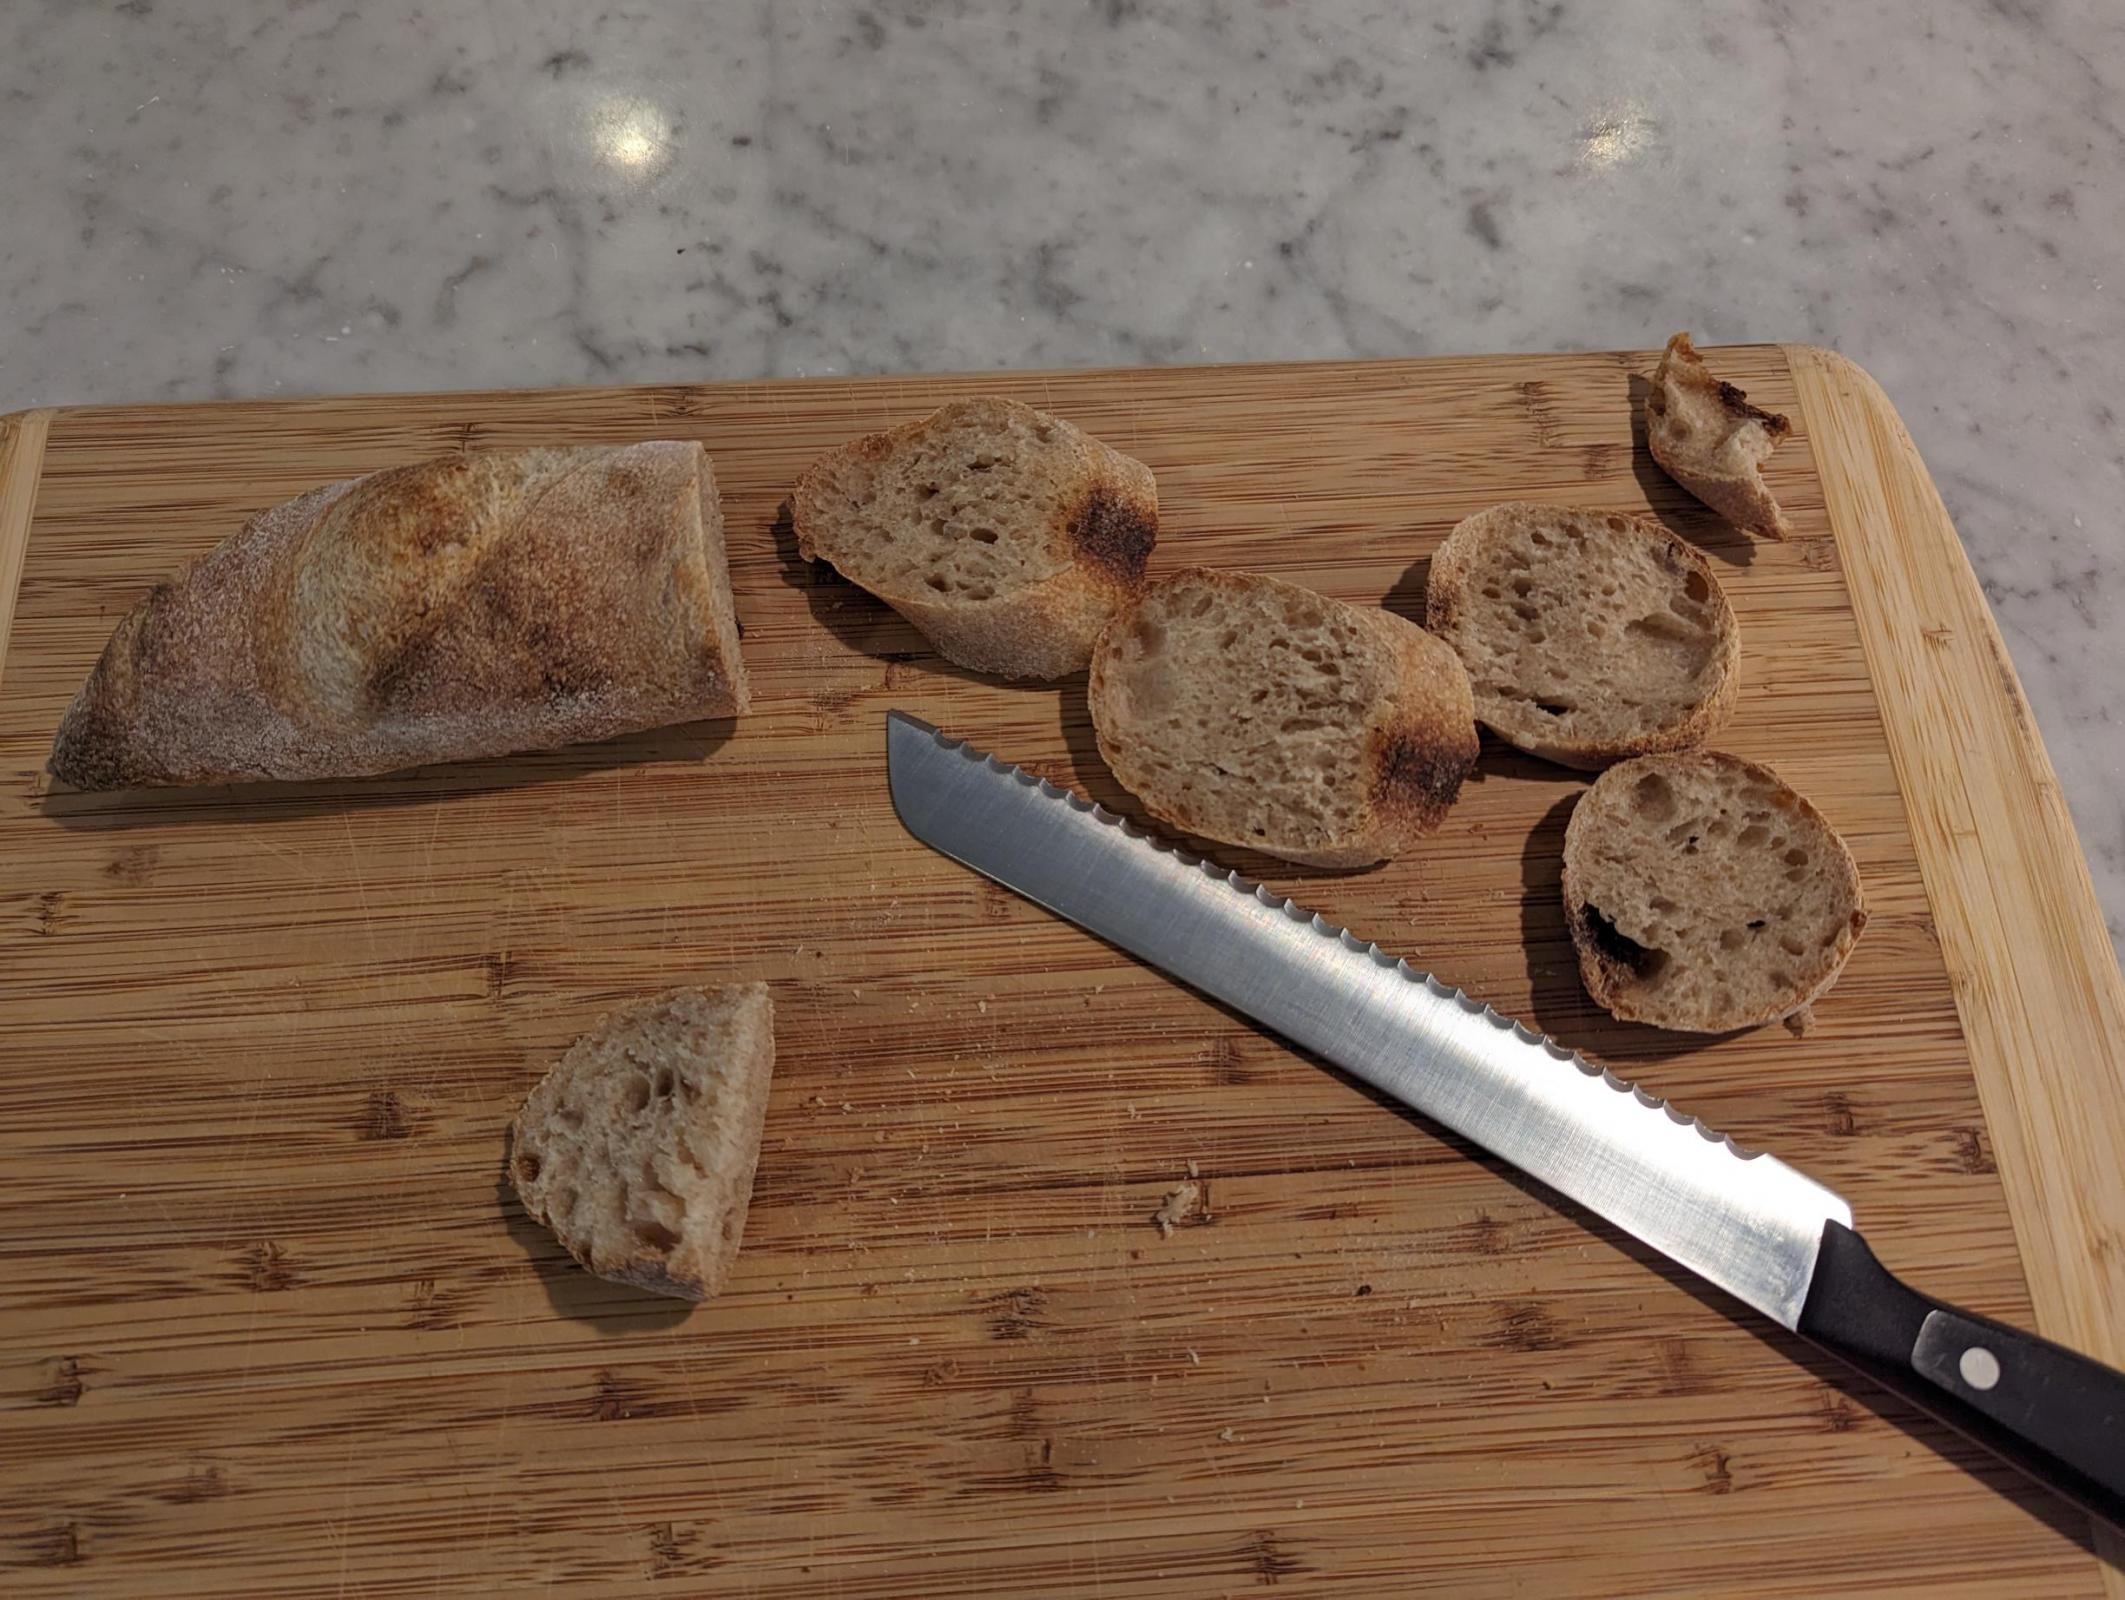
It rallied thankfully, and 4 hours later this was how it looked. I scraped it out and gently pre-shaped for a batard. I realized it wouldn't fit in my clay cooker, so I snipped of a tail of the dough. 20 minutes bench rest, then final shaped a batard and a 200g demi baguette. The batard went into a basket, baguette in the couche. I gave the baguette about 3 hours to prove, scored, and put on the stone with a loaf pan of steaming towels. It baked for 20 minutes at 450f and came out looking pretty good. We have a gas oven that runs pretty regularly and I struggle to get thin crusts from it, but this one felt nice.

After the baguette came out, I put the clay cooker in to get it up to heat. I slashed and loaded, and put it in at 450f for 20 minutes. I pulled the top off and baked for another 20 at 400f.

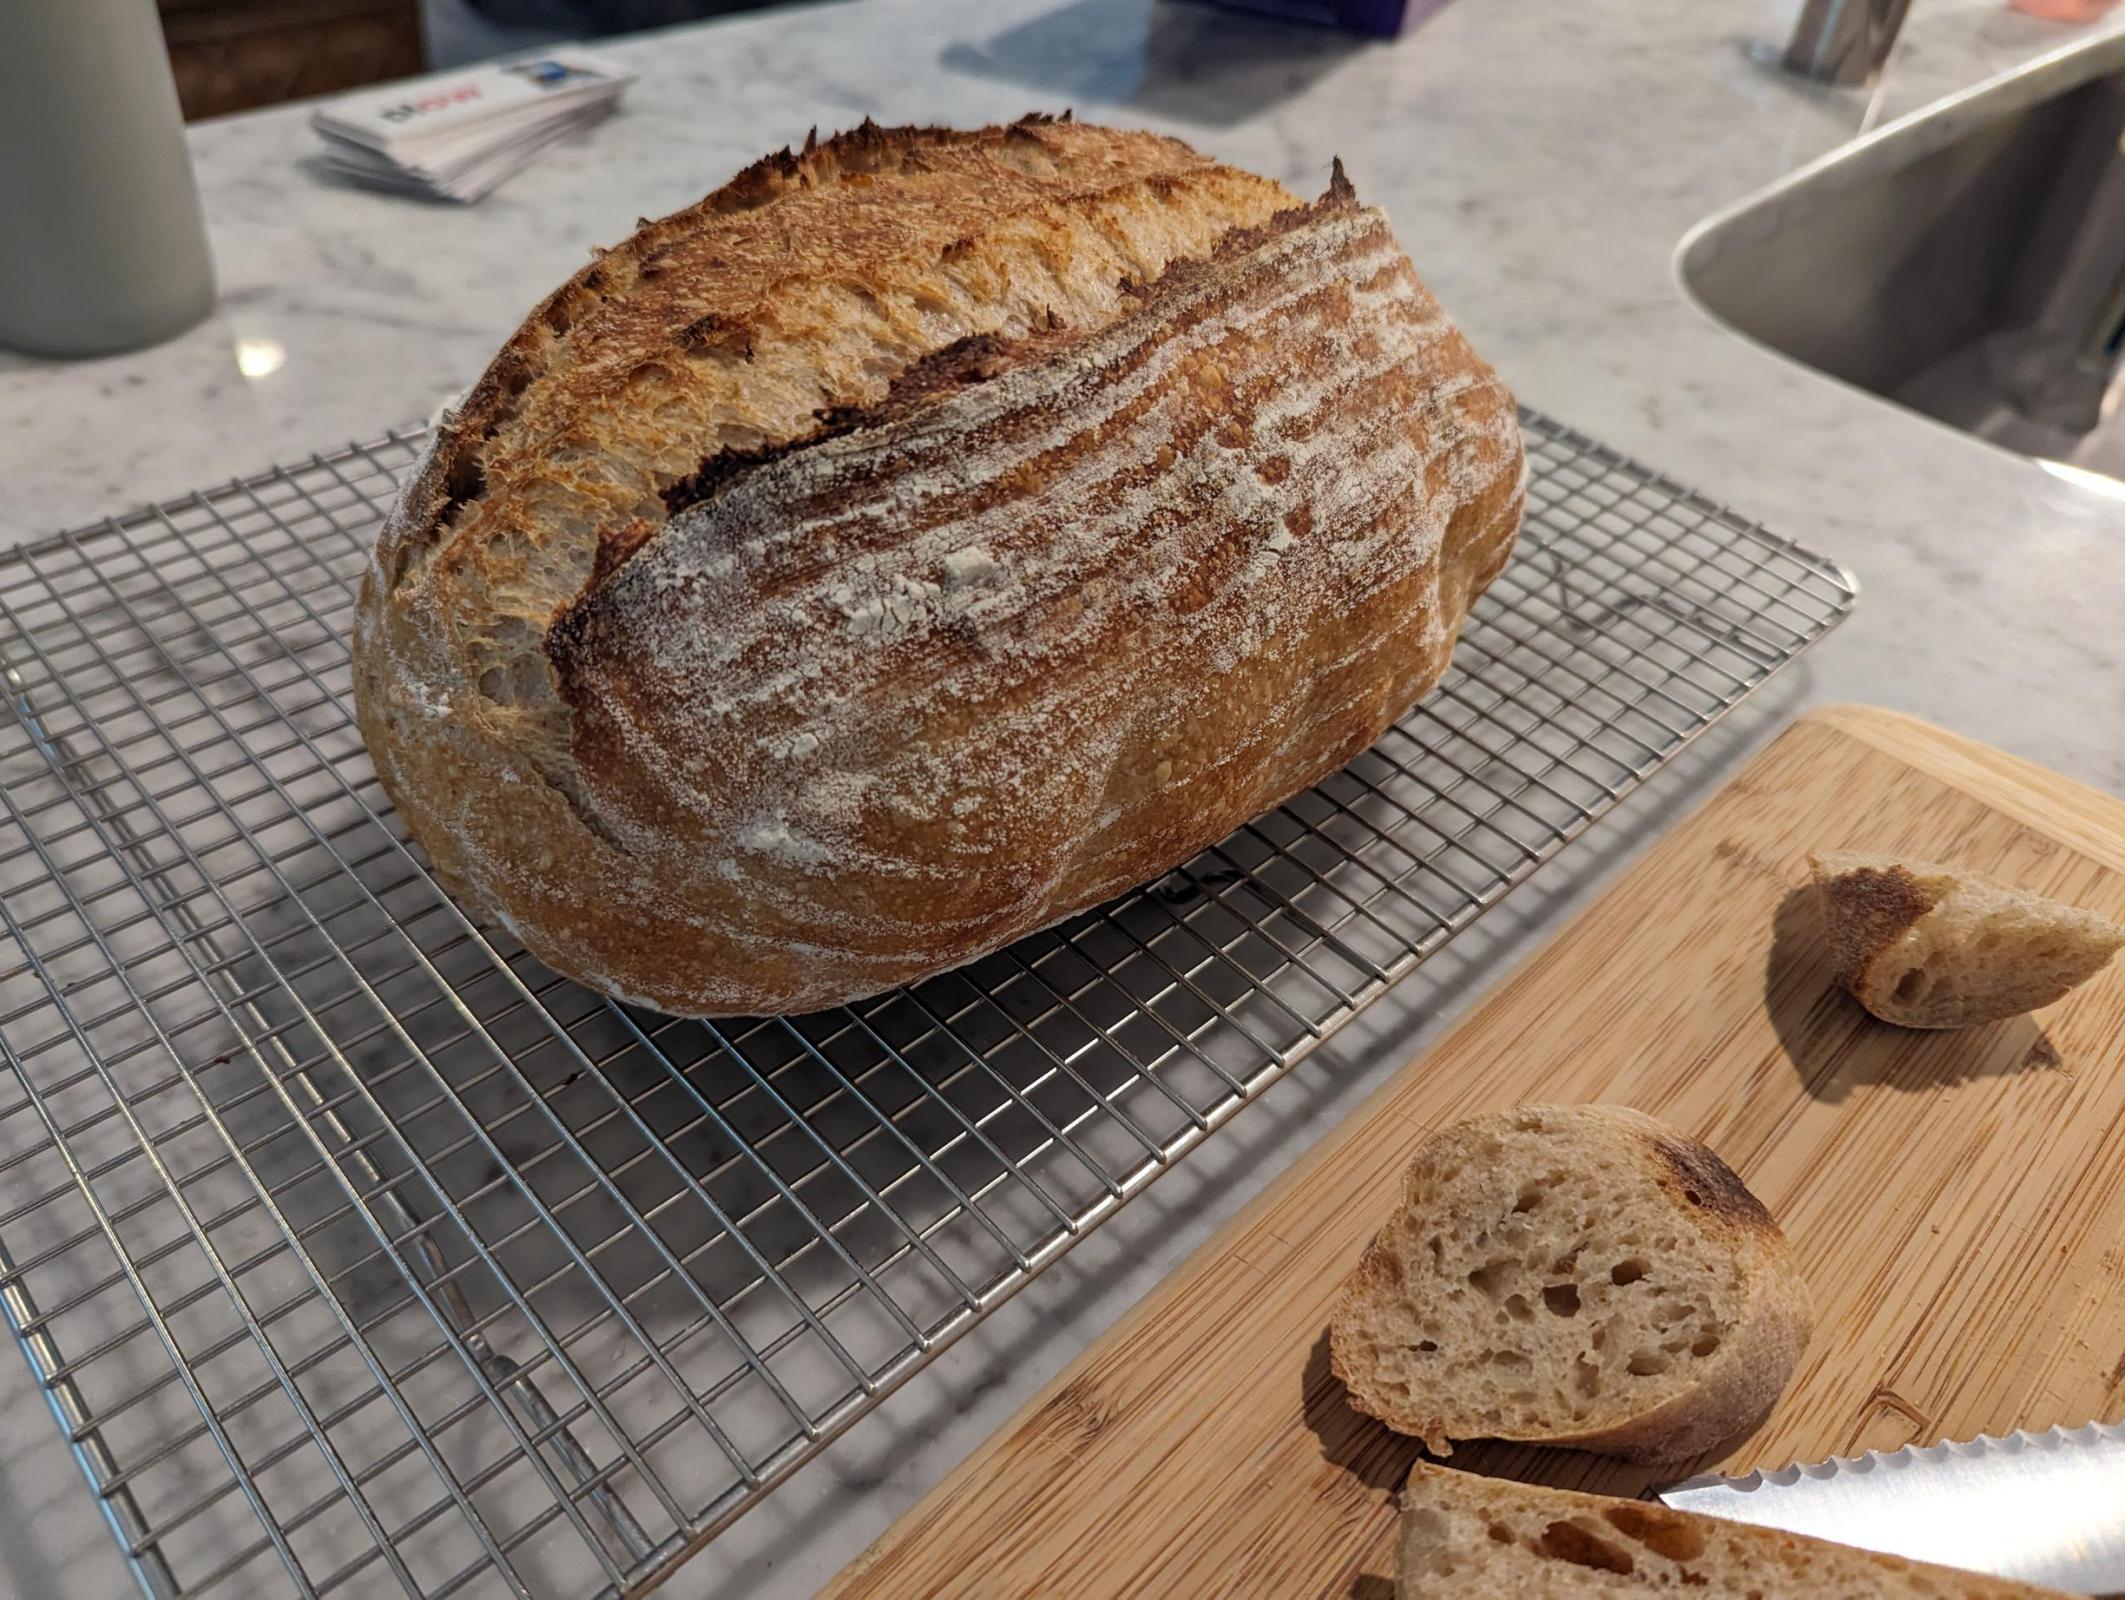
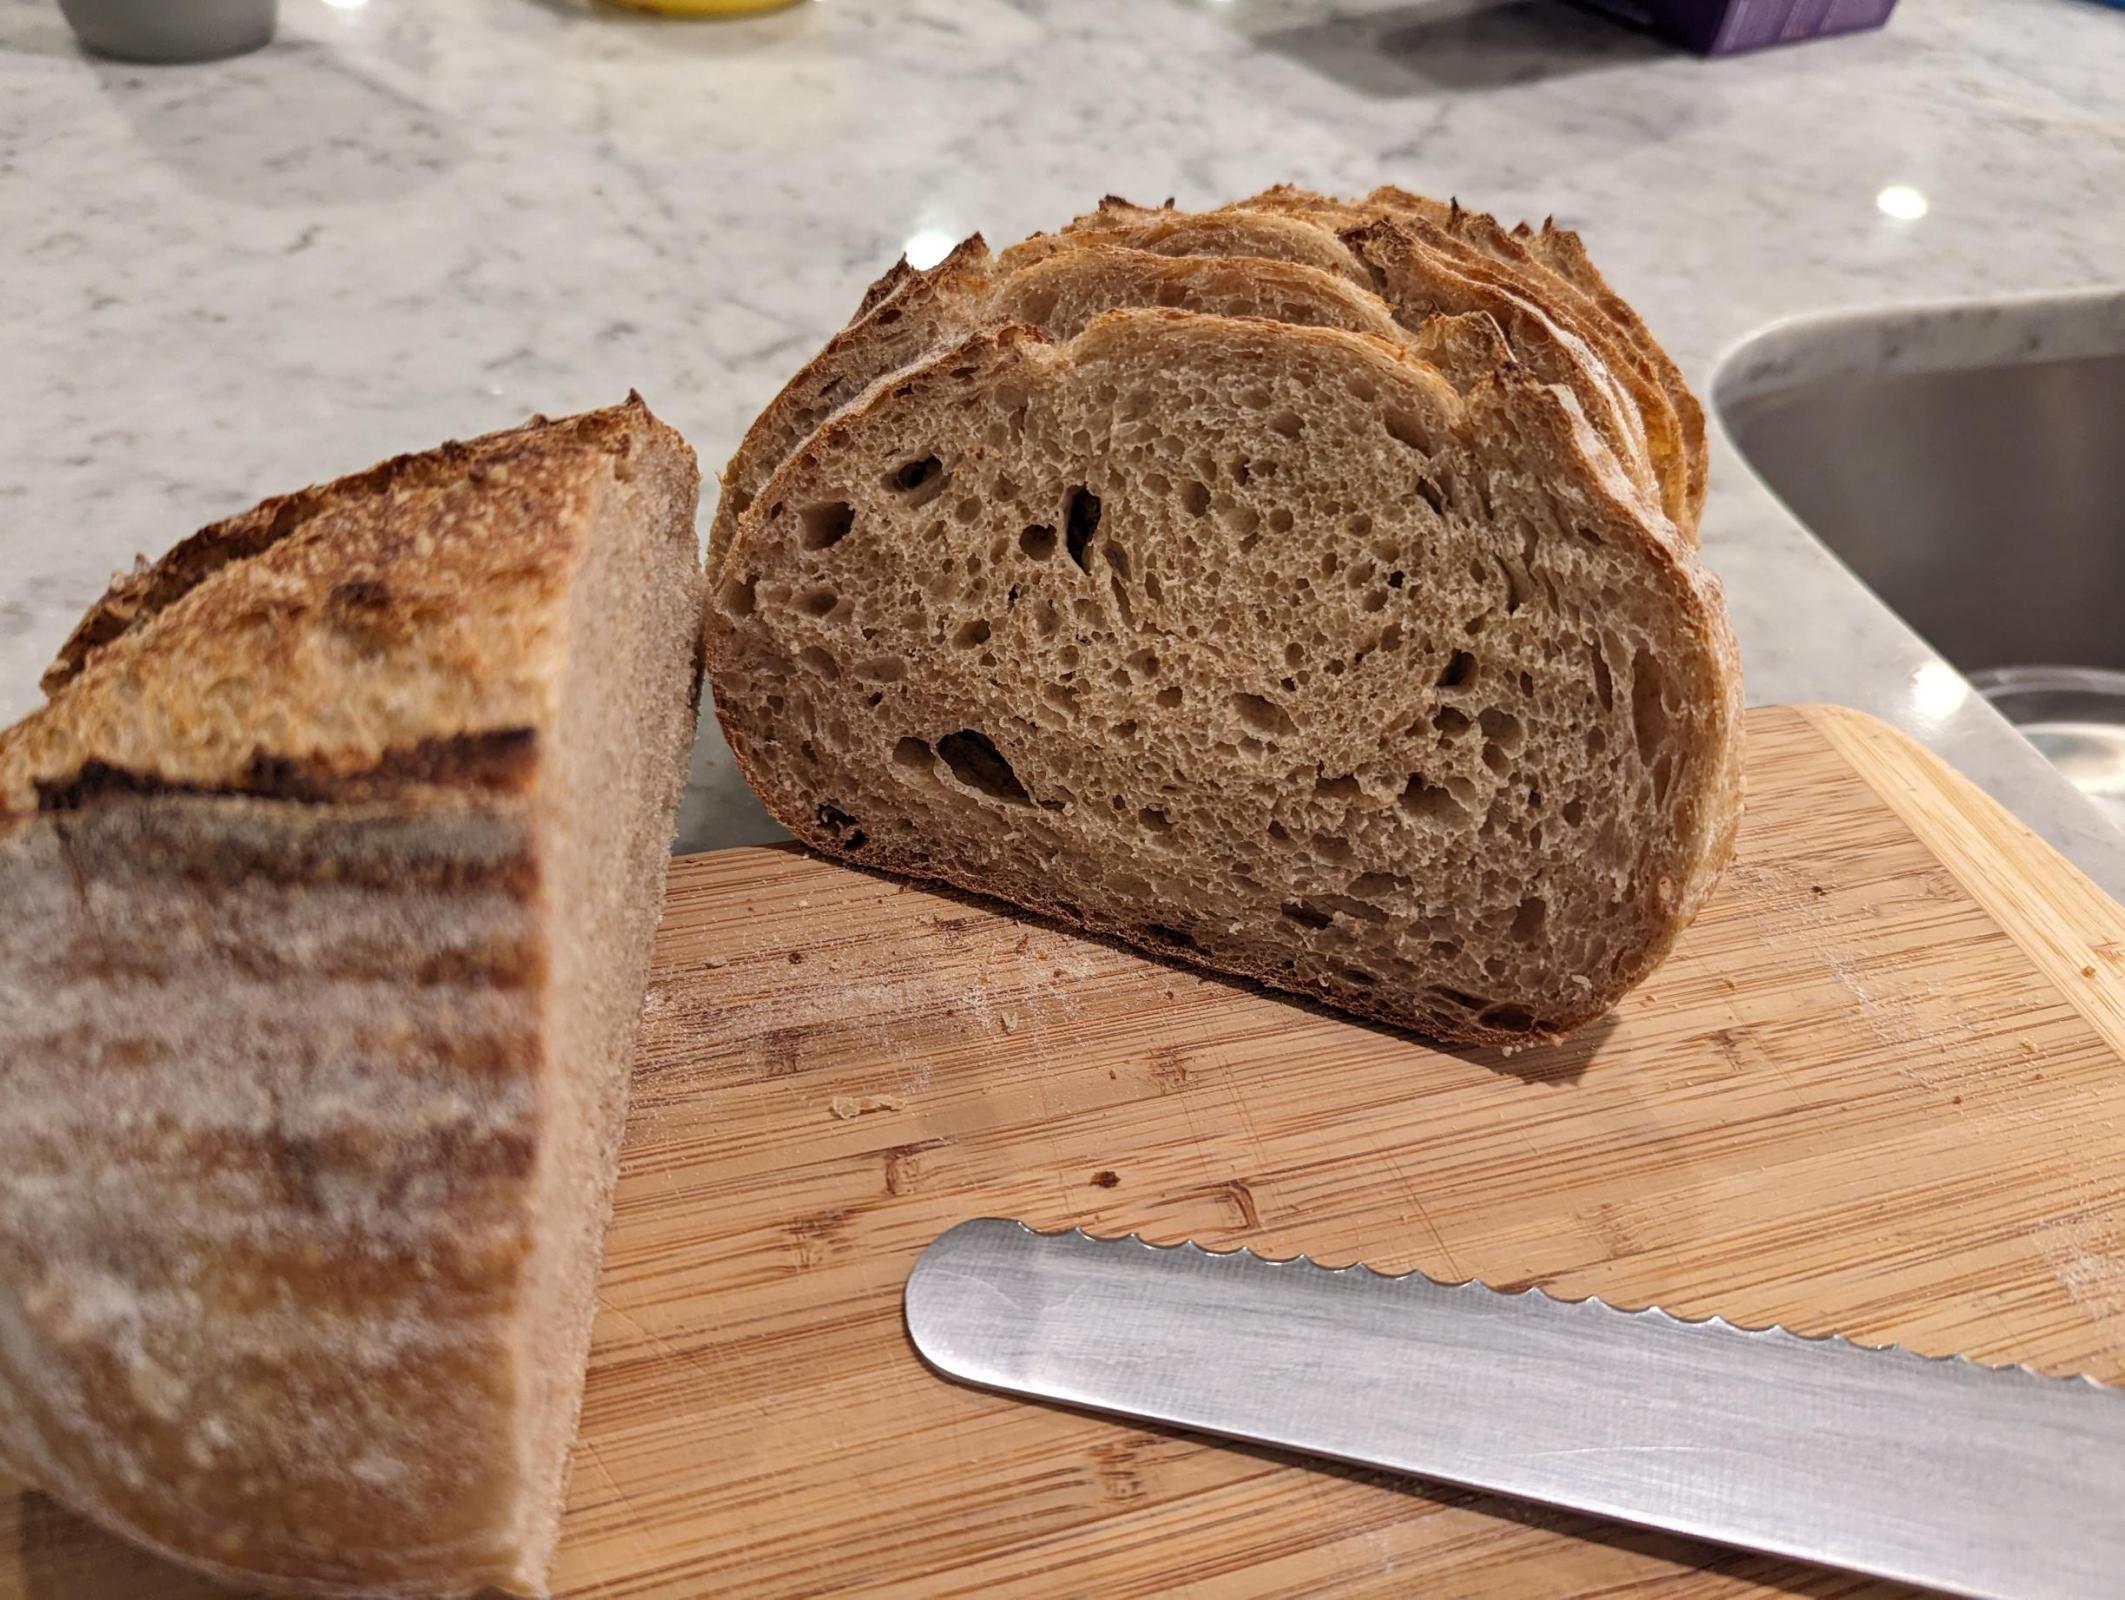
 I was ecstatic. I have always wanted to make a loaf that looked like this- crispy on the outside but soft and pillowy inside. It tastes great to boot, I really like the Type 85. I'm not sure what sort of wizardry happened between the first time using a clay baker, malted flour, or my sourdough starter, but I hope I can replicate it. 

What really stands out though is PATIENCE. With IDY I have gotten used to the timeline- it moves pretty quickly, it's reliable, and I can rely on time vs the dough and still get solid results. With this bake I had to look to the dough- how does it feel? How does it look? What's it smell like? I got very close to tossing it when I saw it in the morning, and I'm so glad I didn't. I had to wait for my starter to be reliable and vigorous (almost 4 weeks.) I had to wait for the dough to look like it was fully fermented, not "12-18 hrs", but aerated throughout. I had to give it time for the final proof, making sure to feel it and look at the way it moved in the basket instead of baking right at the 2 hour mark. When I let the dough dictate the schedule, I got something I was really impressed with.

Thanks again for all the lessons learned from yall's experience- it's been invaluable on the journey thus far!

jkandell's picture
jkandell

ciabattini 0723

Love these ciabatta with stiff biga, used as sandwich rolls. Each roll is its own mini-ciabatta! Hamelman formula but with bassinage coil folds by hand. Great with ham or cheese.

Ciabattini: 6 X 90-100g. 

  • Biga of 20% of the flour at 60% hydration for 15h. (I used 0.083% IDY.)
  • 73% total hydration (to start + lots more during kneading, 80-85% total by end). 
  • 2% salt
  • 0.58% total idy yeast (0.5% idy in main dough + 0.083% in biga).
  • 300g total flour (Natural Grocer's all-purpose, with 5% swapped out for lightly toasted wheat germ).

Method:

  1. Make the biga 15h before. With only 60g of flour, I use 50 mg of IDY, which is only a pinch.
  2. Mix everything with chopstick at 73% total hydration. Let sit 30m to absorb.
  3. 3h bulk.  Fold every 20-30m as long as it takes using "bassinage coil" method: that is, use very wet hands with intention of raising dough hydration to 80-85% by end.  Each fold you are adding a little more water. Coil fold is: with wet hands lift dough straight up in bowl from center, and then allow one of the two drapes to fold back over itself as you put the dough back down. Rotate 90 degrees and repeat x4. It's basically a vertical stretch and fold using gravity. 
  4. Very gently using scraper or hands, place delicate dough onto well floured parchment paper.  Divide into 6 rectangle pieces of 90-100g each floured heavily on each side.
  5. About 1 1/4 hour proof at 79F.
  6. Bake on stone under cover of upside down roasting pan for steam at 450F for 20-30m till dark brown crust.     


Benito's picture
Benito

We are visiting family in Newfoundland for 1.5 weeks now and I wanted to bring a loaf of bread for my brother in law.  The bread had to travel well and stay fresh for a while.  A lot of people seem to enjoy a nutty seedy loaf so decided to make a milk bread.  I had sunflowers, pumpkin seeds and walnuts and wanted to amp up the walnut flavour again by adding toast walnut oil.  Not everyone likes a 100% wholegrain loaf so I decided to use whole wheat for all the levain and tangzhong and the rest of the dough would be bread flour.  Using my usual stiff sweet levain to ensure that there is less sour tang by using the osmotic pressure of sugar to dehydrate the microbes.  The LAB are affected more than the yeast so you reduce the LAB population relative to the yeast resulting in less acids produced during fermentation of your dough.

For one 9x4x4” Pullman pan loaf.


Instructions

Levain

Mix the levain ingredients in a jar or pyrex container with space for at least 300% growth. 

Press down with your knuckles or silicone spatula to create a uniform surface and to push out air.

At a temperature of 76-78ºF, it typically takes up to 10-12 hours for this sweet stiff levain to be at peak.  For my starter I typically see 3-3.5 times increase in size at peak.  The levain will smell sweet with only a mild tang.


Tangzhong 

In a sauce pan set on medium heat, stir the milk and whole wheat flour until blended. Then cook for several minutes until well thickened, stirring regularly with a spoon or heat-resistant spatula. Let cool in the pan or, for faster results, in a new bowl.  Theoretically it should reach 65ºC (149ºF) but I don’t find I need to measure the temperature as the tangzhong gelatinizes at this temperature.  You can prepare this the night before and refrigerate it, ensure that it is covered to prevent it from drying out.


If you plan on using a stand mixer to mix this dough, set up a Bain Marie and use your stand mixer’s bowl to prepare the tangzhong.


Dough

In the bowl of a stand mixer, add the milk (consider holding back 10 g of milk and adding later if this is the first time you’re making this), egg, tangzhong, salt, sugar and levain.  Mix and then break up the levain into many smaller pieces.  Next add the flour.  I like to use my spatula to mix until there aren’t many dry areas.  Allow the flour to hydrate (fermentolyse) for 20-30 minutes.  Mix on low speed and then medium speed until moderate gluten development this may take 5-10 mins.  You may want to scrape the sides of the bowl during the first 5 minutes of mixing.  Next add room temperature butter one pat at a time.  The dough may come apart, be patient, continue to mix until it comes together before adding in more butter.  Next drizzle in the toasted walnut oil.  Again, knead until well incorporated.  You will want to check gluten development by windowpane during this time and stop mixing when you get a good windowpane.  You should be able to pull a good windowpane, not quite as good as a white flour because the bran will interrupt the windowpane somewhat.  Add the seeds and mix again until they are well distributed.


On the counter, shape the dough into a tight ball, cover in the bowl and ferment for 2 - 4 hours at 82ºF.  There should be some rise visible at this stage.


You can next place the dough into the fridge to chill the dough for about 1.5 hours, this makes rolling the dough easier to shape.  Remember, if you do so the final proof will take longer.  Alternatively, you can do a cold retard in the fridge overnight, however, you may find that this increases the tang in your bread.


Prepare your pans by greasing them with butter or line with parchment paper.  


Lightly oil the top of the dough. Scrape the dough out onto a clean counter top and divide it into four. I like to weigh them to have equal sized lobes. Shape each tightly into a boule, allow to rest 5 mins. Using an oiled rolling pin roll each ball out and then letterfold. Turn 90* and using a rolling pin roll each out to at least 8”. Letterfold again from the sides so you have a long narrow dough. Then using a rolling pin, roll flatter but keeping the dough relatively narrow.  The reason to do this extra letterfold is that the shorter fatter rolls when placed in the pan will not touch the sides of the pan.  This allows the swirled ends to rise during final proof, this is only done for appearance sake and is not necessary.  Next roll each into a tight roll with some tension. Arrange the rolls of dough inside your lined pan alternating the direction of the swirls. This should allow a greater rise during proof and in the oven.


Cover and let proof for  4-6 hours at a warm temperature.  I proof at 82°F.  You will need longer than 4-6 hours if you chilled your dough for shaping. I proof until the top of the dough comes to within 1 cm of the top edge of the pan.


Preheat the oven to 350F and brush the dough with the egg-milk wash.  Just prior to baking brush with the egg-milk wash again.


Bake the loaves for 50 minutes or until the internal temperature is at least 190ºF, rotating as needed to get even browning. Shield your loaf if it gets brown early in the baking process. After 50 mins remove the bread from the pan and bake a further 10 mins by placing the loaf directly in the oven on the rack with the oven turned down to 325ºF

yozzause's picture
yozzause

i have been doing a bit of development work for David at the Lupin Co here in Perth and we are at the stage where i needed to bake some of the breads ive been working on that will be photographed tomorrow by a professional photographer.  Jessica is also a local bread baker so looking forward to seeing her work.

i made 3 different doughs today and the aim is to keep them relatively simple for the home baker 

The one i am featuring here is a plain white dough that has 20% Lupin flakes and 5% Lupin Flour in the mix.

Salt 2%, Home produced honey 2%, Butter 2%  yeast 2%, Bread Improver 0.5% water 65% 

i start with the lupin content and pour all the water at boiling point over it stir and set aside to cool  the honey and butter was added to melt. It  has been exceptionally cold here in Perth 18C in the kitchen this morning flour was 15C. So once the Lupin mix came back to 49C the mixer was started.

I have been using a cheap little Chinese Noodle dough machine which i have been very pleased with and at just over A$100  its magic. The dough feels a bit sticky during the mix but is pretty good after the Bulk fermentation time.


 With Lupin having high dietary Fibre and high protein levels it a great loaf  i hope that we will be doing some cut shots tomorrow and will include them. i will also  post the other 2 doughs,

1 produced  2 foccaccias


and the other dough was a "Dates and Flakes fruit dough"

   SO  a busy day and should be an interesting day tomorrow

Isand66's picture
Isand66


     Grilling season is upon us so I needed to make some soft tasty rolls for burgers.  These are pretty straight forward and ended up just as I expected.

I used a combination of freshly milled and double sifted Butlers Gold whole wheat flour from Barton Springs Mill and KAF bread flour plus some KAF AP in the starter.  Softened butter along with the ricotta cheese really added to the softness of the crumb and the honey added just enough sweetness to pull it all together.

I use some everything bagel topping on some and toasted onions as well as poppy seeds on others.

Give these a try and I am confident you won’t be disappointed.

Formula

Levain Directions

Mix all the levain ingredients together for about 1 minute and cover with plastic wrap.  Let it sit at room temperature for around 7-8 hours or until the starter has doubled.  I usually do this the night before.

Either use in the main dough immediately or refrigerate for up to 1 day before using.

 Main Dough Procedure

Mix the flours and water together in your mixer or by hand until it just starts to come together, maybe about 1 minute.  Let it rest in your work bowl covered for 20-30 minutes.  After 30 minutes or so  add the salt, starter (cut into about 7-8 pieces), ricotta cheese, softened butter and honey and mix on low for 5 minutes.  (If using the Ankarsrum you can mix for around 12-15 minutes on medium low).  Remove the dough from your bowl and place it in a lightly oiled bowl or work surface and do several stretch and folds.  Let it rest covered for 10-15 minutes and then do another stretch and fold.  Let it rest another 10-15 minutes and do one additional stretch and fold.  After a total of 2 hours place your covered bowl in the refrigerator and let it rest for 12 to 24 hours.

When you are ready to bake remove the bowl from the refrigerator and let it set out at room temperature still covered for 1.5 to 2 hours.  Remove the dough and shape into rolls around 125 -150 grams each.  Cover the rolls with a moist tea towel or plastic wrap Sprayed with cooking spray and let rise at room temperature for 1 1/2 – 2 hours.

Around 45 minutes before ready to bake, pre-heat your oven to 500 degrees F. and prepare it for steam.  I have a heavy-duty baking pan on the bottom rack of my oven with 1 baking stone on above the pan and one on the top shelf.  I pour 1 cup of boiling water in the pan right after I place the dough in the oven.

Right before you are ready to put them in the oven, use an egg wash and add your toppings.  Next add 1 cup of boiling water to your steam pan or follow your own steam procedure.

After 1 minute lower the temperature to 425 degrees.  Bake for 25 minutes or until the rolls are nice and brown.

Take the rolls out of the oven when done and let them cool on a bakers rack for as long as you can resist.

Isand66's picture
Isand66


I have not made a bread with dates for quite some time and for whatever reason it popped into my head the other day that I needed to make one.


This bake also used some purple sweet potatoes that I baked and then mashed up.  I decided to add a little bit into the levain to see what would happen.  It did a nice job of making a slightly sweet levain and when added with the sweet dates and the rest of the purple sweet potatoes the flavor on this bake was amazing. 

I used some freshly milled high extraction Butlers Gold Whole Wheat flour from Barton Springs Mill along with some freshly milled Danko Rye also from Barton Springs Mill sifted and milled twice.  Some KAF bread flour was also added as well.    

The overall hydration is higher than indicated in the formula since the purple sweet potatoes definitely add some extra hydration.  It adds approximately 58% more water or about 73 additional grams of water to the overall hydration.  The dough was pretty manageable even with the extra hydration from the potatoes.

I love the flavor profile on this bake.  The crumb was moderately open and nice and soft.  You can definitely taste the unique sweetness the dates add.  Overall this is one tasty bread.  I grilled some the other night brushed with olive oil and topped with some fresh mozzarella.  I also snacked on it with some smoked cheddar the other day which was amazing.

Formula

Levain Directions 

Mix all the levain ingredients together for about 1 minute and cover with plastic wrap.  Let it sit at room temperature for around 6-7 hours or until the starter has almost doubled.  I used my proofer set at 76 degrees so it took around 5 hours for me.  Either use in the main dough immediately or refrigerate for up to 1 day before using.

 Main Dough Procedure

Mix the flour and liquids (leave about 50 -70 grams to add after the first mix), together in your mixer or by hand until it just starts to come together, maybe about 1 minute.  Let it rest in your work bowl covered for 20-30 minutes.  After 30 minutes or so  add the salt, starter (cut into about 7-8 pieces), roasted mashed potatoes, dates (cut into small pieces)  and remaining water as needed and mix on low for 5 minutes.   Note: If you are using the Ankarsrum mixer like I do, add your water to the bowl first then add in the starter and flours.  After your autolyse add in the remaining ingredients and remaining water and mix on low to medium low for 15-20 minutes.

Remove the dough from your bowl and place it in a lightly oiled bowl or work surface and do several stretch and folds.  Let it rest covered for 10-15 minutes and then do another stretch and fold.  Let it rest another 10-15 minutes and do one additional stretch and fold.  After a total of 1.5 hours place your covered bowl in the refrigerator and let it rest for 12 to 24 hours.  

When you are ready to bake remove the bowl from the refrigerator and let it set out at room temperature still covered for 1.5 to 2 hours or if using a proofer set at 80 degrees for one hour.   Remove the dough and shape as desired and cover with a moist tea towel or plastic wrap Sprayed with cooking spray and let rise at room temperature for 1 1/2 – 2 hours.  (I use my proofer set at 80 F and it takes about 1 hour to 1.5 hours).

Around 45 minutes before ready to bake, pre-heat your oven to 500 degrees F. and prepare it for steam.  I have a heavy-duty baking pan on the bottom rack of my oven with 1 baking stone on above the pan and one on the top shelf.  I pour 1 cup of boiling water in the pan right after I place the dough in the oven.

After 1 minute lower the temperature to 450 degrees.  Bake for around 35 minutes or until the breads are nice and brown and have an internal temperature around 200-210 F. 

Take the bread(s) out of the oven when done and let them cool on a bakers rack for as long as you can resist. 

Some photos from our “Dances with Dragons” garden.


gavinc's picture
gavinc

Debra Wink’s English Muffins with Biga.

I’ve tried several different English Muffin recipes and keep coming back to these, magnificent flavour and crumb.

NateShrdr7's picture
NateShrdr7

Should bagels touch when baked? 

dmsnyder's picture
dmsnyder

I have been aware of Maurizio Leo through his social media postings for some time. He is a home baker, but an extremely serious one who comes from a restaurant family. Eventually, I discovered his blog (ThePerfectLoaf dot com)  and found him to be an articulate and generous mentor for home bakers. More recently, he has published a baking book. It is more on the model of Tartine Bread or Forkish's books than, say, Hamelman"s. But Leo's recipes are very well documented and look really good. His book, "The Perfect Loaf," won a James Beard Award this year. 

Today, I baked his "Rustico." I have baked it once before with some flour substitutes and thought it very good. Today, I had the Central Milling T85 flour Leo uses, along with AP and whole Spelt, and I followed the recipe exactly.

Maurizio's "Rustico" is quite similar to my favorite multigrain sourdough. It is an 80% hydration, 45% whole grain and high-extraction flour loaf. I made it with no mechanical mixing, and it was a very nice dough to work with.

This is good bread. It has less wheaty flavor than my usual multigrain sourdough, but it has a nice sweet lingering flavor. The crust is crunchy and chewy. The crumb is tender and cool. This is a nice recipe, and I enjoyed the experience of making a bread with more spelt and higher hydration than usual for me. My biggest takeaway is that I want to play more with the T85 flour. I think it's good stuff.

Happy baking!

David

Pages

Subscribe to Recent Blog Entries