The Fresh Loaf

A Community of Amateur Bakers and Artisan Bread Enthusiasts.

Recent Blog Entries

Benito's picture
Benito

I first saw this type of shaped steamed bao when I borrowed Kristina Cho’s book called Mooncakes and Milkbread from the library.  My brother in law then emailed me a recipe for them out of the blue so I decided to make them.  Unfortunately my brother in law is no where near us so I’m unable to share this with him.  I’m pretty happy with how they turned out even if I didn’t do the twisting of the strips of dough prior to shaping them.

For six bao


Overnight Levain

In a large jar, combine all purpose flour, water, ripe sourdough starter, and sugar. Cover the jar loosely and let the levain ripen overnight at warm room temperature (I keep mine around 74°F to 76°F/23°C to 24°C).  After 10-12 hours it should have peaked between 3-3.5x.


In The Morning

In a mixing bowl, add the water, milk, sugar, corn starch, oil and salt, mix to dissolve.  Add the tangzhong and stiff sweet levain and using a silicone spatula, cut the levain into small pieces.  Add the baking powder and flour.  Mix to form a shaggy dough.  Allow to rest for 10 mins.  On your countertop knead the dough until good gluten development.  This is a very stiff dough that will be challenging for your home mixer to knead.  Remove some dough for aliquot jar to follow rise.  Shape into a boule and rest in a covered bowl at 82°F until it has increased by 40%.


Garlic scallion oil

1/4 cup canola oil (substitute some toasted sesame seed oil)(This makes far more oil than needed, use only ¼ to ½ of this amount at most)

2 garlic cloves sliced 

⅛ cup finely chopped scallions 

½ teaspoon flaky salt


To make the oil: While the dough is rising, make the garlic scallion oil by heating the oil, garlic and scallions over medium-high heat until sizzling, about 3 minutes. Remove from the heat, transfer to a heatproof container, and set aside until ready to use.  Remove the garlic slices prior to using, you can pass the oil through a sieve to remove the garlic and scallions as long as you have enough fresh scallions for shaping.


Prepare six 4” parchment squares.


After bulk fermentation, transfer the dough to a lightly greased surface. Roll out the dough to a roughly 10 × 16-inch rectangle. Brush the dough with the garlic scallion oil and sprinkle the crisp scallions, some additional fresh scallions and sesame seeds to taste and salt evenly over the surface. Fold the dough into thirds, like a letter so you end up with a long narrow strip of folded dough and not a square of dough. Pat out any trapped air pockets as you fold.  Brush oil on the top of the dough.  Flatten and roll out the dough with a rolling pin into a roughly 10 × 16-inch rectangle. Cover the dough with a clean kitchen towel and let rest for 15 minutes. (Don't be tempted to skip this step, as the dough will not stretch out as easily without a proper rest.)


Cut the dough into six equal-width strips (1 ½ × 10 inches), then cut in half into 1 ½ × 5-inch strips. Stack two strips of dough on top of each other and press lengthwise down the center of the dough with a chopstick. Pinch the two short ends of the dough with either hand, gently lengthen and stretch the dough, then twist the dough into a spiral. While securely holding onto one end, twist the dough around the pinching fingers, then pinch to secure the other end to the dough (see photos). Place the formed bun on a square of parchment paper. Cover with a damp, clean kitchen towel and let rest in a warm spot until they are 1 ½ times larger.

Cover the shaped bao with a damp cloth and place in a warm place and allow them to ferment until they pass the poke test.  Using an aliquot jar they should reach 120-125% rise.


Prepare your steamer setup and bring water to a boil.  Working in batches if necessary, arrange buns in the bamboo steamer spacing 2” apart.  Steam over boiling water for 10 minutes.  Turn off the heat and leave the buns in the covered steamer for 5 more minutes to prevent collapsing.  (I left them in the steamer and on the same stove element turned off). Do not lift the lid of the steamer, doing so will cause a sudden drop in temperature that can cause the buns to collapse or wrinkle or dent.  Remove the buns from the steamer and allow them to cool for 5 minutes before serving.  


Buns can be kept in an airtight container (a resealable bag works great) at room temperature for up to 4 days or in the freezer for up to 3 months. Room temperature buns can be reheated in the microwave for 15 to 20 seconds or steamed for about 2 minutes, until soft and warmed through. Reheat frozen buns by steaming until soft and warmed through, 10 to 15 minutes.

cfraenkel's picture
cfraenkel

There is nothing like waking up and realizing there is no bread for your morning toast.  I ended up having to eat yogurt for breakfast!

I threw this loaf together with very little fuss, and 24 hours later there was bread. 

I mixed up what amounted to 175 g of ripe active starter at 100% hydration.

added:

290 g. of All purpose flour

204 g of hard white whole wheat

314 g of water

11 g. of salt

to the 175 g of levain. 

I mixed it with the awesome dough wand thing I found at of all places the dollarama.  (best $1.25 I have spent in a long time) Left it on the counter, went about my morning, gave it a stretch and fold in the tub, took the dog for a walk, gave it another fold in the tub and then left it to ferment.  After dinner (it's cold here...) I shaped it and stuck it in the fridge in the banneton with a cover.  Baked it up this morning and it is great!  A lovely soft even crumb, perfect for toast and sandwiches.  Had to write it down so I remember it.

CalBeachBaker's picture
CalBeachBaker

Today's bake: Marble Rye

Source: King Arthur Baking

Note:Increased TDW from 1.124kg to 2.248kg to make two loaves, replaced an egg with a 'flax  egg', left out deli rye flavoring due to availability. 

Discussion: A friend purchased the ingredients for this bread and then asked that I bake it because it seemed too challenging which is to me like waving a red flag in front of a bull, so challenge accepted. I all seriousness this was a fun and easy bread to make. The only tricky part is placing the dough in the pans.

This bread is primarily AP flour and the main flavor comes from the caraway seed which I quite enjoy. There are notes of the cocoa and slight rye flavors from the rye flour, in addition.

My friend got the round loaf.

Make again? - Yes, it was fun and easy.

Changes/Recommendations: Get the deli rye flavoring and a tad more oil would make the dough moister.

Ratings


 Tony


aly-hassabelnaby's picture
aly-hassabelnaby

Hello everyone,

I've posted the latest recipe on my blog for a unique and ancient type of bread we have in Egypt called "Eish Shamsi"

The Breads of Egypt - Eish shamsi

This was quite challenging to produce and took a few trials but I think I've got it nailed now. Since there's a massive amount of baking experience here on The Fresh Loaf, I would love any feedback from you regarding the recipe and the way I describe the steps. If that doesn't sound interesting to you, then I hope you learn something new about something really really old.

Thanks.

Yippee's picture
Yippee


Please see here and here to learn more about concentrated lactic acid sourdough (CLAS). 


With CLAS, making 100% whole-spelt bread with freshly milled flour is simple; anyone can do it. Without using fat, dairy, sugar, or vital wheat gluten, and without turning on the big oven, you can enjoy an aromatic and wholesome loaf in just a few hours through proper dough development and fermentation.


Ingredients


10% flour from whole-spelt CLAS👇👇👇

90% freshly ground whole-spelt flour

15% water from whole-spelt CLAS

50% water,  ~40-45°C

7% water

1.8% salt

0.7% dry yeast

Total dough weight 580g


Mix

x 20-30 mins

Dough temp ~31-32°C


Bulk ferment

38-40°C x 50 mins


Shape

round


Prove  

35°C x 25 mins


Bake

400F x 19 mins, covered with a stainless steel dish

remove the stainless steel dish

400F x 20 mins

flip

400F x 20 mins

check

flip

400F x 5 mins browning the top


Grind the spelt berries in the Vitamix 


until silky-smooth.


Add whole-spelt CLAS to the Zo.


Mix the dough in the Zo. 

If you prefer to increase the dough's hydration, refer to this post for detailed mixing directions.  


Dough temp ~31-32°C


Witness the remarkable gluten development of this 100% whole-grain dough within 30 minutes!

CLAS rocks!💪💪💪


Ferment the dough in the Zo,using Zo's preset "Rise 3" feature.

~38-40°C x 50 mins


Shape the dough and transfer it to a cake pan, covering it with a pizza pan.


Prove the dough in the Instant Vortex using its dehydrating feature. 

35°C x 25 mins


proved


Score the dough to maximize rise and bloom in the air fryer.


Bake in the Instant Vortex without preheating, covering the pans with an inverted stainless steel dish.


400F x 19 mins

remove the stainless steel dish

400F x 20 mins

flip

400F x 20 mins

check

flip

400F x 5 mins browning the top


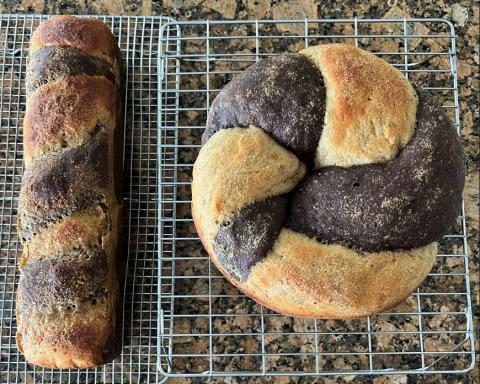
I forgot to take pictures of the bottom. 🙄🙄🙄
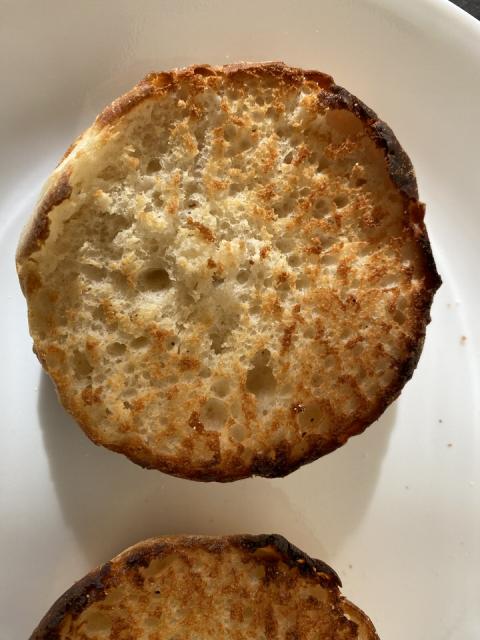


The crumb.


That's it!


🌺🌺🌺🌺🌺🌺🌺🌺🌺🌺🌺🌺


👉👉👉How to make whole-spelt CLAS


 ground wheat malt: 25g

 Whole grain spelt flour: 75g

 Water T. 45°C: 140 ml

 Vinegar (5% acidity): 10 ml

 Fermentation temperature: 38°C±2°C

 Fermentation time: 24-36h

 Hydration: 150%

 End pH: around 4


To refresh spelt CLAS

1:7 (spelt flour in CLAS: new spelt flour), no vinegar needed

150% hydration@38+-2 C x 12 hours

I usually make about 500g of CLAS at a time with 200g of grains. It stays in the fridge until I need it to bake, and I stir it thoroughly before use. I usually warm it up with one of Zo's fermentation features while I prepare the remaining ingredients. When I've used up most of the 500g of CLAS, I refresh it using the 1:7 ratio to make another 500g, give or take. 


I set up a water bath (~low 40s C) in the Instant Pot, support the container with a trivet, and use the Instant Pot's yogurt feature to make CLAS:    

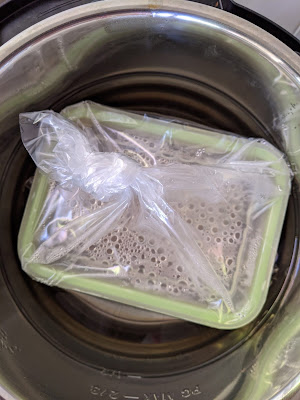
Then cover it with the lid.


P.S. 20230722 🤔🤔🤔

💡💡💡

I can also make CLAS in the Zo using its 'Rise 3' feature because it operates within the same temperature range as a yogurt maker. I can either take out the bread pan, place the container with CLAS in the bread machine, supporting it with a trivet, or ferment the CLAS directly in the bread pan.


Benito's picture
Benito

So I’ve gradually noticed differences between my two starters, one fed only white bread flour and the other whole rye starter.  The white starter I got from Alan (thank you Alan) and the whole rye is my own now what, four years old?  It is possible the differences I am seeing are due to differing microbes that inhabit each of the starters, or they might be purely related to the type of flour each is fed.  With the greater buffering capacity of whole rye vs white flours the LAB population will be able to replicate producing acid for a longer time before the pH falls enough to start to inhibit their growth.  As you know, the LAB are actually more greatly affected by low pH than the yeast.  So the rye starter may have a slightly greater population of LAB relative to the yeast compared to the starter fed only white flour.  In my bakes so far using either the white or the rye starter, I have started to notice this difference in the breads made.  The white starter seems to produce breads with less sour tang and that leaven the dough more rapidly while the pH falls more slowly.  This was very evident in this bake.

The formula was almost unchanged from my previous bake except that the hydration was increased by 1% from a touch more scald water accidentally added to the bran.  As you can imagine, it would be impossible to pour out that extra water since the bran absorbs it pretty quickly.  For this bake, the levain was made using the white starter while my last bake was made using the rye starter.

Some differences noted during bulk and final proof.  

The starting pH of the rye starter bake was 5.31 while the starting pH for the white starter bake was 5.5 suggesting that the TTA of the levains and dough was lower for the white starter bake.  Now of course you could say that some of that TTA was from the starter itself, but considering that the starter was 1:4 ratio to the flour for the levain and the prefermented flour of each bake was only 9% I doubt that the difference in starting pH could be fully explained by TTA of the starter used to make the levain.  

The pH change of the rye starter bake was 1.4 with a total rise of only 45% while the corresponding pH change for the white bake was only 1.15 with a rise of 115%.  Now it is quite possible that the aliquot of dough removed for the rye starter bake wasn’t totally representative of the main dough, I have seen this happen before, but the difference in rising power of the rye vs white starter bakes is quite remarkable and I would suggest is related to relatively less LAB and more yeast in the white starter vs rye starter bakes.

Now my current bake suffered from a lack of ear.  Some possible causes could be over fermentation, over hydration, too shallow a score, insufficient steam and top crust formation too early in the bake.  There are other possible causes but these come to my mind.  I do recognize that my scoring was too shallow I think that I subconsciously scored too shallow because I was concerned that the dough had over fermented even though the poke test passed and there was some rebound of the dough.  The crumb didn’t show any signs of over fermentation and I would have expected more spreading of the dough during baking if it was over fermented.  I doubt it was over hydrated as I only increased the hydration by 1%.  

In the late evening, build the levain and ferment at 74°F aiming to use it after 10 hours.  I used my bread flour starter for this as it seems to produce doughs with less acidity which should allow for longer fermentation and greater rise.

Sift the whole wheat flour.  Scald the sifted bran with 97 g of filtered water (I suspect I can increase the scald water even higher).  After it cools place it in the fridge overnight.


In the morning the levain should have peaked, mine was 3.5 x rise and the dome was just starting to flatten.  Remove the refrigerated bran and allow to come to room temperature.


In the bowl of my Ankarsrum Assistent I added the water (not the hold back water yet) and then the levain.  Using a silicone spatula cut the levain into smaller pieces.  Add the sifted flour and then allow the Ankarsrum Assistent to mix the dough.  I continued to mix at around 2-3 setting until the dough had at least moderate gluten development.  Next I added the salt dissolved in all the holdback water, gradually allowing the salt water to be absorbed before adding more.  Once all the water is incorporated I added bran gradually, again allowing it to incorporate well before adding more.  Once all the bran is added continue to mix until very good gluten development.


Remove the dough from the bowl, perform a letterfold on the counter.  Remove an aliquot of the dough for pH measurement and set up your aliquot jar.  At 30 mins intervals perform a coil fold on the dough, watching the rise and pH.  I performed four sets of coil folds and then allowed the dough to rest and ferment until the dough rose 50% and the pH dropped by 0.7-0.75.  Shape the dough into a batard and place into a prepared banneton.   


About 60 mins prior to baking pre-heat the oven to 500°F setting it up for steam baking.

Once the dough reaches 110-120% rise, the pH drops a total of 1.15 and the dough passes the poke test place the dough into the freezer until the oven is ready.


30 mins prior to baking, pour 1 L of boiling water into metal loaf pan with Sylvia towel and place on baking steel on the lowest rack of the oven.

Once oven reaches 500ºF turn dough out of banneton, brush excess rice flour off, score and then brush with water.  Transfer to oven.  Pour 250 mL of boiling water into the cast iron skillet on a high shelf, high enough that the dough have fully bloom.  Drop temperature to 450ºF and bake with steam for 25 mins.  Then vent oven and remove all steaming gear and drop temperature to 425ºF.  Bake for another 25-30 mins rotating as needed.

I will add that I am totally convinced that doing an open bake leads to a thinner crust the more I have done open steam baking now.  I have consistently found that the crusts baked this way are thinner than the crusts I used to get when doing dutch oven baking. 

jo_en's picture
jo_en

Clas conditions this whole grain too!

Enjoy all the nutrients of freshly milled whole grain sweet brown rice in a wonderfully soft and chewy mochi wrapped around a ball of red azuki bean paste (anko).

Recipe: food geek-

https://fgbc.dk/37cj  (6/17/23)

Ingredients makes 6-8 mochi

100 gr freshly ground brown sweet rice

8 gr rye clas (2.76 gr rye which is 2.7% total flour, 5.24 g water)

134 gr water (optional add 1tsp fresh sugared lemon zest)

60 gr sugar (1/3 cup)

150 gr red bean paste

Don't forget to brush off the excess potato starch on the finished mochi!

P.S.  This recipe uses more liquid than others and  the hot molten cooked dough will be sticky.  However the resulting dough will be much softer and it also stays softer longer. You can even refrigerate it and it will not be hard. I think an 8-10 sec reheat in the microwave will restore it to very soft. 

CalBeachBaker's picture
CalBeachBaker

Today's bake: Blue (Bloody Butcher) Corn and Caramelized Onion Loaf

Source: Sourdough Recipes for Rustic Fermented Breads, Sweets, Savories, and More - Sarah Owens

Note: Substituted Bloody Butcher corn for Blue corn, increased TDW from 1.661kg to 2.5kg, increased hydration from 75.44% to 79.42% due to  fresh milled flour factor of 10%.

Discussion: This is another of Sarah's breads that I have enjoyed baking. I milled the corn and the Red Fife at the finest setting. This is a very tasty bread due to the onions and olive oil but you can definitely taste and feel the grainy texture of the corn which is quite nice and the corn and the onions also add nice flecks of coloring to the crust.

Make again? - Yes, definitely.

Changes/Recommendations: slightly decrease the quantity of olive oil.

Ratings


Rafe's picture
Rafe

All that was left, was to pull together the last “To-Do’s” and combine them with all the others to complete the project. So, without further ado.

  • Use a tablet, pad, phone or printed paper layouts for method, workflow times & temperatures. Hydrations, a gaggle of other info with non-essentials filtered
  • Formatting, fonts, cells, display and anything else that comes to mind 

Setting a single print area and using the active filters already developed, produced the targeted distortion-free pdf style printing. Which achieves having recipe cards that can be used on-screen or other devices. Printing to paper is also an option if it’s to be added to an existing portfolio. Both can be annotated, so there is a choice.
(Personally, I copy the recipe card to my phone as a pdf and make notes on it whilst baking). 

Formatting changed as the project developed, a succession of colours came and went, and cells got a highlighted makeover for completed tasks one way or another.

So, the ultimate question is…. Does it work?

Overall, a Detailed, Fully Formulated, Formatted, Self-Calculating Weight-To-Percentage Spreadsheet removing the need for a calculator in most cases. Entering weights as found, automatically giving a full array of bakers' percentages as the result. With the ability to compare, tweak and adjust a single recipe over multiple rows without losing the original. Including a raft of additional tools, and special features in a one-stop nifty layout. Developed into a complete website on its use, providing samples and finished bakes using all the sheet's capabilities and storing the location of the downloadable master Excel spreadsheet.

I’d say yes, Bakers Percent was Re-Imagined!

The picture displays a full recipe card for the BBGA Three Flour Rustic Sourdough with Cracked Wheat Soaker and a Yeasted Preferment, where multiple flours are used in multiple preferments’.
Complete as per the original 15kg TDW, showing Percentages for Hydrations, Prefermented flours and included ingredients.
Supplemented with a Revised Total Weight & Yield arrangement, Recipe notes, Timings & baking notes, document links, star rating, bakeware used and extra-over hydration information.

gavinc's picture
gavinc

I made some English muffins for lunch today. I'm tweaking the recipe and process as I go. These are great without too many enrichments like you see on some sites. I had one for lunch with home-made green tomato pickle, ham, and Smokey cheese.

Pages

Subscribe to Recent Blog Entries