The Fresh Loaf

A Community of Amateur Bakers and Artisan Bread Enthusiasts.

Benito's blog

Benito's picture
Benito

This is set number 15 of my baguette trials and tribulations and in some ways one of the most successful baguette bakes I’ve had where I figured something out that has turned out to be critical to my baguettes.  I have been stumped by the lack of ears and grigne on my baguettes, but happy with the crumb.  Well in this bake I reduced bulk fermentation aiming for only a 25% rise in bulk and then eliminated bench room temperature proofing of the shaped dough instead putting the baguettes into the fridge after final shaping.

For three baguettes about 280 g (to account for aliquot jar)


Total Flour


Total Dough Weight (g)


900.3


Prefermented

9.09%


Total Formula


Liquid Levain


Final Dough


Ingredients

%

Grams


%

Grams


Ingredients

Grams


Total Flour

100.00%

522.5


100.00%

47.5


Final Flour

475


AP Flour/T55

100%

522.5


100%

47.5


AP Flour/T55

475


Strong Bread Flour

0%

0


0%

0.0


Bread Flour

0


Water

67.7%

353.5


100%

47.5


Water


Autolyse (93%)

0.00%

0.0


0%

0.0


Autolyse(cool)

306


Final (7%)

0.00%

0.0


0%

0.0


Bassinage(v cool)

0


IDY

0.07%

0.38


IDY

0.38


Diastatic Malt Powder

1%

5.2


Malt

5.2


Salt

1.80%

9.38


Salt

9.38


Starter (in final dough)

2.20%

11.5


24%

11.5


Levain

95


Totals

176.89%

900.3


224%

106.5


900.3

Fermentolyse

Dissolve diastatic malt powder, IDY and levain in water.  Then add flour and mix.

20 mins later add salt with wet hands and work in with dimpling and pinching.  then Rubaud kneading for up to 4-5 mins.  Remove 30-50 g of dough and place in aliquot jar and keep with the dough.

Rest 50 mins then Coil Fold.

Rest 50 mins then Coil Fold

Once aliquot jar reaches 25% rise then place dough into refrigerator 2ºC overnight and up to 24 hours.

Remove dough from fridge and divide into 3 equal weight doughs and pre-shape lightly as loose rolls.  Bench rest 20 mins.  Shape baguettes and place in floured couche and then into refrigerator for 1 hour.

Next, set oven up for steaming with Sylvia towel and cast iron skillet and temperature set to 500ºF.  In fact I now wait for 30 mins after oven is turned on and then place the Sylvia towel loaf pan filled with boiling water from kettle into oven.  This time I tried pre-heating oven and baking with steam at 525ºF but ended up with slightly burnt bottom crust so will go back to 500ºF. 

Using transfer board place each baguette on a parchment lined peel.  Brush excess flour off each baguette.  Score.  I didn’t brush water on the baguettes this time and still had some blisters.

Transfer baguettes onto baking steel using the peel and parchment.  Pour boiling water into icast iron skillet.  Bake with steam for 13 mins then remove Sylvia towel and cast iron skillet. 

Drop temperature of oven to 500ºF and turn on convection (I forgot to turn on convection which leads to more uneven browning).  After 5 mins turn and rotate baguettes.  Check for done ness in another 5 mins, if not fully browned then rotate and turn again.  Remove once crust is nicely browned.


Benito's picture
Benito

I first started baking pies about two and a half years ago, I’ve gone through a pile of different pasty recipes until I tried Stella Parks recipe in Bravetart cookbook.  I’ve mentioned this one before, but if you haven’t tried it you really need to.  It is the easiest to make, the one challenge for us bread bakers is not to knead.  Once I have a dough in my hands I automatically want to knead it, with pastry you really shouldn’t knead it.  In fact, I barely bring this together.  It is a dry shaggy mass that you will fold and roll out, it comes together eventually though and the less you do to it the better the outcome.  You certainly don’t want a tough pastry do you? 

In fact until last weekend I hadn’t make any pastry since the fall, once the pandemic started we weren’t seeing friends so with all the bread I’m already baking also eating a whole pie between the two of us was just gluttony.  Then last week we saw two friends and tonight we’ll have neighbors over so I needed to make dessert since that is what I’ve invited them over for, an evening on our balcony having wine and then dessert.  Galettes are so easy and there is less of it to finish so I don’t feel quite as guilty about making it.

I used 2 cups of blueberries

3 cups of rhubarb.

a pinch of salt

1/2 cup of sugar

dash of cinnamon

2 tbsp of tapioca startch

zest and juice of one lemon.


Benito's picture
Benito

OK still on a miso kick, not my homemade as that will take sometime yet, but red miso again.  I was happy with my previous bake of miso with furikake, but decided to change it up just a bit by adding toasted black and white sesame seeds.  Since I love sesame seeds and have baked a previous black and white sesame seed bread I thought that it would be great with the flavour of miso.

Bread flour 352 g

Sprouted Whole Wheat 97 g

Water 320 g

Levain 115 g 100% hydration Sprouted whole wheat 

Miso paste 26 g 5.3% (My red miso paste is almost 1 g sodium per 20 g miso)

Salt 9 g 1.8%

Toasted Black and White Sesame seeds ½ cup.


Bulk Fermentation at 82ºF took in total about 5.5 hours with an aliquot jar rise of 60%.  Because the aliquot jar dough doens’t undergo the coil folds of the main dough, it will overestimate the total dough rise.

1.    Liquid Levain   (0:00) --- I build mine at around 1:2:2 with 2ºC water and refrigerated it for about 2 hours and it was left in the proofing box turned off with the saltolyse dough.

2.    Saltolyse  (0:00) --- 2ºC water to which is mixed the salt and levain to dissolve, then both flours and mixed.  Refrigerated for about 2 hours then placed in the proofing box turned off.

3.    Add Levain  (+10:00)  --- The next morning, spread miso and then levain on top of dough and work in using your hands.  Then 200 French folds to ensure miso and levain well incorporated.

4.    Light Fold   (+10:30) --- With dough on a slightly wet bench do a Letter Fold from both ways.  Remove 30-50 g of dough to the aliquot jar and always keep with the main dough.

5.    Lamination  (+11:00) --- Place dough on wet counter and spread out into a large rectangle. Sprinkle on toasted black and white sesame seeds.  Do a Letter Fold both ways.

6.    Coil Fold   (+11:45) --- Coil Fold

7.    Coil Fold   (+12:30) --- Coil Fold

8.    Coil Fold   (+13:15) --- Coil Fold - good window pane achieved so dough left to complete bulk untouched.

9. End of BF - Shaping   (~15:30) --- Aliquot jar had 60% rise, shaping done and dough placed into banneton and into fridge at 2ºC for cold retard.

10. (21:30) Bake   --- Score cold and bake in a pre-heated 500F oven for 20 minutes with steam

11. Vent Oven 20 minutes into the bake --- Vent oven and bake for 20 or more minutes at 420F then an additional 3 minutes at 350ºF. 


Benito's picture
Benito

After my go at the Red Miso Furikake Sourdough bake, Cedarmountain gave me the idea to make my own miso.  I actually use a lot of miso in my cooking and now I’m also gradually using it in my baking.  So why not make my own miso?  The first hurdle was to source koji rice.  I was able to find some here in Toronto as we have a local sake producer called Izumi and they sold me some koji rice.  Well the ingredient list for a simple miso is even shorter than bread, Koji rice, soy beans, salt and water.  OK perhaps it is the same as for bread.  The following is the recipe for miso that I followed.  

https://www.justonecookbook.com/how-to-make-miso/


HOMEMADE MISO

Prep Time 30 mins Cook Time 1 hr 30 mins Soaking Time 18 hrs Total Time 20 hrs


Make Homemade Miso from scratch with just 3 ingredients and a little patience. My simple step-by-step instructions on How to Make Miso will guide you through this process. Once it is made, you can use the amazing fermented paste for many delicious Japanese dishes!

Course: How to

Cuisine: Japanese

Keyword: miso

Servings: 3 kg (6.6 lb)

Author: Nami

INGREDIENTS

INSTRUCTIONS

January/February

  1. Gather all the ingredients. Besides this, you will need 2 large bowls (one should be a very big one), 1 strainer, Instant Pot (or pressure cooker or a large pot), a clean cloth, alcohol (shochu or vodka), a potato masher (or a food processor), a 1-gallon glass jar to put miso in, and a bag of 1 kg (2.2 lb) table salt.

2. Gently wash the soybeans thoroughly several times under running water.


3. In a large bowl, add the rinsed soybeans and fill the bowl with filtered water to about 5 inches (10 cm) above the beans. Soak the soybeans for 18 hours.


4. Drain the beans. Look how large the beans are now. The right soybean is before soaking, and left two soybeans are after 18 hours of soaking. After soaking, total soybeans weigh 1435 g.


5. Add the soybeans into the inner pot of Instant Pot. Fill the pot with filtered water to about ½ inch (1.2 cm) above the beans (roughly 8 cup line of the pot).


6. Close the lid and set HIGH pressure for 20 minutes. Make sure the steam release handle points at “sealing” and not “venting”.

7. STOVETOP OPTION: Alternatively, you can cook the beans on the stovetop. Bring to a boil over high heat, skim off the surface scum, lower to a simmer, and cook for about 3-4 hours, uncovered, until the beans are soft. Add water as needed during simmering to keep the soybeans submerged in just enough water.


8. Meanwhile, in a large bowl (You will add mashed soybeans in this bowl, so use your largest bowl/pot/container/dish), combine the rice koji and salt with your hands.


9. Also, put some alcohol (shochu, vodka, soju, sake, etc) on a clean cloth and wipe inside the jar you will put miso in.


10. Once the pressure cooking is finished, release the pressure naturally. It will take about 30 minutes till pressure comes down completely and you can open the lid.


11. Test if the beans are done, by pressing a bean between a pinky and thumb. If it is mashed nicely, it’s ready. Drain the soybeans over a bowl to capture the cooking liquid. NOTE: When you are mashing the beans, you may need some cooking liquid, so save about 1 cup just in case. Ideally, it’s best not to use the cooking liquid at all (for this particular recipe, which is designed to make miso without adding cooking liquid). Water in the miso has a higher risk of potentially causing mold growth in the miso.


12. While the soybeans are still hot, transfer some of the soybeans back in the Instant Pot inner pot and mash them with a potato masher (pestle or bottle, etc). Do this process in batches so it’s easier to mash nicely.


13. If you have a food processor, process some soybeans until they are paste form. Do this process in batches so it’s easier to process.


14. ONLY if the soybeans look really dry, add a small amount of cooking liquid. As I mentioned earlier, it’s best if you don’t add it in this recipe. Scoop out the paste and continue with next batch.

 15. Mashed soybeans must be warm/room temperature (NEVER hot) before combining them with the koji because hot soybeans can kill koji mold. Mashing takes time unless you make a small batch, so you don’t need to worry about the soybeans being hot in this recipe.

16. Add the warm (not hot!) mashed soybeans into the bowl with the koji and salt mixture.


17. Knead well to distribute the rice koji and salt with mashed soybeans. Take time to do this process until it’s mixed well.


18. Using your hands, form tennis ball-sized balls with mashed soybeans.


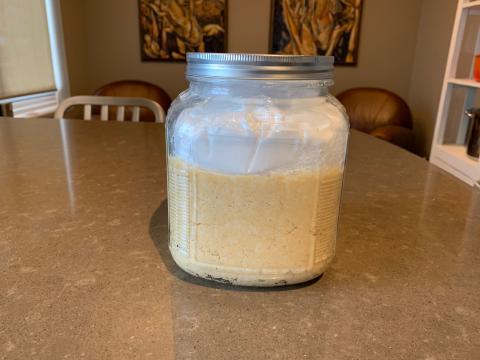
19. Put each ball into the container and mash it with your fist and knuckle to ensure that all air pockets have been eliminated. Do one layer at a time, and make sure to press down tightly. If you have a glass jar, you can see if you miss any pockets by looking from the side of the jar.


20. Repeat this process until all the balls are pressed tightly in the jar. Pat down the surface with flat of your palm or knuckle to smooth out. Make sure you have a space left for the weight on top of the miso. If your jar/container is too small, use another container. Clean the inside surface walls of the container with a shochu-soaked cloth/paper towel to deter mold.


21. Sprinkle ½ Tbsp of sea salt on top of the surface.


22. Place a plastic wrap on top of the surface and make sure to cover nicely. I use my adjustable drop lid (otoshibuta) to hold down the plastic wrap while I work on covering the edges and remove it when I was done.


23. Put heavy objects (or rocks) on top of the miso. I put 1 kg (2.2 lb) of table salt (cheaper than the sea salt) in a plastic bag and put it on top.


To Store


  1. Write down the date on a masking tape and put it on a jar. Place the miso in a dark and cool place for at least 3 months (I put in a storage underneath the stairs). You can also use a dark pillow case and try to find a darker spot in the house.
  2. After 3 Months (April/May)

    1. Stir the miso from the bottom up to avoid mold forming. When checking the miso, do so quickly to avoid exposure to air. If you see any mold on the surface, carefully scrape it off. Clean the inside surface walls of the container with a shochu-soaked cloth to deter mold. Smooth the surface, place a new plastic wrap on top, and put the weight back on top. Place the container back to a dark and cool place for another 3 months.

    After 3 More Months (July/August)

    1. During summer months, the fermentation will be faster but the chances of getting mold are higher. Stir the miso from the bottom up every 2-3 weeks and check your jar regularly and remove any mold appearing on the surface. Even if a layer of mold covers the entire surface, the miso below should be fine. Just scrape off the surface to a sufficient depth where only mold-free miso can be seen. Clean the inside surface walls of the container with a shochu-soaked cloth to deter mold. Smooth the surface, place a new plastic wrap on top, and put the weight back on top. Place the container back to a dark and cool place.

    When Miso is Done (September)…

    1. Remove the weights once the miso is done and store it in the refrigerator to prevent from over-fermenting. You can divide the miso into smaller containers so they will fit in your refrigerator. Now you can enjoy your own miso paste made with patience, love, and perseverance. 

Benito's picture
Benito

I’ve been participating the baguette CB and realized that I hadn’t documented any of the baguette bakes in my blog.  I find it can be nice to go back and see how my baking has progressed with its various ups and downs.

The formula I’ve settled on to hone my baguette craft with is Abel’s Baguette au Levain.  This is the formula I’ve been following.

For three baguettes about 280 g (to account for aliquot jar)


Total Flour


Total Dough Weight (g)


900.3


Prefermented

9.09%


Total Formula


Liquid Levain


Final Dough


Ingredients

%

Grams


%

Grams


Ingredients

Grams


Total Flour

100.00%

522.5


100.00%

47.5


Final Flour

475


AP Flour/T55

100%

522.5


100%

47.5


AP Flour/T55

475


Strong Bread Flour

0%

0


0%

0.0


Bread Flour

0


Water

67.7%

353.5


100%

47.5


Water


Autolyse (93%)

0.00%

0.0


0%

0.0


Autolyse(cool)

306


Final (7%)

0.00%

0.0


0%

0.0


Bassinage(v cool)

0


IDY

0.07%

0.38


IDY

0.38


Diastatic Malt Powder

1%

5.2


Malt

5.2


Salt

1.80%

9.38


Salt

9.38


Starter (in final dough)

2.20%

11.5


24%

11.5


Levain

95


Totals

176.89%

900.3


224%

106.5


900.3

Fermentolyse

Dissolve diastatic malt powder, IDY and levain in water.  Then add flour and mix.

20 mins later add salt with wet hands and work in with dimpling and pinching.  then Rubaud kneading for up to 5 mins.  Remove 30-50 g of dough and place in aliquot jar and keep with the dough.

Rest 50 mins then Coil Fold.

Rest 50 mins then Coil Fold

Once aliquot jar reaches 30% rise then place dough into refrigerator 2ºC overnight and up to 24 hours.

Next day set oven up for steaming with Sylvia towel and cast iron skillet and temperature set to 500ºF.  In fact I now wait for 30 mins after oven is turned on and then place the Sylvia towel loaf pan filled with boiling water from kettle into oven.

Remove dough from fridge and divide into 3 equal weight doughs and pre-shape lightly as boules.  Bench rest 15-20 mins.  

Shape baguettes and rest in floured couche for 20 mins then return to fridge to chill until oven reaches 500ºF.  Chilling the dough makes scoring easier.

Using transfer board place each baguette on a parchment lined peel.  Brush excess flour off each baguette.  Score.  Brush water on each baguette.

Transfer baguettes onto baking steel using the peel and parchment.  Pour boiling water into icast iron skillet.  Bake with steam for 13 mins then remove Sylvia towel and cast iron skillet. 

Drop temperature of oven to 480ºF and turn on convection.  After 5 mins turn and rotate baguettes.  Check for done ness in another 5 mins, if not fully browned then rotate and turn again.  Remove once crust is nicely browned.


Benito's picture
Benito

I usually would use peaches this year because the local Ontario peaches are awesome but you have to peel them. Nectarines don’t need to be peeled so that’s why they are in my galette. This is my first galette although I have baked many a pie. I used my go to pie pastry recipe by Bravetart. If you’re not familiar with it the recipe is in her awesome books  I love that it has the delicious flavour is butter and no transfats that shortening pastry would have. It is made like a puff pastry with much layering so once bake you get many many layers of tender buttery goodness in each bite. 

Benito's picture
Benito

Cedarmountain here on TFL got me interested in making miso after he replied to my blog post about my red miso furikake sourdough.  One major ingredient needed to make miso paste from scratch so I learned from him was koji rice.  From Tartine Book No. 3 “Koji is the traditional Japanese food culture of rice inoculated with Aspergillus oryzae mold.  It has been used for more than two thousand years to make miso, sake, soy sauce, amazements, pickles, and many other umami-rich foods that form the backbone of Japanese cuisine.”  We have a local sake producer here in Toronto Canada that happens to sell koji rice.  I plan on starting my miso making project soon but in the meantime I was very interested to taste koji rice and wanted to try making koji rice porridge sourdough.

I adapted the recipe from Tartine Book No. 3 and blended it with an oat porridge sourdough from Maurizio of The Perfect Loaf as I liked his methods in the past.  This adapted formula has a lot of rice porridge in it, the rice is 50% in baker’s math and based on the photos in Tartine, I wasn’t expecting much oven spring from this bread since the rice porridge is such a high percentage of the dough and is weighing it down.  I was still surprised at how flat the resulting loaf came out.  If the flavour of the koji rice comes through strongly enough then I might be able to reduce the amount of koji rice in the bread and hopefully improve oven spring next time around.  On the other hand it might also be that the bread is overproofed.  The extra sugar in the dough from the koji may have moved fermentation along quickly and waiting for 45% rise in the dough may have been too much proofing since the dough had to overcome the weight of the rice.  The crumb will show what the truth is as usual.

I should mention that the cooked koji rice is quite delicious and has a nice sweetness to it so one has to bake this bread at a lower temperature once the steaming portion of the bake is over.

0 hours - Levain build, 18g starter 36 g water and 36 g whole wheat flour ferment 80*f for 6 hours

6 hours - prepare koji rice 100 g with 200 g water - after cooked spread out on cookie tray, cover with aluminum foil while cooling

6 hours - Fermentolyse - mix water 252 g, 72 g levain, flours.

7 hours - mix salt using some water then do slap and folds to ensure well incorporated and build gluten.

730 hours - add cooled koji rice a little at a time folding well after each addition, you may need to add small splashes of water while folding in koji rice. Then start stretch and folds

Break of any large clumps of porridge with your fingers to break them up.  Once first set stretch and folds complete remove small portion of dough to aliquot jar

8 hours - stretch and fold

830 hours - coil fold or consider a lamination

9 hours - coil fold

930 hours - coil fold

10 hours - coil fold

13 hours - end of bulk 6 hours after salt mixed - bulk rise 50% in aliquot jar - go to shaping - 30 mins bench rest then cold retard until baking next day

Following day - preheat oven with dutch oven at 500*F for 1 hour

Bake in dutch oven 20 mins the drop temperature to 450*F keeping lid on, then remove cover and drop temperature to 375-400*F (dough has a lot of sugar so will brown quickly) and complete bake may take 30 mins or so before crumb fully baked.


Benito's picture
Benito

This is a 25% whole red fife sourdough I baked today.  I made a double batch so I could give one away, unfortunately I think I’ve overproofed these, live and learn.

For two loaves 890 g 

748 g bread flour 75%

160 g whole red fife (total 252 g with the levain) 25%

688 g water gives 78% hydration - add levain and salt without reserved water

4.5 diastatic malt

18 g salt

184 g levain 1:2:2 starter 40 g, 80 g whole red fife 80 g water


These were given 150 French folds after the addition of levain and salt to ensure they were fully incorporated.  

Countertop stretch and fold and then divided into two for the rest of bulk.  Aliquot removed for the jar.

Lamination 30 mins later followed by coil folds every 40 mins.

Bulk fermentation ended at 60% rise in aliquot jar and shaping done and then left on counter at room temperature for another 30 mins.

Overnight cold fermentation.

Baked as usual for the batard in Dutch oven 450ºF x 20 mins then further 23 mins at 420ºF most of which was on the baking steel directly.

The boule was next baked with steaming set up with silvia towel and cast iron skillet.


The batard in particular show some collapsing and lack of oven spring which to me indicates that it had overproofed for this formula.  When I bake this next time I will end bulk at 50% rise.  I am still learning what fully fermented dough looks like and now I think I’ve seen over fermented dough which is a good learning experience for me.


The boule, having seen that the batard baked up showing overproofing, I slipped into the freezer for 10 mins before turning out onto parchment and then transferred onto the baking steel.  Baked for 20 mins with steam at 450ºF and then steam removed and baked for further 23 mins at 430IºF.  Strangely it had better oven spring.  I was more careful to score more shallowly to try to compensate for the overproofing.  However, an error in oven settings prevented one of the ears from forming.  The first 20 mins of steaming bake I had the oven set to convection, so the fan blew hot air on one of the ears and that prevented it from springing up and forming a good ear.  I didn’t notice this until 15 mins into that first phase of baking.

Benito's picture
Benito

This is my first attempt with this formula I’ve put together for a Japanese inspired sourdough using red miso paste and furikake.  Furikake for those unfamiliar with it is a seasoning blend that can vary that Japanese often use to top their steamed rice.  This particular one has nori flakes, bonito and sesame seeds as the primary ingredient.  I’ve based this on Kristen’s basic sourdough recipe.


Total Dough Weight 900 g


Total Flour 494 g 


Bread Flour 80%


Whole Wheat 20%


Total Water 377.5 g 76.5% hydration


Bread flour 352 g


Whole Wheat 97 g


Water 320 g


Levain 115 g


Miso paste 21 g 4.3% (My red miso paste is almost 1 g sodium per 20 g miso) add miso with salt during final mix.


Salt 9 g 1.8%


Furikake 3 tbsp added during lamination 


Levain build 


Whole wheat flour 50 g


Water 50 g


Starter 25 g


Fermentation at 78ºF


1.    Liquid Levain   (0:00) --- I build mine at around 1:2:2 and let it sit at about 80°F until it more than triples in volume and “peaks”. For my starter, this takes approximately 5-6 hours.


Flour for my starter feeds is composed of a mix of 10% rye, 90% bread flour


2.    Autolyse  (+3:00) --- This is a pre-soak of the flour and water. If concerned about the hydration hold back some of the water. You can add it back later, if necessary. Leave the autolyse for anywhere from 2-4 hours (I prefer 3 hours) while the levain finishes fermenting.


3.    Add Levain  (+6:00)  --- Spread on top of dough and work in using your hands. This is a good time to evaluate the feel (hydration) of the dough.


4.    Add Salt and Miso (+6:30)  --- Place salt and miso on top of dough and work in with hands. Dough will start to strengthen.  200 French Folds.


5.    Light Fold   (+7:00) --- With dough on a slightly wet bench do a Letter Fold from both ways. NOTE: If baking more than one loaf, divide the dough before folding.


6.    Lamination  (+7:30) --- Place dough on wet counter and spread out into a large rectangle. Sprinkle on Furikake.  Do a Letter Fold both ways.


7.    Coil Fold   (+8:15) --- Do a 4 way Stretch and Fold (Coil Fold) inside the BF container.


8.    Coil Fold   (+9:00) --- Do a 4 way Stretch and Fold (Coil Fold) inside the BF container.


9.    Coil Fold   (+9:15) --- Do a 4 way Stretch and Fold (Coil Fold) inside the BF container.


10. End of BF - Shaping   (~11:30) --- The duration of the BF is a judgement call. Shoot for 50-60% rise (assuming my fridge temp is set very low). Warmer fridge (above 39F) means your dough will continue to rise... so in this case, bulk to more like 40%. Shape


11. Retard Overnight & Bake   --- Score cold and bake in a pre-heated 500F oven for 20 minutes with steam


12. Vent Oven 20 minutes into the bake --- Vent oven and bake for 20 or more minutes at 450F.


I ended up doing 4 coil folds in order to get a good windowpane.  I’m not sure if the miso interferes with gluten development or not.  When I bake this again I will see if that happens again.

Benito's picture
Benito

I baked a sourdough loaf using Kamut for the first time.  It wasn’t the easiest thing to find here in Toronto, but I recently came upon a new organic market that carries Kamut grown in Canada.  The colour the whole grain flour is a lovely butter like yellow.

This is a 20% Kamut, 80% strong white flour.  9% pre-fermented flour.

Autolyse for 3 hours then added 100% hydration levain, salt 2% and more water to give a total hydration of 78% followed by Rubaud kneading to ensure that salt and levain are well mixed until smooth.  Then over the course of 6 hours a stretch and fold, followed by lamination and then three sets of coil folds were done during the first 3 hours.  Pre-shaping was done when the aliquot jar had risen 40%, followed by a short bench rest and then final shaping.  The dough in banneton was left out at room temperature until the aliquot jar showed a 50% rise then cold retard was done in the fridge overnight and baked in the morning.

I’ve recently taking to brushing on water using a pastry brush that first use to brush off any excess rice flour from the time the dough spent in the banneton.  I think I am getting a bit better blisters on the crust this way which I like.  Anyone have any other suggestions for even bigger better blisters I’m all ears.

Pages

Subscribe to RSS - Benito's blog