The Fresh Loaf

A Community of Amateur Bakers and Artisan Bread Enthusiasts.

Benito's blog

Benito's picture
Benito

I’m still trying to hit the sweet spot on this recipe from Maurizio’s The Perfect Loaf.  I’ve posted the recipe that I followed two blog posts earlier.  

I didn’t extend the bulk fermentation this time as I believed that my starter was more active now than for the first bake which I felt was underproofed.  After final shaping I did leave the dough in the banneton on the counter for 30 mins before placing it in my 3ºC refrigerator for its cold retard overnight.

Slap and folds were employed after mixing, and again I did three sets of coil folds and one lamination to build structure.  Finally I’m continuing not to use any flour for pre-shaping or shaping instead using water which does seem to be working.  I think when I tried water only for shaping months ago and had a really bad experience with it, I probably used too much water.  Now I wet my hands and spread water on the countertop lightly and this seems to work.

I won’t be cutting this bread until later on as it has just come out of the oven.

The oven spring seems quite good but I’m hoping that I hit the fermentation so that the crust is good, we’ll see later on.

Benito's picture
Benito

This was my second try baking this recipe from The Perfect Loaf.  The first bake was good especially the outward appearance but I felt that the crumb was a bit tight in places indicating that it was a bit underproofed.  This time I pushed the bulk fermentation another 30 mins and after final shaping left the dough in the banneton at room temperature for 30 minutes before putting it in the fridge.  I also increased the hydration to 84%.  I also sprayed the dough with some water prior to putting it into the oven and the crust did get a nice slightly shiny blistered appearance that I like.

I suspect that I pushed the fermentation a bit too far in the other direction this time and that there is likely a sweet spot in between.

Benito's picture
Benito

This is my first bake of this recipe from The Perfect Loaf by Maurizio.  I make a 800 g dough as follows.

Dough Formula 800 g dough

Weight

Ingredient

197 g

White bread flour

93 g

Whole Spelt

83 g

Whole Red fife

21 g

Whole Rye

332 g

Water 85% hydration

8 g

Salt

66 

Mature Levain

Hold back 20% of the water so hold back 64 g and use

268 g of water during Autolyze.  I added 32 g of the water to dissolve the salt and mixed.  Through the coil folds I would estimate that I added back another 15 g of water so my hydration would have been around 80%.


Levain Build for 800 g dough

Weight

Ingredient

25 g

Mature starter

12 g

White Bread Flour

13 g

Whole Spelt Flour

25 g

Water


Maurizio’s method below.

Method

1. Liquid Levain – 10:00 a.m.

Add the called for mature sourdough starter, water, and flour listed in the Levain Build section above to a clean jar. As I mentioned above, try to hit a final dough temperature of 78-80°F (26-27°C). Mix well and cover loosely for 3 hours.

2. Autolyse – 12:30 p.m.

Note: This dough has a fairly high hydration. If you’re familiar with the flour you’re using and you know it can handle it, proceed, otherwise, you might want to withhold more water through mixing than the 100g I do (I’d suggest 200g). Add this reserved water in slowly through mixing if it feels like the dough can handle the addition.

Add the called for flour and all but 100g of the water to a mixing bowl. Using your hands, mix to incorporate the ingredients until there are no dry bits of flour remaining. Cover, and keep somewhere at warm room temperature until it’s time to mix 30 minutes later.

3. Mix – 1:00 p.m.

Add the liquid levain, salt, and appropriate amount (add this reserved water in slowly as the dough handles it) of the remaining water to the mixing bowl holding the autolysed dough. Using your hands, mix everything until it comes together into a shaggy mass. Then, dump the bowl out to the counter and slap and fold the dough for about 8 minutes to develop strength. This is a wet dough, and it benefits from a little extra kneading time.

I recently uploaded a new post to my Baking Guides page with more information on the slap and fold technique, including the video below. Check out the Slap and Fold Guide Page for more information on this technique.

When the dough is mostly smooth and starts to hold its shape on the counter, transfer it to a container for bulk fermentation and cover.

3. Bulk Fermentation – 1:15 p.m. to 4:45 p.m.

During the three and a half hour bulk fermentation, give the dough three sets of stretch and folds. The first set will be 15 minutes after the start of bulk fermentation, then every 30 minutes thereafter. Let the dough rest after the last set of stretch and folds for the remainder of bulk fermentation.

4. Divide & Preshape – 4:45 p.m.

Fill a bowl with a little water and place near your work surface. Gently scrape out your dough from the bulk container onto your dry counter. Divide the mass in half using a bench knife and using a wet hand and the knife, preshape each half into a very taut round.

Let the dough rest, uncovered, for 20 minutes.

5. Shape – 5:05 p.m.

This recipe is nice shaped as a boule or batard, but I tend to prefer the long, oval shape because of how it slices. However, a boule is a nice change now and again — it’s up to you. If you do go with a batard, I would suggest shaping it a little tighter than usual, and when scoring, a double (or triple) score will help eke out a bit more rise.

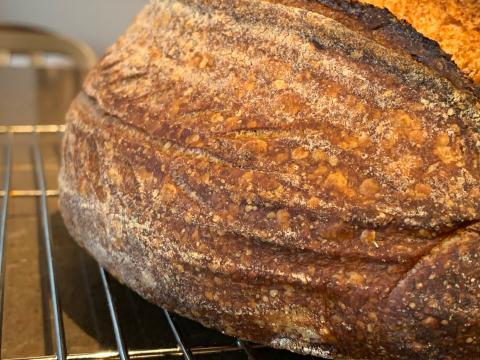
I rolled the final, shaped dough on a towel with a layer of instant rolled oats spread from edge to edge to get them to stick to the exterior. Then, place the dough in the final proofing basket.

6. Proof – 5:10 p.m. to 9:00 a.m. (the next day)

Cover both proofing baskets entirely and put them in the fridge to proof overnight.

7. Bake – 9:00 a.m. (pre-heat oven at 8:00 a.m.)

Preheat your oven with a baking stone or Baking Steel inside to 500°F (260°C).

I baked these boules on my Baking Steel in my oven: see my post on how to steam your home oven for baking. However, you could also use a Dutch oven: see my post on how to bake with a Dutch oven (in which case don’t use a baking stone or Baking Steel).

The next morning, preheat your oven with baking stone/steel for one hour at 500°F (260°C).


Score each piece of dough and load it using one of the two methods listed above, then turn the oven down to 450°F (232°C). Bake for 20 minutes with steam. Then, remove the steaming pans from inside the oven (or remove the lid to your Dutch oven) and bake for an additional 30-35 minutes, or until done.

Once fully baked, cool your loaves on a cooling rack for 1-2 hours.


What I did slightly differently is that I did a coil fold 15 mins after completing the slap and folds.  I followed that 30 mins later with lamination of the dough which for the first time went super well, perhaps the spelt’s extensibility really made it easier than I have experienced in the past.  Then two more coil folds at 30 mins intervals.


Another thing I did differently is that I actually pre-shaped, which I usually skip since I bake one loaf at a time so don’t have to cut the dough in half.  When I did the pre-shaping and the final shaping I only used water to prevent sticking to the countertop and absolutely no flour.  I was surprised that this worked as my one previous attempt at using only water was a horrible disaster.  I don’t know why this worked so well this time, maybe just luck?


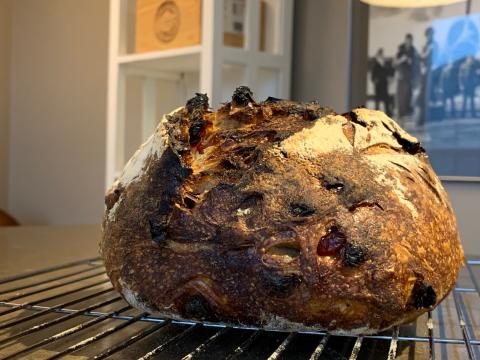
I otherwise followed his instructions until baking, since my dough is 800g vs his 1000g, I baked for 20 mins in my Dutch oven with lid on at 450ºF, removed the lid and dropped the temperature to 420ºF and baked for 10 mins, then replaced the lid leaving gaps by placing the lid across the Dutch oven to shield the bread and baked for a further 10 mins.


The bread is cooling and won’t be cut until tomorrow at lunch so I’ll cross my fingers until then that fermentation went well and that the crumb will be good.  Of note, this was my first time using my starter after a 30 day vacation during which time it wasn’t fed at all.  The levain was built after only refreshing the starter 3 times.

Benny


Benito's picture
Benito


I had another go at this bake, but made a few mistakes right at the start.  Rather than using the recommended 214 g of bread flour and 109 g of water for the final dough, I accidentally use 321 g bread flour and 243 g of water which I reduced to 236 from the total formula column, yikes.  Other changes I made include reducing the soaker water to 150 g.

I’m quite happy with the end product considering the accidental changes I made.  This was the largest loaf of bread I’ve made to date and it kind of overflowed my banneton which is better sized for 750 g loaves.  So taking that into consideration I’m pleased.

Benito's picture
Benito

I’ve been wanting to do a fruit and nut sourdough for sometime and decided my first bake of the year would be that time.  I’ve made raisin walnut commercially yeasted bread in the past so wanted to do something different, so chose cranberry walnut.  I started out thinking that would be follow Maurizio’s cranberry walnut sourdough recipe, but then got intimadated by his 88% hydration and also wanted to try lamination again.  So I sort os used his beginner sourdough recipe 78% hydration and added 10% dried cranberries and 10% lightly toasted walnuts.  Then I essentially followed Full Proof Baking Kristen’s methods that we used for the open crumb CB.  I thought that this would be a perfect way of introducing the nuts and fruit during lamination and I think it worked out alright.

This was also the first time I used my Proofing Box and I’m glad that I now have one given the cold temperatures of winter in Toronto.  I’m not sure I should be surprised but bulk fermentation went a bit more slowly than I expected.  I hope I judged fermentation well and didn’t greatly underproof the dough.  I guess I will know tomorrow when I cut into the loaf.  One other thing, in my haste to score the dough, I made the incision in too vertical a plane instead of a good angle so the ear isn’t as good as I would have liked.


Benito's picture
Benito

This was last night’s dinner.  I made my usual sourdough pizza dough following the recipe that the PieKing shared with us for the pizza CB.

This pizza had homemade fresh pizza sauce for which I used Peter Reinhart’s recipe from his book Artisan Breads Everyday.  In order to keep the crust crispy and avoid sogginess from the sauce, I first put a layer of prosciutto then the sauce.  This was followed by mozzarella cheese, onions, pineapple, roasted red peppers and once out of the oven a bit more prosciutto.  

This definitely made a tasty pizza so long as you like pineapple which we do.

Benito's picture
Benito

I baked Maurizio’s sourdough Pain de Mie today.

Based on his recipe and recommendations I made a 700 g dough to fit in my 8.5” x 4.5” loaf pan, however, it came out rather small, I’d say it could easily have been 800 go for that size.

Anyhow, as per his recipe it is all white flour, 12% butter unsalted, 7% honey, 22% milk, 48% water, and 2% salt.

https://www.theperfectloaf.com/pain-de-

See what I mean, it is rather short and squat for sandwich bread.

How much dough do you guys use for this size of pan?  What it underproofed or just not enough dough?

I’ll post photos of the crumb tomorrow once I cut it open.

Benny

Benito's picture
Benito

I’m feeling more confident now with this sourdough recipe.  I’ve had pretty good success now that I’ve baked it a few times with the hydration lowered to 74% from about 78%.  This is Maurizio’s beginner sourdough recipe which fortunately we love the flavour of.  The only change this time was that I added 0.5% diastatic malt powder to the dough during the autolyse.  I believe it did make the fermentation go faster than usual as the dough appeared nicely fermented after 4 hours at 80ºF and with my starter it usually takes 4.5 to 5 hours before it appears nicely fermented so I think it does what it advertises.  Tonight we’ll cut it and taste it to see how it affects the crumb texture and flavour.  The other change I made during the baking process was that I baked it in my DO at the highest rack that I could still fit it on and place a cookie tray on the rack below to shield it from the direct heat.  Also, I’ve started to pull the bread out of the DO after taking the lid off and then placing the bread with the parchment onto the rack in the oven directly.  I’ve made this change to try to get the bottom crust to be baked more similarly to the sides and top as I’ve often found that the bottom crust to be much thicker than the rest of the crust and I’m hoping that this will help make it less thick.  Again we’ll see if these changes help.  I’ve continued to use slap and folds and coil folds with the dough and I think I’m building pretty good structure this way.

I also tried to score a bit of a pattern on the side of the loaf.  I will need to put a bit of flour on the dough prior to scoring in the future if I want the pattern to actually show, but not a bad outcome for a first try.

Benny

Benito's picture
Benito

I loved last weekend’s apple pie and needed to bake another dessert to go with dinner tonight with friends.  I decided to make this Cranberry Apple Bourbon Pie this weekend.  I tried to do a plaid lattice design to also do something different than I have tried before.  As I have been doing, I used Bravetart’s all butter crust again as it has become my favorite.

Benito's picture
Benito

I am still lacking consistency bake to bake.  One reason is that I’m only baking sourdough every 2 weeks on average, but this week got another bake in.  I’ve still been trying Maurizio’s Beginner Sourdough as that was the first one I started with and wanted to gain some confidence baking it.  Two weeks ago I made an error and added way too much water and the dough lacked structure, it tasted fine but it was a bit on the pancake side of things.  This week I decided to hold back 20 g of water during autolyse, so rather than 78% hydration the bread would be 74%.  I estimate that the water I wet my hands with during the three sets of coil folds I did added back another 10 g or so, so perhaps the bread turned out to be 76% hydration?  The bread is about 80% white strong flour, 16% whole Red Fife and 4% whole rye.  I’ve also adjusted down the temperature after baking in the Dutch oven.  For this bake I turned the temperature down to 400ºF after taking the lid off the Dutch oven and then also placed the bread directly on the oven rack instead of back in the Dutch over uncovered.  I have found that the crust has been a bit too thick for my tastes, I would prefer slightly thinner.  We shall see if this change made any difference.

I will post crumb shots later tonight or tomorrow as this bread part of tonight’s dinner with friends.

Pages

Subscribe to RSS - Benito's blog