The Fresh Loaf

A Community of Amateur Bakers and Artisan Bread Enthusiasts.

Benito's blog

Benito's picture
Benito

This has quickly become our home’s favourite sourdough.  There is something special about the Einkorn with the Red Fife.  There is a hint of cinnamon flavour from this bread, which doesn’t contain any cinnamon, and a sweetness to the crust which is wonderful and that we love.

I’ve been using the aliquot jar lately and it is helping me more accurately determine the degree of fermentation.  Last week I fermented to 40% rise before pre-shaping and shaping.  Then I left the shaped dough in the banneton until the aliquot jar showed 50% rise.  This week I ended bulk fermentation at 50% and pre-shaped, then shaped and then put the dough immediately into the fridge because by the time the dough was placed into the banneton, it had risen an additional 5% to 55%.

This bake was the same 20% Einkorn, 9% Red Fife which was all in the levain and strong bread flour.  It had the same hydration of 82% and 9% pre-fermented flour.  There was a 3 hour autolyse. Salt was the usual 2% and added with water 30 mins after the mix.  Bulk fermentation lasted 4 hours and 15 minutes at 80ºF.  Structure and gluten were built with a combination of 100 slap and folds done after salt was added, one stretch and fold, one lamination then three coil folds.  After 50% rise, I pre-shaped the dough allowing it to bench rest for 10-15 mins then did final shaping and then into banneton and the fridge at 2ºC for 21 hours of cold retard.

Baked as usual in a dutch oven preheated in a 500ºF oven, when the dough was loaded into the dutch oven the temperature dropped to 450ºF with the lid on for 20 minutes.  Then the bread was removed from the dutch oven and continued to bake now at 420ºF until good colour was achieved, this took more than 20 minutes turning the bread to get even colour.

My score was more off Centre than usual and it is interesting to observe how that affected the shape of the resulting loaf compared with the last one.  The long cold retard along with brushing water on the dough seemed to contribute to even better blisters than the previous bakes.

Benito's picture
Benito

Third in my series of Einkorn bakes.  This time I increased the Einkorn to 20% and reduced the Red Fife to 9% all of which was in the preferment.  Other changes I used the aliquot jar and ended bulk fermentation at 40%.  I did a preshape, bench rested for 15-20 mins then final shaped and into the banneton.  I left it out on the counter until the aliquot jar showed just over 50% total rise (not 50% additional rise) then put it into a 2ºC fridge for cold retard.  Next morning baked as usual expect that since I got new oven gloves (The Ove Glove) yesterday after waiting 3 months for delivery, I was able to take the loaf out of the dutch oven to finish baking on the roasting rack after the first 20 minutes.  I think this helped me get a much more even colour on the crust which I’m really happy with.

Benito's picture
Benito

I’ve made this once before and wanted to give it another go since I still have some Einkorn and wanted to inch up the % of it in the bake.  Being aware of the difficulty baking with Einkorn, I just increased the amount from about 10% to 13.5%.  The dough handled just fine.

Bread flour 71%

Whole Red Fife 15.5%

Whole Einkorn 13.5%

Prefermented flour 9%

Diastatic malt 0.5% 

Hydration 80% 

Levain 1:1:1 with whole red fife fermented 78ºF for 6 hours.

Autolyse 3 hours.

Mix levain, 30 mins the add salt 2%.  slap and fold to fully mix.

Over the course of bulk fermentation at 77ºF did a letterfold, then lamination and then 3 coil folds.

When volume increased 33% or so shaped and placed in banneton.  This was approximately 5 -5.5 hours.  Continuing to watch fermentation via the aliquot jar left on counter until 40% rise then placed in fridge 2ºC for 20 hours.  (Had to work)

Baked in DO for 20 mins at 450ºF then lid removed and baked at 420ºF for further 28 mins.

Strangely both times I have baked this I have found the browning of the crust to take quite a long time and to be uneven.  Has anyone else had this issue with Einkorn?  I wonder if I’ve over proofed a bit causing the uneven browning, but I’ve never had that before with other sourdoughs that I have baked, it is strange.

Benito's picture
Benito

I wanted to see how far I could push bulk fermentation and with this bake I probably went a bit far.  I’ve baked this bread before which is in total 50% whole grains but I’ve never pushed the hydration to 83% which I did for this bake.  I also used my aliquot jar and shaped once it showed that the dough had risen 50%.  Given the lack of oven spring, I think for my skill set, 83% hydration and 50% rise made the resultant dough a bit too loose to shape tightly and attain better oven spring.  I’ll post photos of the crumb when I slice it tomorrow.  We have baguettes to eat today.

Benito's picture
Benito

Once again using my favourite sourdough pizza dough recipe that was written by Will the Pie King and shared during the Community Bake, I made a Marinated Artichoke and Olive sourdough pizza.  Actually I made two 9-10” pizzas tonight and will make another two tomorrow.  In the past I have usually cold retarded them for 48 and 72 hours.  This time I wanted to see what would happen if I cold retarded for 72 and 96 hours.  Well tonight of course was the 72 hours and the dough performed as expected, very well.

I marinated a combination of artichoke hearts cut in ⅛, sliced kalamata and green olives, roasted red peppers, halved grape tomatoes, sliced peperoncini and pecorino Romano cheese.  I bake my pizzas in a cast iron skillet which is perfect for a single person’s dinner.  While the pizza dough comes to temperature I have the oven heating to 550ºF for 1 hour with the baking steel and cast iron skillet on the second lowest rack.  After the hour of the topping marinating and the dough coming to room temperature I stretch the dough.  Take the skillet out and place it on a heated burner on the stove to keep it blazing hot while I dress the pizza.  The stretched dough is placed in the skillet and the pecorino cheese goes on first.  I find placing something like cheese first helps keep the crust drier.  Then the marinated toppings are placed on top of the cheese layer.  The pizza is then baked in the oven on convection 550ºF for 8 mins turning once.

I was quite happy with these pizzas, the flavour was great.  I think I would add a thinly sliced shallot next time.


Benito's picture
Benito

So I decided to try baguettes again having had one previous attempt.  This time I tried the Anis Bouabsa recipe more or less based on what MTloaf and Alfanso posted here.

Because I was a bit hesitant about shaping higher hydration dough I reduced to 70%.  I also used 50% bread flour and 50% AP.  I think that is too low hydration for my flour and I think I also build up too much elasticity in the dough as they were resisting shaping to elongate them as much as I wanted.  The bread flour also worked against me when trying to s hape.  I will definitely be using all AP flour next time and hope that I’ll be able to elongate better.  I also think that I need to score more deeply than I did.

Overall so long as the crumb turns out well, a decent second effort I think with things to continue to improve upon. 

Benito's picture
Benito

So after much prodding from certain people, you know who you are, I finally tried making baguettes.  I decided to try to keep it as simple as possible and just try an IDY recipe.  I had a look at Peter Reinhart’s recipe and decided to have a go at that.  It didn’t require a poolish nor levain, just IDY.

I did run into several problems.  I decided to make his whole recipe which turns out makes four baguettes, well it turns out my cookie tray I was doing cold retard on is a rather tight fit for four baguettes.  My couche which I have only used to make pie pastry with and was well floured, decided that it loved the baguette dough and when it was time to turn them out and transfer them didn’t want to let go.  This was a bad problem because I ended up having to use my hands to separate the couche and the dough which quickly deflated the dough : (   I should have cut my loses there and only baked two at a time, but instead I went ahead and tried to bake all four at once on my baking steel, again it is too small for four baguettes so of course crowding on a baking steel causes uneven baking.  So the sides of two of the baguettes were touching and they were all too close so the sides of the baguettes didn’t brown nicely.  Well, what else went astray.  Scoring next, my first attempt at scoring went OK.  I think I did the overlap not too bad, but I should have scored more longitudinally and less across.  The poor dough was already deflating from my transferring them to parchment and then the scoring deflated them further.  Perhaps they had overproofed in the fridge overnight as well because they had very little oven spring.

They certainly won’t win any prizes for looks, fortunately they actually taste pretty good.  Nice soft crumb, crisp and thin crust.  We gobbled one up with dinner just now.  Not sure how to store the other three.

Lesson learned, next time just make three baguettes and don’t be too lazy to do the math to reduce the dough by 25% for this recipe anyhow.

Benito's picture
Benito

I tried to put together another variety of sourdough discard cracker this morning, furikake.  Those of you familiar with Japanese food will know that Furikake (振り掛け / ふりかけ) is a dry Japanese seasoning meant to be sprinkled on top of cooked rice, vegetables, and fish. It typically consists of a mixture of dried fish, sesame seeds, chopped seaweed, sugar, salt, and monosodium glutamate. ... Furikake is often brightly colored and flaky.

I’ve been craving these flavours recently so wanted to use up some discard and try to get a cracker with these flavours.

Ingredients:

  • 200 grams (about 1 cup) mature sourdough starter (100% hydration)
  • 1/2 cup (60g) all-purpose flour
  • 1/2 cup (60g) whole wheat flour
  • 2 tablespoons (12g) rye flour*
  • 3 tablespoons (32g) sesame seed oil
  • 3 tablespoons of Furikake
  •             2-3 sheets of nori broken up into smaller flakes
  •             1.5 tsp mirin
  •            1.5 tsp soy sauce
  • ⅛ teaspoon fine sea salt
  • pink Himalayan salt, for topping


Directions:

  • In a bowl, combine sourdough starter with flours, sesame seed oil, furikake, soy sauce, mirin, nori and salt. Mix to combine, kneading until the dough comes together in a smooth ball.
  • Wrap tightly in plastic wrap and refrigerate for at least 30 minutes or up to 24 hours.
  • Position oven racks in the upper 1/3 and lower 1/3 of oven; preheat to 350 degrees F. Line two baking sheets with parchment or silicone baking mats.
  • Cut dough in half; put one half back in the fridge while you roll out the other. Cut dough again into 4 smaller pieces.
  • Roll out each piece into an oblong rectangle. You can do this with a rolling pin on a lightly floured surface, or using a pasta roller for super thin crackers. I like to roll my dough out to the #6 thickness setting (out of 8). If you are rolling by hand, just roll it as thin as you possibly can.
  • Lay out two oblongs of dough side by side (not overlapping) on each baking sheet.
  • Spritz or brush lightly with water; sprinkle with flake salt.
  • Bake for 12 to 15 minutes or until lightly golden brown and crispy, rotating the pans top to bottom and back to front part way through baking.
  • Let cool, then transfer crackers to a cooling rack. Repeat with remaining dough.
  • Crackers will keep in an airtight container at room temperature for up to one week.


My first bake with this recipe didn’t have enough of the Furikake flavour, so I’ve adjusted the recipe above to reflect what I would do next time to get more sesame and Furikake flavour.


Benito's picture
Benito

I haven’t been feeling great about my baking lately, I’d been over proofing my bread and really disappointed in how they turned out.  I decided that I needed to go back to a recipe that I’d made many times when I first started to bake sourdough, so I went back to Maurizio’s Beginner Sourdough from The Perfect Loaf.  For some reason the flavour of this bread always speaks to me.  However, I decided I still wanted some sort of add in, but one that wouldn’t negatively affect the crumb too much, so since I love sesame seeds I went with black and white sesame seeds.  Now the past few bakes were overproofed so I was expecting to deal with the same this time, but strangely enough my starter suddenly was less active than normal and my levain took much longer to rise than usual.  Then bulk fermentation of course took much longer because I was starting with a less active levain.  I had to bulk ferment at a higher temperature than usual and for longer to try to get this dough fully fermented, I pushed the temperature to 82ºF and bulk lasted 6 hours which is unusual because it usually only takes 4-5 hours for this recipe at 80ºF.  I tried the trick of pulling some of the dough early on about the size of a ping pong ball and placed it into a small narrow glass.  I used this to judge the rise of the dough and was thus able to judge a 40% rise more accurately.  I think I will start using this trick more often especially during seasons when the temperatures and conditions are rapidly changing.

374 g white bread flour

55 g whole wheat flour

25 g dark rye flour

Total Flour = 500 g

344 g water (none reserved - add levain and salt without reserved water) 78% hydration

9 g salt

92 g Levain  1:2:2  20 g starter, 20 g bread flour, 20 g whole wheat flour, 40 g water

1/2 cup mixed black and white sesame seeds toasted 


Autolyse for 4 hours with salt.

Mixed Levain without any extra water and performed 150 slap and folds

30 mins did letter fold on the counter

30 mins later lamination and sesame seeds added (did not soak the seeds)

Three more coil folds done at 30 mins intervals

after total 6 hours bulk at 82ºF, final shaping done

left on counter in banneton in a bag for 20 mins then into the fridge at 4ºC for 14 hours cold retard.


Preheat oven 1 hour 500ºF 

I used a silicone pastry brush to generously brush water on the dough after scoring and then once the dough was placed in the dutch oven spritzed a bit more water into the dutch oven.  I was hoping to get more oven spring and also more blisters with this and I think it worked.  I believe a long cold fermentation also contributes to good blisters and I think if I did a longer cold retard the blisters may have been even better.

Baked at 450ºF for 20 mins in preheated dutch oven

Lid removed and continue to bake 425ºF for 12 mins

then 400ºF for 12 mins 

then 350ºF for 4 mins


Benito's picture
Benito

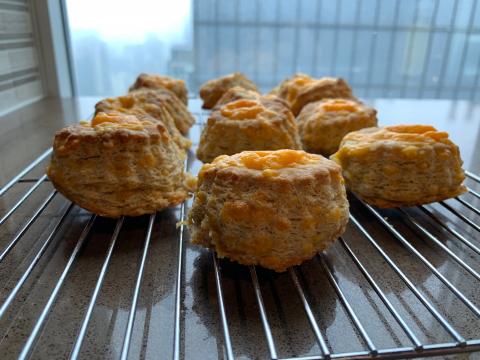
This is another recipe from Full Proof Baking.  This is really simple just keep the butter cold and you’re golden.  Don’t throw away your discard, there are so many things to make with your discard.


 150 g All purpose flour 

8.5 g sugar

4.g sea salt

4 g baking soda

20 g baking powder

3 g garlic powder 


113 g (½ cup) unsalted butter

145 g sharp cheddar.    661

150 g sourdough discard 100% hydration

60-80 g buttermilk 


Whisk all dry ingredients together in a large bowl

Grate 113 g (½ cup) frozen unsalted butter into dry ingredients

Then toss butter to coat with flour as you go.

Rest in the freezer.

Grate 145 g (1 ⅓ cup) sharp cheddar into a bowl

Divide and place 35 g of the grated sharp cheddar into a separate bowl to top biscuits later.

Add 150 g of sourdough discard to the 110 g of grated cheddar

Then add 60-80 g of buttermilk ( how much depends on how wet your sourdough discard is) mix with fork to well combined x 1 min.

Move that to the refrigerator. 

Then turn on oven set to 475ºF Bake.

Line baking sheet with parchment paper (or use the cast iron skillet)

Working quickly about 20 mins later add wet ingredients on top of dry, use bowl scraper to cut and rotate and fold ingredients together, it is really important not to over work this.  The dough should see very dry and shaggy.  

Next turn the dough onto the countertop and collect the dough into a mound using the bench scraper as much as possible so not to warm up the butter in the dough.  Press it down and then give it a fold.  Then using a floured rolling pin roll out the dough to about 10 inches in length.  Then cut into thirds and stack (letter fold), repeat this several times turning a quarter turn after stacking each time.  Roll to about a one inch thickness then cut out biscuits (do not twist).

Place the biscuits on your parchment lined sheet pan or skillet and use your finger to press the center of each biscuit to create a little indent, about ½” deep, this prevents the biscuits from tipping over when baking.

Finally, top each biscuit with a heap of that extra cheddar we put aside earlier.

Place them into the oven and immediately turn the temperature down to 450ºF.

Bake for 10-12 mins or until they are golden brown.

After baking, let them cool in the sheet/skillet a few minutes before carefully transferring them to a cooling rack.

Pages

Subscribe to RSS - Benito's blog